To avoid these ads, REGISTER NOW!

Craftsman 4 ton floorjack rebuild

EDGAR

Well-known member
Joined
Aug 21, 2010
Messages
437
For Jeeper

O-rings should always be installed with some type of lubricant, never dry. Try using silicone grease instead of oil and maybe this will prevent the o-ring from losing its outside edge. Regular grease can be used also. The o-rings do look kind of big, specially the bottom one, compared to the size of its backup. I am pretty sure it will not fit the hole at the bottom of the pump body were it is supposed to seal. Look at the bottom of the hole and you will see that the hole gets smaller way down there, where the o-ring should be when the cylinder is tightened down completely. So even if you change the top o-ring, the bottom one will also cause problems. You may not be able to tighten down the cylinder all the way down with that big o-ring down there. The o-ring should therefore be closer in size to its backup. You can test this by removing the top o-ring and then try to tighten the cylinder all the way down with the new bottom o-ring installed.

Did you measure the old o-rings cross section? Is the cross section of the new o-rings 2.5 mm or 3.5 mm? If you are using 3.5 mm cross section and it happens to be too large, you may need to get a 3 mm cross section o-ring. And again the issue of local availability rears its ugly face. Some hydraulic shops only like to sell SAE o-rings, otherwise they have to carry a large inventory of o-rings between the SAE and the metric. If you find out that you indeed need a 3 mm o-ring, you may have to shop around or have one ordered by one of your local hyd. shops. Harbor Freight sells cheap electronic calipers, by the way. Unfortunately, HF o-ring kits do not have all the o-rings sizes needed for jack repair.

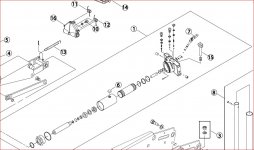
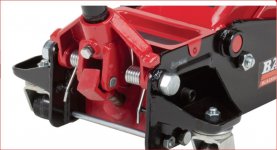
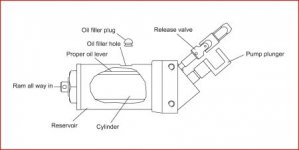
That pump design is an odd design, for all the Craftsman 4 ton jacks I have seen have a much simpler design for the pump piston assembly as shown in the picture below. This pump is the same as the one used by the Michelin G735 and it only uses one o-ring in the size of 3mm x 16 mm mounted in a cylinder groove, not on the piston. And this pump has been around for some time. If you go to your local Sears and take a look at the 4 ton jack, you will see that the pump piston is different. Maybe that was the first pump designed for this jack and soon after revised to make it much simpler.

The first picture is from the current parts breakdown for the Craftsman. The second picture shows the parts breakdown for the pump of the new Banner Blackhawk B6350 and the Pro Lift G737, which use the same pump.

http://www.hcrcnow.com/uploads/drawings/craftsman_50156_floor_jack_4_ton.pdf

http://www.shinnfuamerica.com/Temp/2763.PDF
 

Attachments
  • MICHELIN G 735 CRAFTSMAN 4 TON PUMP.JPG
    MICHELIN G 735 CRAFTSMAN 4 TON PUMP.JPG
    21.3 KB · Views: 49
  • G 737  PUMP DETAIL.JPG
    G 737 PUMP DETAIL.JPG
    107.1 KB · Views: 63
  • BANNER B6350.JPG
    BANNER B6350.JPG
    72 KB · Views: 41
Last edited:
To avoid these ads, REGISTER NOW!

Hiball

Well-known member
Joined
Apr 30, 2009
Messages
14,032
Location
Missery
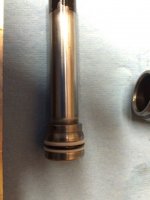
I loaded up some new orings. For now I plan on putting it back to stock and see how it goes. Only issue is that the cross section of the orings is a little large. The upper one on the outside of the pump shredded as I screwed the pump into the housing. I will have to put some oil to see if I can get it back together without wrecking the orings. Can't tell if the ones I picked from the HF kit are larger cross section or if the old ones are just a compressed and there is a trick getting it all back together.

5df98e27d34bdd127bffcb3f58852bcf_zps71490ba6.jpg

The Orings on the pump cylinder have to big of a cross section.. I can tell by looking at them, they will never go in without damaging them.
 
OP
J

Jeeper

Well-known member
Joined
Dec 25, 2006
Messages
2,124
Location
Round Rock, TX
The Orings on the pump cylinder have to big of a cross section.. I can tell by looking at them, they will never go in without damaging them.

I was afraid you were going to say that. I will grab some measurements and have to order them.
 
OP
J

Jeeper

Well-known member
Joined
Dec 25, 2006
Messages
2,124
Location
Round Rock, TX
For Jeeper
And again the issue of local availability rears its ugly face. Some hydraulic shops only like to sell SAE o-rings, otherwise they have to carry a large inventory of o-rings between the SAE and the metric. If you find out that you indeed need a 3 mm o-ring, you may have to shop around or have one ordered by one of your local hyd. shops. Harbor Freight sells cheap electronic calipers, by the way. Unfortunately, HF o-ring kits do not have all the o-rings sizes needed for jack repair.


No doubt on part availability. I can really see why it doesn't make sense to pay someone to rebuild these. It's still a fun little project, that can be worked on here and there... other than finding parts.

Interesting that they changed the design. When i was taking it apart, I was thinking how overly complicated it seemed.
 
OP
J

Jeeper

Well-known member
Joined
Dec 25, 2006
Messages
2,124
Location
Round Rock, TX
Did some measuring. Oh how I wish the orings all came in a kit. Hiball, are these something you carry? I was looking at the oring store and they have a lot of options. The risk here is that if your measuring is off, then it's reorder until you get the right ones. If you order, is it best to go up or down in size if you don't have exact matches?

The size is inner diameter, then section width. All metric.

Release 7.8ID/1.6SEC

Pump Piston 18.9ID/2.3SEC

Backing Ring 18.84ID/23.28OD/2.11SEC

Inside Pump 16.6ID/2.65SEC

Outside Pump Upper 30ID/2.5SEC

Outside Pump Lower 26.5ID/2.25SEC

Tank 67.5ID/2.6SEC (NEED 2)

Tank nut 31.6ID/3.5SEC (HAVE IN KIT)
 

EDGAR

Well-known member
Joined
Aug 21, 2010
Messages
437
For Jeeper

Out of curiosity, what part did you measure for the inside diameter? The best to measure for this is the groove diameter itself whenever possible. As for the cross section it gets tricky because the wear on the o-ring can give you a smaller cross section depending on the amount of wear. Should be measured on the side with less wear which is usually the top and bottom of the o-ring, except for the bottom o-ring which looks thinner on the top and bottom side.

Anyway, 2.5 mm to 2.65 mm o-rings can be substituted for SAE 3/32" cross section o-rings. Also, 1.6 mm o-rings can be substituted for 1/16" cross section o-rings. SAE o-rings have the letters OR in front of the number that identifies a specific size. It is called "dash number". See below some o-rings that can be substituted for the metrics you need.

1.6 x 7.8 = OR 011 = 5/16" x 7/16" x 1/16" = 1.58 x 7.9

2.65 x 16.61 = either OR 114 = 5/8" x 13/16" x 3/32" = 2.5 x 16

..............................OR 115 = 11/16" x 7/8" x 3/32" = 2.5 x 17


2.5 x 30 = OR 123 = 1-3/16" x 1-3/8" x 3/32" = 2.5 x 30.1

2.5 x 67.51 = either OR 146 = 2-5/8" x 2-13/16" x 3/32" = 2.5 x 66.7mm

.............................OR 147 = 2-11/16" x 2-7/8" x 3/32" = 2.5 x 68.2


3.5 x 31.61 = OR 218 = 1-1/4" x 1-1/2" x 1/8" = 3.5 x 31.75


The following need remeasuring of the cross section:

2.3 x 18.91 Maybe, if it is too worn down, it could be 2.5 mm. In that case

it would be: OR 116 = 3/4" x 15/16" x 3/32" = 2.5 x 19


2.25 x 26.51 Same as above, if it is 2.5 it could be: OR 121 =

1-1/16" x 1-1/4 x 3/32" = 2.5 x 26.9

Keep this in mind in case you don't find some of the sizes in metric. Some of them are not an exact fit, but are close enough.They are also cheaper. Still, if you can get them in metric, much better. And remember "measure twice, buy once".
 

Hiball

Well-known member
Joined
Apr 30, 2009
Messages
14,032
Location
Missery
Did some measuring. Oh how I wish the orings all came in a kit. Hiball, are these something you carry? I was looking at the oring store and they have a lot of options. The risk here is that if your measuring is off, then it's reorder until you get the right ones. If you order, is it best to go up or down in size if you don't have exact matches?

The size is inner diameter, then section width. All metric.

Release 7.8ID/1.6SEC

Pump Piston 18.9ID/2.3SEC

Backing Ring 18.84ID/23.28OD/2.11SEC

Inside Pump 16.6ID/2.65SEC

Outside Pump Upper 30ID/2.5SEC

Outside Pump Lower 26.5ID/2.25SEC

Tank 67.5ID/2.6SEC (NEED 2)

Tank nut 31.6ID/3.5SEC (HAVE IN KIT)

Lemme do some Checking.. I probably have some of those, as i recognize some the sizes. If Not.. I have a Order that im building right now.. so i can add as necessary.

Just for Clarity.. You did measure that Actual "Hard Part" for the ID? Its Uphill business measuring oring ID with a Caliper.
 
Last edited:
OP
J

Jeeper

Well-known member
Joined
Dec 25, 2006
Messages
2,124
Location
Round Rock, TX
Just took some new measurements. I need some thoughts on what orings to order. Curious on 2 things. For measurements of the parts themselves, i assume you order an oring that has a slightly smaller ID than the part. How much smaller? Also for an a used oring that has memory and been used/compressed, how do you find the proper cross section to order?


So here are my measurements...

Inner diameter of hardware-diameter of oring (measure multiple times around oring and from horizonal and vertical)
All metric

Release
8.06-1.81,1.69,1.81,1.52,1.76,1.56

Pump Piston
18.79-2.22,2.27,2.23,2.28,2.21,2.23

Inside Pump
16.91-2.73,2.50,2.47,2.68,2.56,2.61,2.45,2.74

Outer Pump
Upper
30.00-2.59,2.51,2.66,2.35,2.47,2.58,2.6,2.39
Lower
27.71-2.23,2.34,2.22,2.29,2.26,2.22,2.15,2.19

Tank Base
At cap
67.82-2.59,2.35,2.60,2.25,2.36,2.57,2.31,2.5
At valve body (think this is the same as the tank base at cap)
67.81-2.73,2.29,2.35,2.74,2.69,2.32

Tank nut
31.93-3.38,3.11,3.2,3.35,3.32,3.21
 
Last edited:
OP
J

Jeeper

Well-known member
Joined
Dec 25, 2006
Messages
2,124
Location
Round Rock, TX
Release
8.06-1.81,1.69,1.81,1.52,1.76,1.56

In other words:

8.06mm around the release shaft where the inner portion of oring sits against. Then I measured 6 times around the oring in different spots. I measured both in/out and up/down to get the different readings. You can tell that the measurements are closer when you compare inner/outer and top/bottom. Also note that they ARE NOT always in order....i/o, t/b, i/o,t/b.
 

EDGAR

Well-known member
Joined
Aug 21, 2010
Messages
437
For Jeeper

Below see the alternatives you have for your o-rings. The metric sizes are shown and also their alternatives in SAE sizes. Sizes 2.65mm cross section are harder to find in local hydraulic shops than 2.5 cross sections but could be obtained if you are planning to order them online. Perhaps you may want to try the SAE sizes first by buying them locally, if the the metric are not available locally, before ordering the metric sizes. Did you see post #46?

There a no 2.2 mm or 2.3 mm o-rings cross sections. A 2.4 mm cross section does exist and it is used in floor jacks.

Cross section x inside diameter

Release

1.8 x 7.8 The Harbor Freight metric kit, blue case, has this one. Could also try 2 x 8

Pump piston

2.4 x 19

2.5 x 19 >>> OR 116

Inside Pump

2.5 x 17 >>> OR 115

2.65 x 17

Outer Pump Upper

2.5 x 30 >>> OR 123

2.65 x 30

Outer pump lower

2.4 x 28

2.5 x 28

Tank base

2.5 x 68 >>> OR 147
 
Last edited:
OP
J

Jeeper

Well-known member
Joined
Dec 25, 2006
Messages
2,124
Location
Round Rock, TX
I will either order them through the oring store or Hibal so think I will stick with the metric versions. I wish it wasn't so much of a guessing game for matching up sizes.

I forgot one set of measurements for the oring inside the tank nut...
Tank nut
31.93-3.38,3.11,3.2,3.35,3.32,3.21
 

EDGAR

Well-known member
Joined
Aug 21, 2010
Messages
437
For Jeeper

Tank nut

3.5 x 32 >>> OR 218 = 1-1/4" x 1-1/2" x 1/8" = 3.5 x 31.75
 
OP
J

Jeeper

Well-known member
Joined
Dec 25, 2006
Messages
2,124
Location
Round Rock, TX
Edgar - can you walk me through how you pick orings off the measurements that I provided? Seems like the cross section measurements vary greatly on the same oring. Also when you look at the insides diameter , do you find an oring that is just slightly smaller than the diameter of the hard part ? Am I over thinking this? Do you get something close and it usually works.

Thanks in advance for the input.
 
To avoid these ads, REGISTER NOW!

Hiball

Well-known member
Joined
Apr 30, 2009
Messages
14,032
Location
Missery
Jeeper as requested per your PM, here is "My" opinion based of "My" Experience with Import Jacks Oring Replacements.

Don't get excited with trying to replace All the Orings with Metric, I've found over the years that very few of this designs utilize oring seals that land on whole sizes (ie 15,16,17 etc). A Example of this can clearly been seen by looking at this example of a Omega 25025 (page 6). You will quickly notice that a lot of the sizes are given in MM but lots of MM.2's, MM.8's etc and in some cases these actual sizes can be found at Seal stores, other times it takes a little conversion from SAE to get where you need to be. I don't know why they intended on making things so difficult seal wise, I've only assumed over the years it was done to deter people from rebuilding. How many times have you read here at GJ, where some member joins up and claims his hydraulic shop says his seals are obsolete/unavailable? Happens all the time, and there are a lot of shops who won't work on these jacks, either because its not worth there time monetarily or they just don't want into invest the resources to try and cover all the sizes required in a ever changing import jack world.

The bad part... I will be the first one to say its very difficult to distinguish between 2.4, 2.5 and 2.65 oring cross sections.. Especially on used orings. Generally when I find myself In situation Like this, Ill get a actual groove measurement, and even then there might be some trial and error while checking fitment, by actually installing the oring and visible checking how it fits in the groove. Is it sitting evenly around the groove? Any groove play? How does it fit the pump piston when installed? Which will Vary if the wrong cross section is utilized..

The good part.. Your not dealing with a NASA space shuttle, A tenth of a Mm here or there isn't gonna make a lot of difference either way.. I've sent out "tons" of orings during my time here at GJ and on occasion I've sent a a couple different sizes , this way the User can do a little trial and error and generally in the end, the job gets done.

I know your in a tough position, especially if you don't have a local shop where you can pick and choose and do a little fitment prior to money exchanging hands. I'm extremely busy right now, to the point where I've had to postpone and even turn business away because I'm only 1 man, trying to balance Railroading/GJ and Shop work. I just placed a order last week with my supplier (MFP) as I waited as long as I could for you to get back to me on those hard part measurements. I'm currently in KC Mo, when I get home ill verify what I have and see if I can fill some of those rabbit holes for you.
 
OP
J

Jeeper

Well-known member
Joined
Dec 25, 2006
Messages
2,124
Location
Round Rock, TX
Thanks for the perspective Hiball. Just trying to learn from your experience. Sorry about holding up your order, did not intend to. This project is absolutely no rush and please put me on low priority. My snappy jack, along with my Arcan and today I just picked up a Montgomery Wards jack so I am in no shortage of lifting equipment. Just having fun getting old things working.
 

EDGAR

Well-known member
Joined
Aug 21, 2010
Messages
437
For Jeeper

Measuring the cross section of an o-ring with a caliper can be difficult. No matter how careful one is when measuring, it is possible to tighten the caliper a bit too much, giving you a slightly smaller size than the actual but if you don’t tighten it enough, then you have a slightly bigger size, giving one a variation of sizes every time the o-ring is measured. So the important thing is to know what specific cross section size range the o-ring belongs to.

For example, if the o-rings measures more than 2 mm, like 2.22, 2.31, etc, you know that it has to be an o-ring from the available sizes in the 2.++ mm range, which are 2.4mm, 2.5mm, 2.65mm. In most applications requiring one of these sizes, the differences in size is so small that using a 2.5mm instead of a 2.65mm makes really no difference. They should seal about the same.

The same also goes for the 3.5mm. Any measure over 3 mm, for example 3.22, 3.41, etc can only use one of the 3.+ mm cross section like 3.5mm, 3.55mm, 3.65mm.

The real difference is when you need a 3 mm, for example, but you instead use a 2.5mm or 2.65mm. In this case, it will not seal.

Using a bigger size than required will not work either because you may not be able to insert the piston, with the bigger o-ring, in its cylinder, or may shave/cut the outside of the o-ring trying to do so, and of course this o-ring becomes useless for any future use.

Sometimes the o-ring size used is dictated by what is available locally. Maybe you want to use a 2.4mm o-ring but only a 2.5mm o-ring is available. Maybe you prefer a 2.65mm but only can get the 2.5mm. Still, these sizes should work.

It is always good to know what SAE sizes can be interchanged with the metrics in case you don’t find the metric size you want. SAE sizes are usually cheaper and more readily available
 
OP
J

Jeeper

Well-known member
Joined
Dec 25, 2006
Messages
2,124
Location
Round Rock, TX
Yesterday I found a place in austin that does seals. They said bring in what you have and they will size them out. They did mention that they carry mostly SAE and very few metric. I figured what the heck. The lady there size everything using SAE charts and I had a $3 bag or SAE orings to try. This evening I put everything back together. The outer pump oring fit very well which were the ones that I had the most difficulty matching out of the HF kit. I kept the metric ones from the HF on the inside of the pump, thought they fit well so I kept them as is. I used an SAE ring on the release as the cross section was a better fit than the kit ones. Also used an SAE one on the tank nut.

The larger SAE ones for the tank were a little loose for my liking but I gave them a go. I figure the tank isn't under pressure anyway. Everything is assembled and working. Bled the air out and cycled it with the plug back in it. I then pulled the plug and very little air came put, unlike before where it was rushing out. I will give it a few days and see if it leaks but so far so good.

The pump with new orings
uc


Working
uc
 
Last edited:

EDGAR

Well-known member
Joined
Aug 21, 2010
Messages
437
For Jeeper

I am glad that you could get the o-rings you needed. This is kind of a “I told you so“ situation. Many repair shops will use SAE o-rings whenever they can and only use metric o-rings when there are no equivalent cross section SAE o-rings for sizes like 2mm, 3mm, 4mm, etc. Metric o-rings are more expensive than SAE o-rings and when a shop has to buy many different sizes, they try to save money by buying only a few metric sizes and everything else in SAE sizes.

If you pump the jack up to maximum height a few times and leave it without releasing the air in the tank (lift arm down), it is easier to find out if any of the o-rings is leaking as the air will try to escape by any available route. The trapped air will be acting on the big nut ram o-ring, on the pump o-rings, on the tank o-rings and on the release o-ring.

:thumbup:
 

EDGAR

Well-known member
Joined
Aug 21, 2010
Messages
437

Attachments

  • O-RING STRETCH.JPG
    O-RING STRETCH.JPG
    44.5 KB · Views: 93
  • GROOVE DIMENSIONS FOR METRIC O-RINGS.jpg
    GROOVE DIMENSIONS FOR METRIC O-RINGS.jpg
    121.4 KB · Views: 18
  • GLAND DESIGN FOR DYNAMIC SEALS.JPG
    GLAND DESIGN FOR DYNAMIC SEALS.JPG
    140.6 KB · Views: 24
Last edited:

Hiball

Well-known member
Joined
Apr 30, 2009
Messages
14,032
Location
Missery
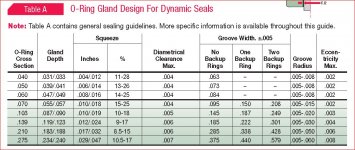
Thanks Edgar. The stretch % will help when order orings from a hard part size.


attachment.php

Rule of thumb.. As I stated earlier you don't want the oring to "stretch" around the part too much because it reduces the sealing area of the oring. On rod sealing applications, I like to see the oring leave a clean surface behind when moved by hand, this way when under pressure with a proper cross section it will provide a good seal.
 
OP
J

Jeeper

Well-known member
Joined
Dec 25, 2006
Messages
2,124
Location
Round Rock, TX
Back to this thread and to this floor jack. After I got this back together 1.5 years ago, it had issues almost from the start. The jack had issues with the pump. You could push the handle down, the saddle would go up, but the pump wouldn't return back. I figured it may be something stuck in the valve or something wrong with the pump. The pump itself is overly complicated because of speedy system. Since I have a bunch of other better floor jacks, this was put in the corner where it sat for over a year.

Just finished up a walker jack and figured since I was in the mode, I'd dive into this CM 4 ton. Filled it with oil, still same issue so tore it all down again. I think the pump issue..the fact the pump would depress and work but not "pop back" had to do with a few things. Thought maybe it was that space issue on the pump oring or maybe junk inside the valve.

The first picture shows the oring and backups that go inside the ram. This is part of the speedy system. I never changed out this oring and the major reason the pump failure was because that threaded piece had backed off creating all kinds of play between the oring and the backing ring. I am pretty sure this led to the speedy part of the pump never priming. So I changed out the oring and used some Loctite on the threads to help it stay in place. You can see on the piece where the factory attempted to stake it but it did not hold.
ImageUploadedByTapatalk1416154150.641402.jpg

Here are all the pieces of the valve block laid out. When I originally attempted to rebuild, i did not pull out all the valves. I had left the overload (on the bottom left) and the valve under a hex head. I think the "hex head valve" is part of the speedy valve as there was channel from the upper pump to the speedy tube inside the ram. That is actually one of the more interesting parts of this set up is the pump piston actually channels oil on the down push and on the up pull of the jack handle. So the pump oring is under resistance in both directions of the stroke. Shinnfu has since gone away from this pump as they make a similar jack for Blackhawk Banner.
ImageUploadedByTapatalk1416154167.007522.jpg

While I was in the pump, I took care of the backup ring that we think was missing. Pretty sure they accidentally left it off from the factory. I ordered a few different SAE sizes. The one I used fit OK but there was a little gap (not shown) in between the kerfs . Not perfect but much better than what was there.
ImageUploadedByTapatalk1416154177.858307.jpg

Got everything back together and it works. I will keep testing it but seems to be back to the way it worked originally. You can tell the main ram seal is not factory and slightly bigger as the retracting spring cannot pull the lift arm all the way down. There is more drag then before. Stepping on the saddle takes care of that. I suppose the speedy valves could use a little fine tune adjusting but I am not sure how the 4 valve systems work. Read a little on the 3 valve and that makes some sense but not sure what the 4th adjuster will do.
ImageUploadedByTapatalk1416154197.710363.jpg

Anyway, the jack seems to be working. Was it worth it, probably not other than sometimes you hate to let the thing beat you and you do learn as you go.
 
Last edited:

mrvm

Well-known member
Joined
Feb 12, 2014
Messages
3,853
Location
PA
Thanks, interesting read on floor jack diagnosis and repair that many folks might not have the knowledge nor the desire to repair. Cheap imported jacks are widely available and getting a good one is challenging if what you discovered for your floor jack represents QC from the factory. In the mean time there is no if, and or buts about the use of jack stands...
 

roccitman

New member
Joined
Mar 18, 2023
Messages
1
Hey Gang. Ten year old thread here, but I now own this old jack? If @Hiball is still around can someone point me to the tutorial that @Jeeper mentions above? Meanwhile printing all this stuff out and tearing into the old 4 ton!
 

USMCord1

New member
Joined
Aug 29, 2010
Messages
4
Location
Mohave Az
Here is the break down that i have of the valves. It's working from left to right with the piston rod point up. I put the number of turns i counted. You may have to download and lighten one of the earlier pics to see where the screw slot is pointed. I wish I knew what each of the screws acutally did. Looking over Hiball's tutorial, he mentiones working, crossover, overload valves. This one has 4 so not sure how to make sense of them.

Hope this helps.

First one on the left was just a cover for another screw. I pulled the cover but didn't mess with the first one.

Second one from the left. 5x turns..
uc


Third one from left. 14x turns.
uc


The one on the right. 7 turns.
uc
Any chance of seeing these pics. Need to know which ball bearings go where. Thanks.
 
To avoid these ads, REGISTER NOW!
Top Bottom