You are using an out of date browser. It may not display this or other websites correctly.
You should upgrade or use an alternative browser.
You should upgrade or use an alternative browser.
Craftsman DP 103.23640 Spindle pulley
- Thread starter sassafras
- Start date
gleman
Well-known member
Are you trying to remove the spindle from the head or are you trying to remove the pulley from the spindle?
A pic would really help!
A pic would really help!
FrankLee
Well-known member
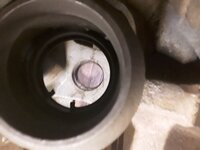
There are two bearings on the pulley shaft separated by a ~1" spacer. You need to align the lower bearing with the upper bore to pull out the pulley.
FrankLee
Well-known member
This and many other of Jeff's videos will help.
Yours is a 13-1/2" drill press. It is virtually the same as a 15-1/2" Craftsman 100 drill press. The main difference is the feed handle assembly. Jeff has a video series about the Craftsman 100 that should help.
Yours is a 13-1/2" drill press. It is virtually the same as a 15-1/2" Craftsman 100 drill press. The main difference is the feed handle assembly. Jeff has a video series about the Craftsman 100 that should help.
Last edited:
This and many other of Jeff's videos will help.
Yours is a 13-1/2" drill press. It is virtually the same as a 15-1/2" Craftsman 100 drill press. The main difference is the feed handle assembly. Jeff has a video series about the Craftsman 100 that should help.
Will watch the video. Thanks again.
FrankLee
Well-known member
One more thing.
Regarding the spindle pulley assembly... I always remove the pulley assembly FIRST and install it LAST. The spindle will keep the bearings aligned correctly and make R&R very easy.
Regarding the spindle pulley assembly... I always remove the pulley assembly FIRST and install it LAST. The spindle will keep the bearings aligned correctly and make R&R very easy.

FrankLee
Well-known member
External snap ring pliers will work.
I use these vintage KM0630 parallel jaws plies. They work great and this is their only job in my shop.


You will then likely need a puller to remove the bearings. The bearings are loose fit on the shaft, but dirt and a ridge/burr from that snap ring will prevent them from sliding off.
I use these vintage KM0630 parallel jaws plies. They work great and this is their only job in my shop.
You will then likely need a puller to remove the bearings. The bearings are loose fit on the shaft, but dirt and a ridge/burr from that snap ring will prevent them from sliding off.
Last edited:

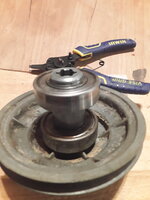
FrankLee
Well-known member
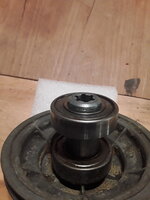
Ok, it wasn't clear in post #10 that the snap ring was missing. It might be hiding in the nose cavity of the head casting. If not, you should be able to find a replacement locally.
Now you can remove the bearings. You will then likely need a puller to remove the bearings. The bearings are loose fit on the shaft, but dirt and a ridge/burr from that snap ring will prevent them from sliding off.
Now you can remove the bearings. You will then likely need a puller to remove the bearings. The bearings are loose fit on the shaft, but dirt and a ridge/burr from that snap ring will prevent them from sliding off.
alfadan
Well-known member
On reassembly, put just the slightest hint of antisieze on the pulley shaft. It will greatly help with disassembly in the future.
FrankLee
Well-known member
On reassembly, put just the slightest hint of antisieze on the pulley shaft. It will greatly help with disassembly in the future.
Will do. Thanks
I do just the opposite and apply a small dab of low-strength thread locker for each bearing and the spacer. I've seen too many pulley bearing shafts where the inner races of the bearings spun on the shaft and wore them down. I want the inner races to stay put on the shaft. I have taken these apart with no problems.
View attachment 1954655
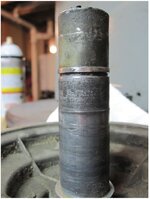
Last edited:
FrankLee
Well-known member
Which puller? You'll also need a to use a puller for the motor if you plan to open it.
alfadan
Well-known member
I can see that. I guess I should specify antisieze for the pulley (especially if diecast). Bearings installed dry or as you say.I do just the opposite and apply a small dab of low-strength thread locker for each bearing and the spacer. I've seen too many pulley bearing shafts where the inner races of the bearings spun on the shaft and wore them down. I want the inner races to stay put on the shaft. I have taken these apart with no problems.
FrankLee
Well-known member
This may help further along the refurb.
 www.garagejournal.com
Quill/Quill Stop Assembly Question For Craftsman 100 DP and Finished Pics
Hello Everyone, I have been restoring old machines for resale for a few years. I have done maybe 20 table saws and a few other items occasionally. I've been looking for a drill press and I found this one an hour away. It seems complete except for the table lock lever. Its a 1948 (motor date)...
www.garagejournal.com
FrankLee
Well-known member
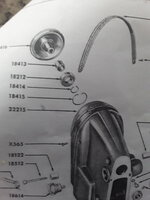
There's only one snap ring attached to the spindle pulley assembly as seen in my photos in post #12 above. This is the inner snap ring, part number 18414 here.
The outer snap ring, #18415, is installed in the head casting. The outer race of the lower bearing rests on this snap ring.
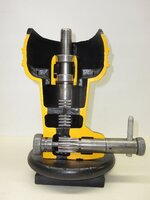

Because your inner snap ring is not there, you are gtg with the puller.
The outer snap ring, #18415, is installed in the head casting. The outer race of the lower bearing rests on this snap ring.
Because your inner snap ring is not there, you are gtg with the puller.
Last edited: