To avoid these ads, REGISTER NOW!

Craftsman Drill Press spindle cover

BFBOB

Well-known member
Joined
Sep 20, 2011
Messages
5,073
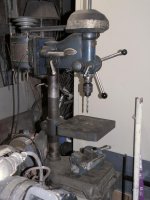
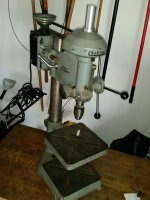
I just bought this Craftsman/Atlas drill press. It's in excellent condition, but it's missing the spindle cover. Apparently their rarity is comparable to that of unicorns - understandable since there's a family resemblance. I have no illusions of finding one, but perhaps one of you kind souls on GJ might have one.
I'd like to fab one up, but lack the dimensions and details of construction, materials, etc. The only clue I have is the photo below, from a 1940 Sears tool catalog.
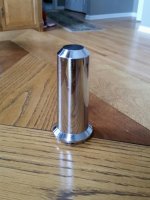
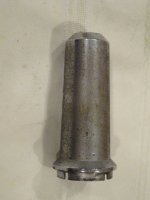
I know the diameter of the very bottom because I do have the pulley cover it fits into. Other than that, I can only estimate by comparing the picture to the known dimensions on the machine.
And of course I have no idea at all of the construction. Die cast? Turned? Deep drawn? Some combination?

Any clues will be much appreciated. - and of course posting here might help other obsessive types too!

...and in my spare time I'll be trying to dream up a way to mount a power switch on the front without making any holes or marring the original paint.:shocking:
 

Attachments

  • 20181105_221917.jpg
    20181105_221917.jpg
    128.6 KB · Views: 80
  • DSCN5945.jpg
    DSCN5945.jpg
    81.5 KB · Views: 95
  • DSCN5952.jpg
    DSCN5952.jpg
    150.6 KB · Views: 54
Last edited:
To avoid these ads, REGISTER NOW!

454ragtop

Well-known member
Joined
Mar 24, 2008
Messages
5,011
Location
Carver, MA
Bob, can't really help with the spindle cover, the only one of those I had was missing it also, though I have a gut feeling it was sheetmetal.
As far as switch mounting, that's easy, use the guard mounting bolt, replacing it with one that is longer by the thickness of your mount, since that bolt also retains the spindle pulley/bearing. I'd use a piece of 1/8" strap from that bolt to the left side of the head to hold a switch box. Could make another small bracket off the box to rest against the side of the head, but not attached to the head, to steady the box. Hope this makes sense.
 
OP
B

BFBOB

Well-known member
Joined
Sep 20, 2011
Messages
5,073
Good idea, Rags. I haven't looked at it carefully yet, was thinking of making a pinch-bolt mount to clamp on the left motor mounting shaft... your idea sounds a whole lot easier!
 

Bdgjr215

Well-known member
Joined
Oct 21, 2015
Messages
760
I think I have one of those somewhere,I sold one of those drillpresses and found the cover afterwards.I will look around for it ,I'm halfway moved into a new garage so it should be challenging.Btw,if I remeber correctly its cast potmetal
 
OP
B

BFBOB

Well-known member
Joined
Sep 20, 2011
Messages
5,073
Woo hoo!
Just the excuse I needed to build a home foundry!!
 

exmaxima1

Well-known member
Joined
Jun 25, 2011
Messages
6,339
Location
Midwest
I bought an Atlas DP last year, sold the spindle cover. But I machined a new cover from aluminum for the DP (sold it as well). The original cover is just some cheap die-cast metal, nothing special.

If you have a lathe, you start with a tube unless you have a very long drill and/or boring bar (I do not). Turn a slug for the end, press it in, and turn down to blend with the tube. Similar process for the "big" end. As far as dimensions, just make the ID bigger than the spindle, and long enough to clear it when fully retracted. The original was a friction fit, while I used an O-ring on mine to hold it in place.

Original looks like attached pic. You can make yours straight sided.
 

Attachments

  • 20180208_090155_resized.jpg
    20180208_090155_resized.jpg
    83.4 KB · Views: 63
Last edited:

WWShop

Well-known member
Joined
Aug 25, 2015
Messages
948
Location
MN
Is that a 1/3 hp Craftsman block grinder in the lower left, Bob?
 
Last edited:

WWShop

Well-known member
Joined
Aug 25, 2015
Messages
948
Location
MN
I bought an Atlas DP last year, sold the spindle cover. But I machined a new cover from aluminum for the DP (sold it as well). The original cover is just some cheap die-cast metal, nothing special.

If you have a lathe, you start with a tube unless you have a very long drill and/or boring bar (I do not). Turn a slug for the end, press it in, and turn down to blend with the tube. Similar process for the "big" end. As far as dimensions, just make the ID bigger than the spindle, and long enough to clear it when fully retracted. The original was a friction fit, while I used an O-ring on mine to hold it in place.

Original looks like attached pic. You can make yours straight sided.

Very impressive machining skills! :thumbup:
 

exmaxima1

Well-known member
Joined
Jun 25, 2011
Messages
6,339
Location
Midwest
Very impressive machining skills! :thumbup:

Oops. I didn't make the chrome cover shown in my pic above, it's the original that came with the DP which also turned out to be a Craftsman (memory failure). This is mine. It's a much plainer version.
 

Attachments

  • cm2.jpg
    cm2.jpg
    81 KB · Views: 66
Last edited:

WWShop

Well-known member
Joined
Aug 25, 2015
Messages
948
Location
MN
Oops. I didn't make the chrome cover shown in my pic above, it's the original that came with the DP which also turned out to be a Craftsman (memory failure). This is mine. It's a much plainer version.

Oh noooo! I take back my compliment!! Just kidding :).....Still impressive skills in your pic! :thumbup:
 
OP
B

BFBOB

Well-known member
Joined
Sep 20, 2011
Messages
5,073
Here's a dimensioned drawing I made from some good photos, starting with the lower diameter, which I can be sure of because it fits into the `1 13/16" hole in the pulley cover. the rest I extrapolated from that.

I'm thinking start with a tube the size of the big end of the taper, 1/16" or thicker, cut a wedge out, weld up to form the taper, turn a properly shaped button for the top, braze in, turn the bottom to fit the pulley cover, braze the taper into it. Grind, sand, polish, dash of clear lacquer.

No prob - I can whip that up before lunch.

***Thanks to ToolScrounge for posting a better picture of the original. I've made a small change in my drawing based on it. Same filename, so if you've saved the older one save/replace with this:
 

Attachments

  • CraftsmanDP1940.pdf
    17.7 KB · Views: 18
Last edited:
OP
B

BFBOB

Well-known member
Joined
Sep 20, 2011
Messages
5,073
Is that a 1/3 hp Craftsman block grinder in the lower left, Bob?

Yep, it is. I have several, but this 1/3 hp ugly duckling came with the tool rests, eye shields, wheel covers and steel-shaded light. I couldn't resist.
 

bubinga

Well-known member
Joined
Jul 26, 2014
Messages
12,744
Location
Bridgeport Ohio. (Across River From Wheeling WV)
I bought an Atlas DP last year, sold the spindle cover. But I machined a new cover from aluminum for the DP (sold it as well). The original cover is just some cheap die-cast metal, nothing special.

If you have a lathe, you start with a tube unless you have a very long drill and/or boring bar (I do not). Turn a slug for the end, press it in, and turn down to blend with the tube. Similar process for the "big" end. As far as dimensions, just make the ID bigger than the spindle, and long enough to clear it when fully retracted. The original was a friction fit, while I used an O-ring on mine to hold it in place.

Original looks like attached pic. You can make yours straight sided.

Oops. I didn't make the chrome cover shown in my pic above, it's the original that came with the DP which also turned out to be a Craftsman (memory failure). This is mine. It's a much plainer version.
No, You Did A Fine Job on the one you Made.
 

exmaxima1

Well-known member
Joined
Jun 25, 2011
Messages
6,339
Location
Midwest
Here's a dimensioned drawing I made from some good photos, starting with the lower diameter, which I can be sure of because it fits into the `1 13/16" hole in the pulley cover. the rest I extrapolated from that.

I'm thinking start with a tube the size of the big end of the taper, 1/16" or thicker, cut a wedge out, weld up to form the taper, turn a properly shaped button for the top, braze in, turn the bottom to fit the pulley cover, braze the taper into it. Grind, sand, polish, dash of clear lacquer.

No prob - I can whip that up before lunch.

Excellent sketch, really amazing if you only scaled it from pics! Your plan to fabricate it is fine, but I submit that you don't need to weld this. It's only a cover, and no stress, so just use aluminum and press the parts together. FWIW, I made my cover in less than 2 hrs and I'm not a machinist. And I wouldn't put the time into a perfect reproduction without having an original to work from.
 
Last edited:
OP
B

BFBOB

Well-known member
Joined
Sep 20, 2011
Messages
5,073
Excellent sketch, really amazing if you only scaled it from pics! Your plan to fabricate it is fine, but I submit that you don't need to weld this. It's only a cover, and no stress, so just use aluminum and press the parts together. FWIW, I made my cover in less than 2 hrs and I'm not a machinist. And I wouldn't put the time into a perfect reproduction without having an original to work from.

The problem is the taper. After all, there is very little functional reason to have it there at all; I just want it to look as original as possible. I think I can do that best in steel. My 9x20 lathe won't turn that long a taper, hence the 3-piece solution.
I have to admit it hadn't dawned on me that the hole down the middle doesn't need to be conical- being able to just drill that sure makes it easier, but still turning the whole thing in one piece involves a huge amount of material removal. My cheapie lathe just can't take a very big bite.

OTOH...
I could turn it out of wood very easily, make it ohhh let's say 4% oversize, and then sweet talk some GJ'er with a foundry to cast it in iron for me.
Yeah, that's the ticket!:thumbup:
 

exmaxima1

Well-known member
Joined
Jun 25, 2011
Messages
6,339
Location
Midwest
OTOH...
I could turn it out of wood very easily, make it ohhh let's say 4% oversize, and then sweet talk some GJ'er with a foundry to cast it in iron for me.
Yeah, that's the ticket!:thumbup:

If you want it perfect, why not buy one for about $50? Those covers (and complete drill presses) are readily available for very little $$

For example:

https://offerup.com/item/detail/477954589/

It's worth the asking price just for the cover.
 
OP
B

BFBOB

Well-known member
Joined
Sep 20, 2011
Messages
5,073
Wow, too bad it's 350 miles away!
Yes, I thought of buying one, even found one for sale, but more than I wanted to pay -- more than I paid for the whole drill press!
 
To avoid these ads, REGISTER NOW!

rvogel

New member
Joined
Nov 14, 2018
Messages
3
Location
In my attached garage
Looking at the drill...It looks like a 1936 model 101.0358...Note...in the Craftsman catalog, they did not come with a spindle cover. It was not in the catalog until 1937. Yours is older. I can tell from the spindle spring cap. It is an earlier version. They improved the spindle cap with a click adjustment. Yours is not adjustable.
 
OP
B

BFBOB

Well-known member
Joined
Sep 20, 2011
Messages
5,073
Looking at the drill...It looks like a 1936 model 101.0358...Note...in the Craftsman catalog, they did not come with a spindle cover. It was not in the catalog until 1937. Yours is older. I can tell from the spindle spring cap. It is an earlier version. They improved the spindle cap with a click adjustment. Yours is not adjustable.

Very interesting! The photo I posted is from a 1940 catalog. I thought it was identical to mine, but squinting really hard, I can see the click stop quill spring adjuster you mentioned. Mine doesn't have it... but the part number is the same: 101.03580.
The next earlier catalog I could find is 1933, and this DP isn't in it at all.
If you have it, could you please post the 1937 catalog page, or point me to it?

Thanks!
 

Kenwc

Well-known member
Joined
Aug 7, 2007
Messages
603
untitled.jpg.html
 

Attachments

  • cone.JPG
    cone.JPG
    38.1 KB · Views: 46

bubinga

Well-known member
Joined
Jul 26, 2014
Messages
12,744
Location
Bridgeport Ohio. (Across River From Wheeling WV)
OP
B

BFBOB

Well-known member
Joined
Sep 20, 2011
Messages
5,073
Despite Rvogel's contention that my DP didn't originally come with a Spindle Cover,
I couldn't stand it. Gotta have it.
Had a little free time so I decided to build a replica Spindle Cover from whatever I could scrounge around the homestead. I started with a piece of heavy-wall fence post - wall thickness about 3/32 or 1/8". I slit it twice on the bandsaw, taking out a wedge sized to make what was left roll into a cone. About 5 minutes with my Columbian 12" woodworking vise had it looking pretty darn good. A little more effort pounding it over the 1" steel shaft clamped to my workbench got it as close as I thought I could get it.
Then I welded it up, forming the basic cone. I wasn't sure how precise any of this would be, so I made it nearly an inch longer than needed in case my calculations of the final diameters was off.
 

Attachments

  • DSCN5974.jpg
    DSCN5974.jpg
    153.1 KB · Views: 26
  • DSCN5973.jpg
    DSCN5973.jpg
    148.5 KB · Views: 19
  • DSCN5972.jpg
    DSCN5972.jpg
    151.5 KB · Views: 24
  • DSCN5970.jpg
    DSCN5970.jpg
    149.3 KB · Views: 22
  • DSCN5971.jpg
    DSCN5971.jpg
    149.6 KB · Views: 22
  • DSCN5968.jpg
    DSCN5968.jpg
    85.8 KB · Views: 23
  • DSCN5969.jpg
    DSCN5969.jpg
    100.7 KB · Views: 23
Last edited:
OP
B

BFBOB

Well-known member
Joined
Sep 20, 2011
Messages
5,073
Next came the lathe work - starting with squaring up the ends of the cone. There's not much travel in my compound feed, so I ended up having to turn the taper in three steps- repeated several times. A real pain, but as much by trial and error as calculations, I did manage to get the right slope over the whole 5" length. I had planned on just knocking off the horribly high points and then giving it a wirebrush finish, but the more I turned, the better it looked. The wall thickness was enough I was able to turn the entire surface and still have sufficient meat left over - about 1/32 - 1/16".
I finished it with a dose of 100, then 240 grit sandpaper. I considered polishing it to a high gloss, but ya gotta draw the line somewhere.
That done, I started on the bottom collar. I had a good starting point with a cut-off section of very heavy tubing, so it was just a matter of turning the ID's and OD's to spec. That was a little tricky because of the down/up/down profile plus the short length I had to work with- and not wanting to mar one surface with the chuck jaws while turning another. A little fine tuning made a gentle press fit with the bottom of the cone. A simple jig allowed cutting the four notches on the sleeve that fits into the pulley cover on the bandsaw, neatening up with a file.
 

Attachments

  • DSCN5979.jpg
    DSCN5979.jpg
    122.3 KB · Views: 29
  • DSCN5978.jpg
    DSCN5978.jpg
    150.8 KB · Views: 29
  • DSCN5976.jpg
    DSCN5976.jpg
    129.2 KB · Views: 30
  • DSCN5975.jpg
    DSCN5975.jpg
    135.5 KB · Views: 28
Last edited:
OP
B

BFBOB

Well-known member
Joined
Sep 20, 2011
Messages
5,073
The topknot was a pain. I didn't have a good starting point in my scrap bins - a bit of 1.5" shaft would have been good, but no dice. The best I could come up with was hauling out the cutting torch and cutting a semi-roundish piece out of a chunk of H-beam I'd salvaged decades ago. I did a bit of grinding, then changed ove to the 4-jaw chuck to true it up. Once I got a decent cylinder, the rest was easy. Again I gave it a 240-grit finish, fitting it to the top of the cone by trial and error. It is also a light press fit into the cone.
After thoroughly degreasing all three parts, I assembled them and applied water-thin Superglue from the inside. There's enough clearance in the joints that it wicked right in, and is invisible from the outside. Should be plenty strong for what's basically a decorative piece.
 

Attachments

  • DSCN5980.jpg
    DSCN5980.jpg
    146.9 KB · Views: 30
  • DSCN5981.jpg
    DSCN5981.jpg
    151 KB · Views: 30
  • DSCN5983.jpg
    DSCN5983.jpg
    65 KB · Views: 32
OP
B

BFBOB

Well-known member
Joined
Sep 20, 2011
Messages
5,073
Thanks for the kind words!

Aaaaannndd
The end result!
I'm thinking I may repaint the pulley cover. From the catalog shots I've seen, it should be all the same dark blue as the rest of the machine. Close inspection of mine looks an awful lot like the silver part has been brushed over the original blue, which remains top and bottom. I might still paint the Craftsman lettering a contrasting color.
If anyone knows a good match in rattle can paint, I'd apprecate that info.

Speaking of paint, I decided I'd like the new spindle cone to stay all shiny, mostly because the originals are chrome plated. I had a can of Rustoleum clear gloss, so I spritzed it, and here's the result. Not chrome, but pretty shiny, and should stay that way for quite a while.
 

Attachments

  • DSCN5986.jpg
    DSCN5986.jpg
    79.5 KB · Views: 37

larry4406

Well-known member
Joined
Jan 27, 2006
Messages
19,159
Location
Northern Virginia
Yes!

In traditional GJ colors where overkill is not good enough!

Well done!

How did you hold the cone in the lathe on the tail stock end with the live center? Tapered plug?
 
OP
B

BFBOB

Well-known member
Joined
Sep 20, 2011
Messages
5,073
Yes!

In traditional GJ colors where overkill is not good enough!

Well done!

How did you hold the cone in the lathe on the tail stock end with the live center? Tapered plug?

Yup, you got it. I had a thick washer that was pretty close - machined the OD to match the cone's taper, worked fine. Not the most rigid setup, so I had to take very small cuts to true up the taper - .002 was about it. Tedious.
 
OP
B

BFBOB

Well-known member
Joined
Sep 20, 2011
Messages
5,073
To avoid these ads, REGISTER NOW!
Top Bottom