Outlawmws
Well-known member
Nice find with the cover!

Thank you Outlaw. I know how uber rare it is, especially with all the hardware and in such great condition. Motor is dated Jan 1954.Nice find with the cover!


So the idea for that cover is lift change speeds adn pop it back down? Much better than having to unbolt it!


Posted this once before but I will do it again as I can't find it. Have a craftsman DP, tag# shown. I will NEVER get around to playing with it and have other DP's. Anybody want it, it's free for the taking. You will have to come get it as the shipping would be stupid high, I am sure. Near STL in Illinois.

I edited the post to include the motor model -- apologies, I posted here because it came with my Craftsman 150 drill press.Kcramp858, sounds like you have already ohmed the motor. Which model motor is this? I believe your best course of action would be to post a help needed thread in the general tool discussion with all the information you can provide. Whenever I have motor issues that is where I post and get several replies in a day or so.


")
 www.garagejournal.com
I had really good luck on my motor band with wd-40 and some very fine grade steel wool. It probably took me about 45 minutes and i was pleased with the results. I just sprayed it gently to keep the liquid out of the motor and then rubbed it down . It works pretty quick.Thanks 11b. I took the plunge and began the investment of "sweat equity". So I tore it down today while I await some Grez-off. So are you saying no Evapo-rust for the column? I have a quart calling my name.
I started with the motor and Simple Green with a hand brush. The grey came back like magic. I'm not trying to make it look new but make it look "Mint Used". How would you attack the metal band around the motor? The one on the headstock is flawless.

Wilson, nice work so far on that DP.UPDATE:
NEXT:
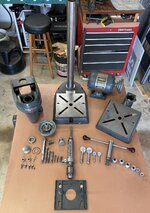
- Got some assistance on disassembling pulley and quill from head stock
- Feed Stop bracket had slipped down 1/4". Fix was to cut the feed stop at bolt hole (as was done on later models),
- Reseated feed stop on quill
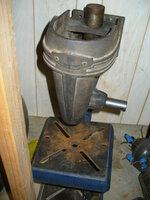
- Column removed from base
- All bore's refinished with 400 and 1000 grit rotary bits and compound (Tripoli & White Rouge)
Refinish tops with finish sander and lube
Treat rust then refinish column on buffer
Refinish motor mount posts on buffer

This did not work for me. It made no visible improvement in spite of me using a ton of elbow grease in addition to the WD-40 and #0000 scotch brite. I'm willing to remove the band. Any other ideas?I had really good luck on my motor band with wd-40 and some very fine grade steel wool.