
You are using an out of date browser. It may not display this or other websites correctly.
You should upgrade or use an alternative browser.
You should upgrade or use an alternative browser.
Craftsman Drill Press
- Thread starter FrankLee
- Start date


Re: The Classic Craftsman 100/150 Drill Press
I prefer the styling of the 100's and that's exactly how I like to find them! Your's will clean-up nicely.
The condition of that belt is good indication that it was not used in a production type, heavily used environment. The belt is likely hardened and stiff though.
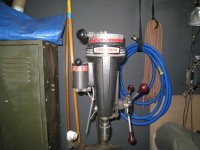
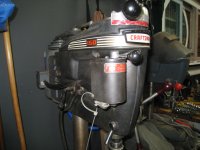
Newest find. Heavy duty 100, motor dated 4/47. Very dirty, but seems to be in nice shape under all that. Only thing missing is one of the feed handles broke off inside, but should be easy to make a new one. This thing is Stout! Probably going to swap this in for my late model 150.
Anyone have a motor dated earlier than 4/47? I know the 48 catalog was the first produced post-war. Thinking this thing had to be near the start of ramping back up production.
While looking this over, I think this thing has a 70yo rubber V belt still on it! Table is pristine, no holes whatsoever.
I prefer the styling of the 100's and that's exactly how I like to find them! Your's will clean-up nicely.
The condition of that belt is good indication that it was not used in a production type, heavily used environment. The belt is likely hardened and stiff though.
poppinjohnnies
Well-known member
I think mine is dated 11-47.
NewOldStock
New member
- Joined
- Oct 3, 2017
- Messages
- 3
Hi Frank,
Thanks for all the great articles. A few months back I found an old Craftsman DP model 103.23640. I flipped the switch, it purred to life and I bought it for $70.
Since then I have used it on several projects, and then one day I screwed up. I was drilling though some 1/2" bar stock, when the tip of the bit caught and held that last fraction of metal and it started to whip the bar stock around. Like a dummy, I grabbed the bar stock with one hand and reached around to switch off the DP with the other. The chuck stopped rotating while I held on with my right hand, but the spindle was still turning.
When I finally got the motor turned off, I removed the bit and offending bar stock. I wanted to make sure nothing bad had happened, so first test was to turn on the motor again to listen, and sure enough that previous beautiful purr was now mixed with a slight thumping sound.
I turned it off, decided to tear it down to look for damage, and that is when I started going to the internet boards for assistance. I found your posts and they will be a great help when I start to tear my baby down for a cleaning and damage inspection.
I have one question: From my previous description of accident and current sound, would you have an idea where I should focus my search for damage?
Thanks much,
NOS
Hi Frank,
Thanks for all the great articles. A few months back I found an old Craftsman DP model 103.23640. I flipped the switch, it purred to life and I bought it for $70.
Since then I have used it on several projects, and then one day I screwed up. I was drilling though some 1/2" bar stock, when the tip of the bit caught and held that last fraction of metal and it started to whip the bar stock around. Like a dummy, I grabbed the bar stock with one hand and reached around to switch off the DP with the other. The chuck stopped rotating while I held on with my right hand, but the spindle was still turning.
When I finally got the motor turned off, I removed the bit and offending bar stock. I wanted to make sure nothing bad had happened, so first test was to turn on the motor again to listen, and sure enough that previous beautiful purr was now mixed with a slight thumping sound.
I turned it off, decided to tear it down to look for damage, and that is when I started going to the internet boards for assistance. I found your posts and they will be a great help when I start to tear my baby down for a cleaning and damage inspection.
I have one question: From my previous description of accident and current sound, would you have an idea where I should focus my search for damage?
Thanks much,
NOS
How did you know the spindle was still spinning? What did you see when the chuck was not spinning with the spindle?
If indeed the spindle was spinning and the chuck was not, that tells me the chuck came loose from the spindle taper and the safety collar did it's job and held it onto the thrust collar.
Or perhaps the pin that secures the thrust collar to the spindle sheared.
Is it possible that the motor was still running and the spindle stopped? If the motor pulley was spinning on the belt that stopped, it may have cause a wear spot on the belt and could cause the thumping.
From your description though, it's likely that the spindle is bent. Remove the chuck and measure spindle run-out with a dial indicator on the spindle taper. Please post your results.
Do you have a Multi Speed Attachment (middle pulley)? What was the chuck RPM? Also curious as to the size of bit you were drilling with and whether you broke any bones grabbing the spinning stock?
Your experience is a prime example of why a vise or other work hold-down is important and how a foot switch may be beneficial.
Last edited:
NewOldStock
New member
- Joined
- Oct 3, 2017
- Messages
- 3
Hi Frank,
Thanks for the quick reply. To answer your questions:
FL - How did you know the spindle was still spinning? What did you see when the chuck was not spinning with the spindle?
I could see the pulley over the spindle spinning over the top of the cover, and assumed the spindle was still turning, but not sure.
FL - Is it possible that the motor was still running and the spindle stopped? If the spindle can stop inside the moving pulley, then it might be possible.
FL - Do you have a Multi Speed Attachment (middle pulley)? No, I do not.
FL - What was the chuck RPM? It was on the lowest setting, large pulley on spindle to smallest pulley on motor. I think that the RPM at that setting is around 600?
FL - Also curious as to the size of bit you were drilling with and whether you broke any bones grabbing the spinning stock? Bit was 1/4", and has a "T" shank which would not allow the chuck to spin around the shank. No bones broken, and the force was not that great as I recall, there could have been some "give" between the bit and the metal stock.
I am taking the easiest path first, changing the belt as there was some wear and it is old. In that process, I found that the left motor adjustment screw had been sheared off at the top. So I will be extracting the remains to move the motor so I can change the belt. The silver lining in all of this is that I have learned some lessons, and I am taking an inspection tour of my DP. I will update as I continue the tour. Thanks again!
Thanks for the update.
One more thing to check... It's also possible that the splines inside the spindle pulley could be worn off, but you would have likely felt some vibrations. The splines are on the inside of the end of the shaft and are only 5/8" long.
The photo of the spindle pulley below is from a 100 or 150 and has severely worn splines. The spindle pulley shaft on your 80 is shorter and extends just beyond the bearing. More info on the spindle pulley assembly here.

Last edited:
DP#39 - Atlas 1435
Here is my latest find from yesterday. It's an Atlas model 1435 (#39, Roch. Hills) with some very nice features and options.
It has a Craftsman motor, the large slow-speed spindle pulley, the middle slow-speed pulley, a taper spindle, a production table, and best of all, a table lift! The only thing missing is the feed return spring.
A Craftsman vise, a 1/2hp block grinder (missing only the rubber feet) and quite a few extras were part of the deal; a couple chucks on tapers, a handful of taper adapters, a bunch of taper bits (which are mostly scrap), a few packs of sandpaper, and a small metal tool box. This will be fun!


Last edited:
Warped5
Well-known member
Excellent find, Frank!
A buddy recently got about a 1/2 milk crate of 'rusty taper bits'.
He picked some out and went after them with a wire wheel. Turned out they were nearly new and nearly all were made by Cleveland Forge. He now has nearly every bit on one of those drilling/tapping charts.
So if you have the time and/or patience ...
Trey T
Well-known member
Frank: Seems like you have a museum of awesome vintage Craftsman equipment
Excellent find, Frank!
A buddy recently got about a 1/2 milk crate of 'rusty taper bits'.
He picked some out and went after them with a wire wheel. Turned out they were nearly new and nearly all were made by Cleveland Forge. He now has nearly every bit on one of those drilling/tapping charts.
So if you have the time and/or patience ...
I checked them this morning and not one is usable. Most have been poorly hand-sharpened and others have chips or are blued from overheating. They're all going to scrap.
Frank: Seems like you have a museum of awesome vintage Craftsman equipment
Well, it's not really what I want. I just happened upon some very unique presses in a very short time frame. I have five in pieces right now.
SAA44-40
Well-known member
Frank you're a fine craftsman and teacher. You inspired me to pick this up
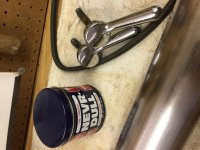
So, my capacitor is kaput. Hey, it's at least 70yrs old. The capacitor is the sardine can type and doubtful I will find one to fit in the motor base. Question: has anyone installed the oval shape? I want to keep as OEM as possible. Not sure how I should mount a replacement. Also attached some pics of my bases and column. Lots of hand sanding on the column- went with the orbital on the bases- thought you fellas may enjoy that tool
So, my capacitor is kaput. Hey, it's at least 70yrs old. The capacitor is the sardine can type and doubtful I will find one to fit in the motor base. Question: has anyone installed the oval shape? I want to keep as OEM as possible. Not sure how I should mount a replacement. Also attached some pics of my bases and column. Lots of hand sanding on the column- went with the orbital on the bases- thought you fellas may enjoy that tool
Attachments
Frank you're a fine craftsman and teacher. You inspired me to pick this up
So, my capacitor is kaput. Hey, it's at least 70yrs old. The capacitor is the sardine can type and doubtful I will find one to fit in the motor base. Question: has anyone installed the oval shape? I want to keep as OEM as possible. Not sure how I should mount a replacement. Also attached some pics of my bases and column. Lots of hand sanding on the column- went with the orbital on the bases- thought you fellas may enjoy that tool
Hello Colt, and welcome to Garage Journal! Glad to see you finally posted after nine months.
Thanks for your comments.
I've only replaced one cap and it was the cylindrical style in a non-Craftsman motor. I can't comment on using the oval style to replace the sardine-can cap. Hopefully someone will chime in.
Have you cracked open the motor yet? Perhaps there's an issue with the centrifugal switch.
Nice work on your 100 with a nice vintage sander! I hope you stick around and post more pictures. Please update your profile with your general location.
Cruzan80
Well-known member
Re: The Classic Craftsman 100/150 Drill Press
If yours has the center oval cutout on the motor mount, I think you could get creative about running the wiring thru the bottom of the motor, thru the plate and hiding it inside the back of the head. Should be enough room behind the post to let it sit safely, while not interfering with the head raise/lower. Just an idea.
You would have to make sure to unhook the leads before removing the motor. Just make sure you give yourself enough extra wire to ensure full tension on the belt.
Sent from my Moto G (5) Plus using Tapatalk
SAA44-40
Well-known member
Frank- I haven't popped the motor open yet, it's next on the list. I included a pic of the stand. I had this channel shaped piece of wood that was very convenient to hold a bench model column in place. Pretty pleased with the nevr dull results on the chromed parts. However, the chrome started to lightly flake in some areas so I backed off. Regarding the capacitor- great idea about running thought the oval holes in the motor. Now, anyone have a capacitor recommendation?
Also, I want to point out that I have a 2 young sons. This project is teaching us that items and can be repaired if originally manufactured with quality in mind. It has been a good teaching experience. Not everything needs to be hauled to the curb when it stops working...
Also, I want to point out that I have a 2 young sons. This project is teaching us that items and can be repaired if originally manufactured with quality in mind. It has been a good teaching experience. Not everything needs to be hauled to the curb when it stops working...
Attachments
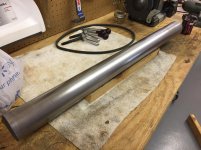

Frank- I haven't popped the motor open yet, it's next on the list. I included a pic of the stand. I had this channel shaped piece of wood that was very convenient to hold a bench model column in place. Pretty pleased with the nevr dull results on the chromed parts. However, the chrome started to lightly flake in some areas so I backed off. Regarding the capacitor- great idea about running thought the oval holes in the motor. Now, anyone have a capacitor recommendation?
Also, I want to point out that I have a 2 young sons. This project is teaching us that items and can be repaired if originally manufactured with quality in mind. It has been a good teaching experience. Not everything needs to be hauled to the curb when it stops working...
I should have asked what symptoms your motor shows... What makes you think it's the capacitor? No noise, no start? Hum, no start? Slow turn?
There could be other things besides the cap. Bad switch, broken wire, the cent switch, etc. I had a fubar plug once, tore the whole motor down and discovered it was just the plug at the end of the cord.
Yeah this is a great father/sons project.
That column is looking very good! I also see a block grinder and a Wilton vise in the background. You're going to fit in well here!
Last edited:
SAA44-40
Well-known member
Frank- upon switching on, I get a hum with no motor movement. A gentle twist of the pulley...and she spins just fine. Figured cap with those symptoms but could be wrong.
SAA44-40
Well-known member

Outlawmws
Well-known member
Modern caps are a LOT smaller that in the old days, what some Audio guys do to keep the stock look is to open the can, empty it, and refill with a modern cap on the inside of the larger can.
Defc0n
Member
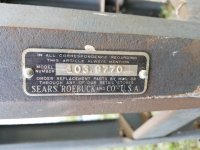
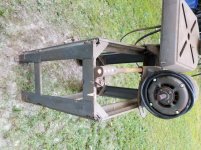
After a week of bugging them they finally got back to me. Some kid went to look at it for $100 (they raised the price from $20) and he told them it was junk. They gave it to me Just to get rid of it. I gave them $20 anyway which is what it was originally on CL for. I think a complete teardown, cleaning, and paint is in order and I'm well into that. The trouble is that I've been through this whole forum and the catalogs and I still haven't seen one set up like this. I know it was part of a multi tool setup but on those the stand is much larger and the DP lays down into a cradle. The number on my stand is 103.9770 and the motor is 115.19790 (3/4HP). There is no number on the DP but I'm guessing it's 103.21761? I think I'm going to twist it into a bench model by buying a base and moving the motor up on the head in place of the 90 degree pullys. 96" of twisted belt whipping around in my shed doesn't sound too safe. Any suggestions? p.s. Sorry for the sideways pictures. No matter how I rotate them the page rotates them again.
Attachments


Last edited:
After a week of bugging them they finally got back to me. Some kid went to look at it for $100 (they raised the price from $20) and he told them it was junk. They gave it to me Just to get rid of it. I gave them $20 anyway which is what it was originally on CL for. I think a complete teardown, cleaning, and paint is in order and I'm well into that. The trouble is that I've been through this whole forum and the catalogs and I still haven't seen one set up like this. I know it was part of a multi tool setup but on those the stand is much larger and the DP lays down into a cradle. The number on my stand is 103.9770 and the motor is 115.19790 (3/4HP). There is no number on the DP but I'm guessing it's 103.21761? I think I'm going to twist it into a bench model by buying a base and moving the motor up on the head in place of the 90 degree pullys. 96" of twisted belt whipping around in my shed doesn't sound too safe. Sorry for the sideways pictures. Only so much I can do with a phone from work. Any suggestions?
That's a nice find for $20! I can't recall seeing a set-up like it here either. IIRC, I saw the tilting parts on eBay a while back. I believe you're correct on the model number. The motor has a date code of 5/58.
It looks like it had a rough life out in the elements. It can be revived, but will take a lot of work. I do like your idea of converting the DP into a dedicated bench model. What's your location? I have a base and motor mount that will fit.
The 1957 catalog has a similar combination machine. The base is larger, but doesn't look as heavy as yours. http://vintagemachinery.org/pubs/222/4403.pdf#page=11
Last edited:
Defc0n
Member
That's a nice find for $20! I can't recall seeing a set-up like it here either. IIRC, I saw the tilting parts on eBay a while back. I believe you're correct on the model number. The motor has a date code of 5/58.
It looks like it had a rough life out in the elements. It can be revived, but will take a lot of work. I do like your idea of converting the DP into a dedicated bench model. What's your location? I have a base and motor mount that will fit.
The 1957 catalog has a similar combination machine. The base is larger, but doesn't look as heavy as yours. http://vintagemachinery.org/pubs/222/4403.pdf#page=11
I'm in California, MD. The unit was in a shed right by the water which probably accounts for the "patina" lol. I have a motor mount stamped 18921-103 with the extra rib on the way from ebay for $17 that should fit. The posts are the correct size and spacing anyway. Id be willing to trade the table for the base you have if you have a need for it or know someone who does.
I'm in California, MD. The unit was in a shed right by the water which probably accounts for the "patina" lol. I have a motor mount stamped 18921-103 with the extra rib on the way from ebay for $17 that should fit. The posts are the correct size and spacing anyway. Id be willing to trade the table for the base you have if you have a need for it or know someone who does.
Yes, that is the correct mount.
Do you have two tables? You'll still need a table with the base. How tall is the column? The diameter should be 2-1/4".
Did you test the motor yet?
Last edited:
FJ 432
Well-known member
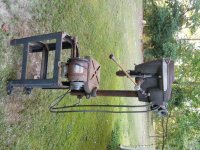
A recent estate sale landed this 150 with vari-slow and a Dayton 1/2hp with forward and reverse switch. Paid 150.
Frank, thanks for the thread and all of your information. Looking forward to replacing the belts and cleaning this up.
Frank, thanks for the thread and all of your information. Looking forward to replacing the belts and cleaning this up.
Attachments

A recent estate sale landed this 150 with vari-slow and a Dayton 1/2hp with forward and reverse switch. Paid 150.
Frank, thanks for the thread and all of your information. Looking forward to replacing the belts and cleaning this up.
That is a very nice looking machine and a great price too!
Defc0n
Member
Yes, that is the correct mount.
Do you have two tables? You'll still need a table with the base. How tall is the column? The diameter should be 2-1/4".
Did you test the motor yet?
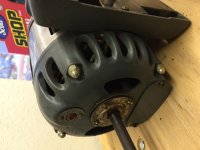
Frank, The column is 2' 11 3/4" with a diameter of 2.23" on both ends. The motor runs fine but is full of sawdust and makes some strange ticking noise when rotating by hand. It sounds like a peeled paper edge rubbing the armature. On a side note, I'm an *** and dropped one of the bearing cover screws inside and can't find it. I assume it's stuck to something magnetic but it needs to come out of course. I can't get the fan side endcap off so I'm going in with an endoscope tomorrow.
I assumed turning it into a bench DP with a base negated the table. I don't really have floor space for it in my 10 x 16 shed. I assumed it would take the space where my old benchtop DP is. Please elaborate on how the table would interface with the base. Please note that I have that rod on the table that the motor slides L&R on to power different attachments.
I'm also currently struggling with getting the bearings out of the quill. I'll be seeking more advice at work tomorrow afternoon. All I have left to do is to R&R the bearings on the quill and pulley, paint, and reassemble. Thanks in advance for all your help.
Last edited:
Smokeshow69
Well-known member
A recent estate sale landed this 150 with vari-slow and a Dayton 1/2hp with forward and reverse switch. Paid 150.
Frank, thanks for the thread and all of your information. Looking forward to replacing the belts and cleaning this up.
Let me be the first to say you **** for paying $150 for that amazing machine ! Very good find !
Sent from my iPhone using Tapatalk Pro
My comments in red are interspersed below.
Frank,
The column is 2' 11 3/4" with a diameter of 2.23" on both ends.
Typical columns for Craftsman 80 bench models are ~28-1/2"... at least that's what my spare 80 column is. Craftsman 100 bench columns are ~33". So, your ~36" column is a real bonus!
The motor runs fine but is full of sawdust and makes some strange ticking noise when rotating by hand. It sounds like a peeled paper edge rubbing the armature.
That ticking noise could be a dirty bearing, the centrifugal switch collar or other debris inside.
On a side note, I'm an *** and dropped one of the bearing cover screws inside and can't find it. I assume it's stuck to something magnetic but it needs to come out of course.
Been there, done that. I dropped one in when I was almost done reassembling and had to dismantle again and find it. Since then, I've accumulated a variety of screw starters and always use them on the bearing covers. The long screw starters work very nicely when reaching through the stator to remove screws on the inside of the terminal end cover.

Also, positioning the motor on it's base with the shaft horizontal minimizes the chances or a screw falling inside.
I don't think there are any magnets inside these motors. It's probably just stuck between the stator and cap or band.
I can't get the fan side endcap off so I'm going in with an endoscope tomorrow.
The fan side is the easier to remove. You may need a chisel or similar to remove. There are several motor rebuild threads on GJ. Here's one of mine that may help.
I assumed turning it into a bench DP with a base negated the table. I don't really have floor space for it in my 10 x 16 shed. I assumed it would take the space where my old benchtop DP is. Please elaborate on how the table would interface with the base.
This was my assumption of what your conversion would look like. Without a table, drill bit height adjustment will be more difficult moving the head frame up and down.
Please note that I have that rod on the table that the motor slides L&R on to power different attachments.
That rod and that motor mount would no longer be needed on a bench model drill press.
I'm also currently struggling with getting the bearings out of the quill. I'll be seeking more advice at work tomorrow afternoon. All I have left to do is to R&R the bearings on the quill and pulley, paint, and reassemble. Thanks in advance for all your help.
Sometimes there are burrs, dirt, dried grease or other obstacles on the spindle that make removing the bearings more difficult. I use a small file or sharpening stone to remove burrs from the spindle. Some type of bearing puller is often required. This post may help.


Last edited:
New to the forum so wanted to say hello. Received a drill press from my father-in-law that has is in great condition but has a few issues that I wanted to ask about to help me get parts for it and get it back in service.
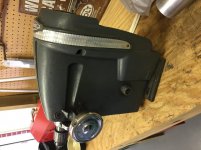
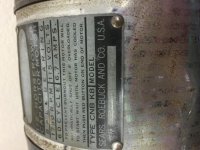
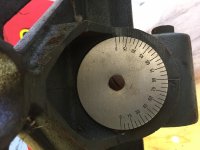
1. From FrankLee's amazing spotter's guide I think I have a 1952 or 1953 Craftsman & Dunlap 12-1/4” model 80 (see attached pic). data plate says 103.23100, straight handle with no knobs, oval badge with no trim. Is this correct?
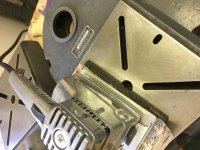
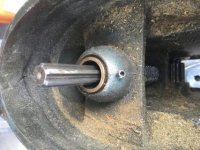
2. The spindle pulley has been taken out and has no bearings or spacers on it. It does have the washer and c-clip, as well as a brass spacer. (see pic#2) Does the brass spacer belong there? I don't see what its function is, nor do I see it on the parts list.
3. From what I can see the splined sleeve threads onto the spindle until the c-clip rests on top of the bronze bearing pressed into the head. That cant be right is it?
From what you can see how is this incorrect and what parts do I need to fix it? where is the best source for those parts I need?
Happy to join the forum and look forward to your responses.
Glenn
1. From FrankLee's amazing spotter's guide I think I have a 1952 or 1953 Craftsman & Dunlap 12-1/4” model 80 (see attached pic). data plate says 103.23100, straight handle with no knobs, oval badge with no trim. Is this correct?
2. The spindle pulley has been taken out and has no bearings or spacers on it. It does have the washer and c-clip, as well as a brass spacer. (see pic#2) Does the brass spacer belong there? I don't see what its function is, nor do I see it on the parts list.
3. From what I can see the splined sleeve threads onto the spindle until the c-clip rests on top of the bronze bearing pressed into the head. That cant be right is it?
From what you can see how is this incorrect and what parts do I need to fix it? where is the best source for those parts I need?
Happy to join the forum and look forward to your responses.
Glenn
Attachments


New to the forum so wanted to say hello. Received a drill press from my father-in-law that has is in great condition but has a few issues that I wanted to ask about to help me get parts for it and get it back in service.
1. From FrankLee's amazing spotter's guide I think I have a 1952 or 1953 Craftsman & Dunlap 12-1/4” model 80 (see attached pic). data plate says 103.23100, straight handle with no knobs, oval badge with no trim. Is this correct?
2. The spindle pulley has been taken out and has no bearings or spacers on it. It does have the washer and c-clip, as well as a brass spacer. (see pic#2) Does the brass spacer belong there? I don't see what its function is, nor do I see it on the parts list.
3. From what I can see the splined sleeve threads onto the spindle until the c-clip rests on top of the bronze bearing pressed into the head. That cant be right is it?
From what you can see how is this incorrect and what parts do I need to fix it? where is the best source for those parts I need?
Happy to join the forum and look forward to your responses.
Glenn
Hello Glenn and welcome to the Garage Journal.
I've refurb'd only one 12-1/4" drill press. I don't recognize that brass spacer, but that does look like the pulley spline shaft in the pulley.
I'm a little confused with the photo in that the shaft and pulley are shown as one assembly. To remove the pulley from the head frame, the set screws should be loosened and it should be pulled up off the shaft. The shaft should then be pushed down through the bushing in the head frame.
Is there a set-screw in the pulley securing it to the shaft?
I'm also not familiar with the splined sleeve threading onto anything. Is this a custom repair? Perhaps more pictures would help.
This post describes how I dismantled a 12-1/4" drill press head frame.
Here is the owners manual with an exploded parts view for a 23100 drill press.
So I am correct that this is a model 80 12-1/4" right?
In answer to your question, yes the pulley does separate from the shaft by set screws. But right now the whole pulley and shaft simply slides straight up and comes off the spindle in one piece without taking the pulley off the shaft first. Nothing retains the shaft to the spline. It just sat on top of the brass spindle collar. (pic #1 with the shaft removed and pic #2 with it as I found it with the sleeve and c-clip sitting on top of the collar). Again, the brass spacer does nothing.
As I was checking it just now I noted that with nothing to hold the sleeve to the spline, that the quill can be lowered by about 8-10 inches and, as the pulley shaft is only 4 inches long, the top tip of the spindle will become completely disconnected with the bottom of the pulley shaft. This cant be right can it?
PS: It is important to note that while I am not dissing my father-in-law, (especially since he gave me the PD for free), he did disassemble the PM and wasn't sure if he put it back together correctly. For example, in the pic you can see that he didn't know where the set screw went and put it back into the oiler hole in the head. I know it doesn't go there so will take that out. but where where should it go? The diagram isn't very detailed.
Attachments

Ok. Now it's making a little sense.
I don't think that brass spacer is an original part. You might recheck that exploded parts view.
I believe to correctly assemble:
- Remove the quill/spindle assembly
- remove the splined shaft from the pulley
- remove the brass spacer
- insert the splined shaft into the bushing from below/inside the head frame
- install the pulley onto the splined shaft from above
- tighten the set screw onto the flat of the splined shaft. The pulley and the splined shaft are now captive in the head frame. There should not be much up/down play of the pulley. I believe the bottom of the pulley bore should ride on the bushing.
-reinstall the quill/spindle assembly.
It's been a long time so if I'm wrong anywhere I hope someone will chime in.
Last edited:
I see what the problem is. the shaft was assembled upside down. it should be c-clipped BELOW the brass bushing with the upper end protruding out the top for the pulley to be set screwed to.
You are a genus. I stared at this for hours before I got your note and it made perfect sense. Now I just have to disassemble it and put it together right. oh well, I wanted an excuse to take it apart to clean and paint it!!
You are a genus. I stared at this for hours before I got your note and it made perfect sense. Now I just have to disassemble it and put it together right. oh well, I wanted an excuse to take it apart to clean and paint it!!
Last edited:
NewOldStock
New member
- Joined
- Oct 3, 2017
- Messages
- 3
First, thanks Frank for all the help.
It appears that the noise maker was the belt. After extracting a broken adjustment screw and replacing it, I was able to install the new belt. After fiddling with pulley height a bit, I turned on the motor and the sound was back to normal.
The previous thumping must have been a worn spot, as you mentioned. I still plan to tear down and clean at my earliest opportunity.
Thanks again for the help!
I see what the problem is. the shaft was assembled upside down. it should be c-clipped BELOW the brass bushing with the upper end protruding out the top for the pulley to be set screwed to.
You are a genus. I stared at this for hours before I got your note and it made perfect sense. Now I just have to disassemble it and put it together right. oh well, I wanted an excuse to take it apart to clean and paint it!!
Glad you got it figured out! Please post progress and more pictures along the way.
First, thanks Frank for all the help.
It appears that the noise maker was the belt. After extracting a broken adjustment screw and replacing it, I was able to install the new belt. After fiddling with pulley height a bit, I turned on the motor and the sound was back to normal.
The previous thumping must have been a worn spot, as you mentioned. I still plan to tear down and clean at my earliest opportunity.
Thanks again for the help!
My pleasure! Glad you got the motor mount fixed and thumping addressed. Were you able to measure runout?
Me. Frank lee, first wanted to say that I have enjoyed this whole thread. Thanks for sharing all your work with the world. Next, I have two Craftsman DP that I will restore thanks to your thread. I am having a ball!!
First post for me good sir!!
Appreciate you ��
First post for me good sir!!
Appreciate you ��
Me. Frank lee, first wanted to say that I have enjoyed this whole thread. Thanks for sharing all your work with the world. Next, I have two Craftsman DP that I will restore thanks to your thread. I am having a ball!!
First post for me good sir!!
Appreciate you ��
Welcome Jig, and thanks! I hope to see some pictures of your overhauls.
Last edited:
I think I have a 1952 or 1953 Craftsman & Dunlap 12-1/4" model 80 (see attached pic). data plate says 103.23100, straight handle with no knobs, oval badge with no trim. Is this correct?
So I am correct that this is a model 80 12-1/4" right?
Yes, I believe you do have a Craftsman 80, 12¼" drill press, but it's earlier. Model 23100 was manufactured between 1946 (maybe earlier) and 1949. You should have the CRAFTSMAN oval badge, often referred to as the Craftsman heritage badge, on the front.