lafester
Well-known member
The grinder is looking great! With all of these insane quotes for glass maybe I should get a bunch made up for people. When I get around to checking for my Baldor I will inquire about some other sizes and volume pricing.

Restoring a Long C drill press made by Atlas. I have the machine apart but really want to deal with any sort of rust inside the head. I have a ton of vinegar on hand, but am concerned about rinsing it and then treating the inside surfaces afterward. Has anyone done a derust job on the inside of a dp head? I don't want to spray rust-killing primer in there...
The grinder is looking great! With all of these insane quotes for glass maybe I should get a bunch made up for people. When I get around to checking for my Baldor I will inquire about some other sizes and volume pricing.
Use the vinegar and then rinse, then neutralize with baking soda water, THEN blow dry and heat the thing to get ALL the water out...


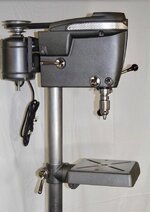
itsDROCK: DP#2 is a beauty! Love the color. Can you share what you used?
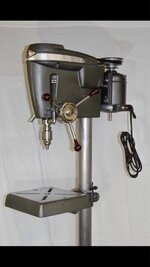
Finished up DP #2 today.
Sent from my iPhone using Tapatalk
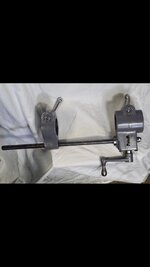
So, has anyone mounted a mortising attachment on a 150? I have tried several searches on this site sans success. The quill od [1.625"/41.275mm] does not seem amenable to something like the delta 17-924, which can be had for not too many $$.
After getting my 3-phase motor and drum switch successfully wired I have been drilling 1/4-inch plate with ease. Many smiles. I'd now like to be able to do some mortising. Suggestions?
bs

Thank you! The color of the drill press is Rustoleum Hammered Soft Iron Ore. The table lift is Rustoleum Dark Machine Gray. Someone else on here used Soft Iron Ore on their drill press and I decided to use it too. The engine-turned panel was in rough shape so it has a vinyl sticker over it. I decided not to put the model number plate back on the base because 1/4 of it was badly corroded. I'm already looking forward to the next DP.
Absolutely beautiful color on the DP. Did you shoot the pix in B&W?
Jee wizz; you can't mortise 1/4 inch plate...


Question for the experts. I have a bench top model in great working condition. I would rather make it a floor model. Is it as simple as replacing the pipe?


Finished up DP #2 today.
Sent from my iPhone using Tapatalk
First time poster here. Looks like an interesting site. I have a 1937-38 floor model Craftsman drill press (unrestored) that works wonderfully after all these years. But I need to tighten the spring mechanism up for the quill and don't know how to do it. All the pieces are there but I have to bring the quill up manually now with the handle. I don't want to mess anything up. Can someone help? Thank you.


Thanks for getting back to me so quickly.
It looks like the one on the left. I can take the flat plate off to access the spring and it looks in fine shape. I can turn the assembly a degree or two counterclock-wise and the spring works correctly. Looking straight at the assembly from the left side of the head, there is a small screw with a round knob in the 1:00 o'clock position of the spring assembly that I can remove with no affect, but there is a nut under that that I have not touched.
Also, under the head, there is a screw & locking nut that looks like it may be an adjustment for the spring, also. I have not fooled with that either.
I’ve WD40’d that pawl and pulled and it didn’t move but I’ll try again.
I’ll try to attach a pic if I can.
Quill lock works fine as does everything else, Craptain. I'm sure it all needs some amount of attention, but nothing major. I'll try pulling on that pawl again after some penetrating oil & see if I can loosen it up. I don't want to unscrew the entire pawl assembly out of the housing if I don't need to.
The only other thing I noticed on the drill is a large "rubber" spacer at the top of the spindle shaft that I can see while looking up thru the hole on the right side of the housing that held the on-off switch (the on-off switch is on the motor, now). I can look in and see a bunged up rubber spacer maybe 1.5-2" dia and maybe 1/2" long. Looks like a bumper for the spindle in the "full-up" position. It's kind of torn up and riding off to the side of the spindle as it goes up & down. Without taking the whole head apart, I could either cut it out of there or just leave it. I'm tempted to leave it. That may be the reason why I need a bit more spring return action than I did in years past.
Thanks for all your help, guys. This has been a terrific help.
Would I cause any harm if I could just cut it out?


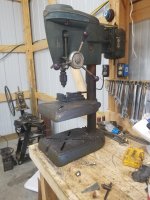
Congrats! That looks great!Picked up DP #4 today.... for free! The old man just wanted to give it away. So I made the 114 mile round trip to get my first 150.
The guy said he hasn’t used it in 10 years. I fired up the 1/4hp Westinghouse motor and it ran very smooth & quiet.