To avoid these ads, REGISTER NOW!

Craftsman Drill Press

whateg01

Well-known member
Joined
Mar 13, 2006
Messages
11,193
Location
doo dah, kansas, usa
Firstly, welcome to The Garage Journal and the Craftsman Drill Press thread!

Secondly, I didn't realize you had attached a link to a photo until I started a reply.

I don't even see the photo, so unless I quote it, I don't even get a chance to see the link. I'm on my phone, so I don't know if that matters.

Dave
 
To avoid these ads, REGISTER NOW!
OP
F

FrankLee

Well-known member
Joined
Sep 13, 2010
Messages
3,548
Location
seMI, 48317
I don't even see the photo, so unless I quote it, I don't even get a chance to see the link. I'm on my phone, so I don't know if that matters.

Dave
I usually remove photos from my quotes, but I guess I shouldn't have in this case.

0vEcbIk.jpg
 

whateg01

Well-known member
Joined
Mar 13, 2006
Messages
11,193
Location
doo dah, kansas, usa
I usually remove photos from my quotes, but I guess I shouldn't have in this case.

No, I'm glad you do. I hate when somebody posts 20 pictures of something and somebody else quotes them and leaves all the pictures and then the OP quotes them, ad nauseum.

I can see the pic in the original reply on my computer, but on my phone, there was not even a hint that there was something else in that post until I clicked on the Quote button. So, you're fine. It's something to do with my phone. In fact, I just reloaded the last page and now the pic shows up on my phone, so it must have been something weird going on there.

Dave
 
OP
F

FrankLee

Well-known member
Joined
Sep 13, 2010
Messages
3,548
Location
seMI, 48317
So, I'm nearly finished with the refurb of dp#84. This morning, I started cleaning up the motor. It is a Craftsman 1/2 hp, 1725 rpm motor with sleeve bearings, model 113.12140, manufactured in late '64.
IMG_0056.JPG IMG_0065.JPG


It's nothing unusual until I noticed that ends of the cradle mount are different heights. The difference between the height at the ends of the shaft is ~5/8". I've never seen this before. With the pivoting motor mount, it will be easy to compensate for the angled shaft. Is this a mistake? Or does anyone know the purpose of a cradle like this?

IMG_0058.JPG
IMG_0063.JPG IMG_0057.JPG IMG_0064.JPG
 
Last edited:

lafester

Well-known member
Joined
Mar 1, 2017
Messages
2,191
Location
Northern CO
Re: The Classic Craftsman 100/150 Drill Press

My guess is that it is a defect and not intended to be like that. Surprised nobody had chimed in with another, more logical reason why.

Sent from my Pixel 3 XL using Tapatalk
 

Jim C.

Well-known member
Joined
Jan 8, 2010
Messages
2,598
I’m getting close to putting my drill press back together and figured I’d better take a look at the belt. Although it’s very faint, the belt is stamped with the Craftsman underlining letter “C” logo followed by, “Cat. No. 9-1644 1/2 x 44.” I’m guessing it’s the original 72 year old belt. Probably time to replace it.

Jim C.
 

Attachments

  • F1AA5479-E2B2-4EEA-9996-0AC8F59EC4B4.jpg
    F1AA5479-E2B2-4EEA-9996-0AC8F59EC4B4.jpg
    45.8 KB · Views: 36

Smokeshow69

Well-known member
Joined
Dec 7, 2012
Messages
8,366
Location
Pacific Northwest
I’m getting close to putting my drill press back together and figured I’d better take a look at the belt. Although it’s very faint, the belt is stamped with the Craftsman underlining letter “C” logo followed by, “Cat. No. 9-1644 1/2 x 44.” I’m guessing it’s the original 72 year old belt. Probably time to replace it.

Jim C.


That belt was made into the 60’s using that long c design. I had one on a crown top power bronze floor model that was late crown top era.


Sent from my iPhone using The Garage Journal mobile app
 
OP
F

FrankLee

Well-known member
Joined
Sep 13, 2010
Messages
3,548
Location
seMI, 48317
I’m getting close to putting my drill press back together and figured I’d better take a look at the belt. Although it’s very faint, the belt is stamped with the Craftsman underlining letter “C” logo followed by, “Cat. No. 9-1644 1/2 x 44.” I’m guessing it’s the original 72 year old belt. Probably time to replace it.

Jim C.

I have a hard time believing it's the original if the machine is that old.

Dave

That belt was made into the 60’s using that long c design. I had one on a crown top power bronze floor model that was late crown top era.

I've got handful of long C belts. Whether Jim's belt is original, I dunno, but the 9-1644 at the top of the picture came off of dp#84, circa ~1965. It's still in good usable condition and it's going back on. The other two are also still good. I use these for testing purposes.


Here's an interesting belt with the original sleeve. It backs-up Smoke's comment. The 99 cent price tag and the "Sears" logo in the round red dot dates it to 1969. This one is a wall-hanger. It's very stiff and retains the exact same shape when removed from the sleeve.

 
Last edited:

Jim C.

Well-known member
Joined
Jan 8, 2010
Messages
2,598
You know, I really don’t know the answer. I only guessed it was the original based on the originality of the rest of the machine. I mean, the DP was still bolted to its original wooden shipping pallet. I know that has nothing to do with the belt. I do know that the DP has gone unused since 1985. Fortunately it was stored in a dry, climate controlled basement since then. So, it was fairly well preserved. Looking at some of the pictures posted by FrankLee, the stamp on my belt is missing a final series of numbers/letters. I attached a picture with a red circle and question mark. Does the lack of those extra numbers/letters indicate a time period? Again, I don’t know. What I do know is that the outer layer is starting to separate from the lower layer, indicating that it’s time for a new one.

Jim C.
 

Attachments

  • 9A63D12E-51DD-41D4-9F04-85C956E91151.jpg
    9A63D12E-51DD-41D4-9F04-85C956E91151.jpg
    156.1 KB · Views: 25
Last edited:
OP
F

FrankLee

Well-known member
Joined
Sep 13, 2010
Messages
3,548
Location
seMI, 48317
You know, I really don’t know the answer. I only guessed it was the original based on the originality of the rest of the machine. I mean, the DP was still bolted to its original wooden shipping pallet. I know that has nothing to do with the belt. I do know that the DP has gone unused since 1985. Fortunately it was stored in a dry, climate controlled basement since then. So, it was fairly well preserved. Looking at some of the pictures posted by FrankLee, the stamp on my belt is missing a final series of numbers/letters. I attached a picture with a red circle and question mark. Does the lack of those extra numbers/letters indicate a time period? Again, I don’t know. What I do know is that the outer layer is starting to separate from the lower layer, indicating that it’s time for a new one.

Jim C.
Yeah, with my 9-1644 belt in such good shape from 1965-ish, I was kinda implying that yours could be original.

I believe those missing numbers on your belt are manufacturer and/or industry standard numbers.
 

Jim C.

Well-known member
Joined
Jan 8, 2010
Messages
2,598
Who knows for sure? I do need to find a new belt. Any recommendations?

Jim C.
 
OP
F

FrankLee

Well-known member
Joined
Sep 13, 2010
Messages
3,548
Location
seMI, 48317
Who knows for sure? I do need to find a new belt. Any recommendations?

Jim C.
I usually buy cogged belts at Autozone. They're normally in stock.

Check coo, tho. US and India are ok. I did not care for Mexico belts. They seemed very stiff.
 
Last edited:
OP
F

FrankLee

Well-known member
Joined
Sep 13, 2010
Messages
3,548
Location
seMI, 48317
OK- that's just plain weird. Also don't know if the high side is right or the low side. Mike.
Yeah, it really is weird.

This morning, I removed the motor from the cradle and measured again. The cradle difference is about 3/8" from end-to-end, so some of the difference is the rubber mounting rings.

IIRC, the stud for the lower motor mount clip was threaded into the head frame only about 1/4". I thought that was odd too. Regardless, I reversed the cradle. We'll see what happens when the machine gets reassembled.
 

Smokeshow69

Well-known member
Joined
Dec 7, 2012
Messages
8,366
Location
Pacific Northwest
I've got handful of long C belts. Whether Jim's belt is original, I dunno, but the 9-1644 at the top of the picture came off of dp#84, circa ~1965. It's still in good usable condition and it's going back on. The other two are also still good. I use these for testing purposes.


Here's an interesting belt with the original sleeve. It backs-up Smoke's comment. The 99 cent price tag and the "Sears" logo in the round red dot dates it to 1969. This one is a wall-hanger. It's very stiff and retains the exact same shape when removed from the sleeve.


Franklee- this belt is awesome! Not a user but a cool wall hanger


Sent from my iPhone using The Garage Journal mobile app
 

whateg01

Well-known member
Joined
Mar 13, 2006
Messages
11,193
Location
doo dah, kansas, usa
Well, it appears I was wrong about there being a lip on the base for the column to seat against. I don't know why I was thinking there was one, other than there is still a ring of grime, dirt, etc. there that looks pretty solid at a glance. So, my bad!

Dave
 
OP
F

FrankLee

Well-known member
Joined
Sep 13, 2010
Messages
3,548
Location
seMI, 48317
Well, it appears I was wrong about there being a lip on the base for the column to seat against. I don't know why I was thinking there was one, other than there is still a ring of grime, dirt, etc. there that looks pretty solid at a glance. So, my bad!

Dave
No worries. Thanks for checking and posting your findings.
 

Jim C.

Well-known member
Joined
Jan 8, 2010
Messages
2,598
Finished the DP project. FrankLee, many thanks for the great information contained in this thread, particularly as it relates to disassembly and assembly of the head. It was very helpful. Other than the cracked tilt table flange, the DP was in pretty good shape to start with. Still, the thread was instrumental in helping me avoid making mistakes, or causing unintended damage. Thanks again!

Jim C.
 

Attachments

  • 91991BAE-DF35-402B-94CE-2EAFF5564F2E.jpg
    91991BAE-DF35-402B-94CE-2EAFF5564F2E.jpg
    104.4 KB · Views: 38
  • 5E578578-0F90-4319-B8B8-24B593654CD1.jpg
    5E578578-0F90-4319-B8B8-24B593654CD1.jpg
    136.6 KB · Views: 40
  • 26D24CB7-FF68-4D67-AA0E-E2587315A0F6.jpg
    26D24CB7-FF68-4D67-AA0E-E2587315A0F6.jpg
    151.2 KB · Views: 39
To avoid these ads, REGISTER NOW!
OP
F

FrankLee

Well-known member
Joined
Sep 13, 2010
Messages
3,548
Location
seMI, 48317
Finished the DP project. FrankLee, many thanks for the great information contained in this thread, particularly as it relates to disassembly and assembly of the head. It was very helpful. Other than the cracked tilt table flange, the DP was in pretty good shape to start with. Still, the thread was instrumental in helping me avoid making mistakes, or causing unintended damage. Thanks again!

Jim C.
Fantastic job, Jim!

The replacement table looks great! The thrust nut fit good too.

I'm always happy to hear this thread helped get another of these classics back in shape. Now enjoy your work.
 

Jim C.

Well-known member
Joined
Jan 8, 2010
Messages
2,598
Jim,

looks great! what color paint did you use?

Thanks! Believe it or not, that’s factory original paint. All I did was wipe it with a microfiber rag and some mineral spirits. That took off old grime, dust, etc. Then I wiped it down again with a clean dry microfiber rag. There were a lot of multI color paint splatters all over the DP. Top to bottom including inside the head casting and chuck jaws. It took a while to remove it all without damaging the original finish underneath. I was using Q-tips, small brushes, toothpicks, etc. to keep the paint remover only on the paint splatters. It took time but not getting sloppy with it preserved the factory finish.

Jim C.
 

Jim C.

Well-known member
Joined
Jan 8, 2010
Messages
2,598
Fantastic job, Jim!

The replacement table looks great! The thrust nut fit good too.

I'm always happy to hear this thread helped get another of these classics back in shape. Now enjoy your work.

FrankLee, I’m very happy with the results! The thrust nut was a perfect fit and O rings went on like expected. The replacement table will work, but at some point I’d like to find another tilt table just to get the DP back to its original configuration. I know those parts might be hard to find. I’m watching out for one.

As for the thread, like I said, it was a super resource. I wish I could have added a little more valuable information to it, but you have everything so well covered, there’s not much more to say. All I can do is give the thread my endorsement.

Jim C.
 
OP
F

FrankLee

Well-known member
Joined
Sep 13, 2010
Messages
3,548
Location
seMI, 48317
So, I'm nearly finished with the refurb of dp#84. This morning, I started cleaning up the motor. It is a Craftsman 1/2 hp, 1725 rpm motor with sleeve bearings, model 113.12140, manufactured in late '64.


It's nothing unusual until I noticed that ends of the cradle mount are different heights. The difference between the height at the ends of the shaft is ~5/8". I've never seen this before. With the pivoting motor mount, it will be easy to compensate for the angled shaft. Is this a mistake? Or does anyone know the purpose of a cradle like this?


OK- that's just plain weird. Also don't know if the high side is right or the low side. Mike.
Yeah, it really is weird.

This morning, I removed the motor from the cradle and measured again. The cradle difference is about 3/8" from end-to-end, so some of the difference is the rubber mounting rings.

IIRC, the stud for the lower motor mount clip was threaded into the head frame only about 1/4". I thought that was odd too. Regardless, I reversed the cradle. We'll see what happens when the machine gets reassembled.

I reinstalled the motor on dp#84. The reversed cradle works well and the belt tracks square to the spindle and motor shaft. However, I had to use the 45" belt because the lower stud bottomed out to the column with the 44" belt before belt alignment was correct.


whateg01

Well-known member
Joined
Mar 13, 2006
Messages
11,193
Location
doo dah, kansas, usa
Starting to work on the new spindle. Did some test cuts. I think I'm going to have to use a smaller radius on the endmill, or one without a radius on the corners. I also found that my collet block or the collet is not concentric. I intend to use the Super Spacer with a tailstock, so that shouldn't be an issue. The SS has an adjust-tru style chuck on it. Overall, it looks like it should be pretty easy to get the splines done. Then I can deal with the taper.


Dave
 

Attachments

  • splines1.jpg
    splines1.jpg
    101.9 KB · Views: 18
  • splines2.jpg
    splines2.jpg
    122.3 KB · Views: 18

whateg01

Well-known member
Joined
Mar 13, 2006
Messages
11,193
Location
doo dah, kansas, usa
I reinstalled the motor on dp#84. The reversed cradle works well and the belt tracks square to the spindle and motor shaft. However, I had to use the 45" belt because the lower stud bottomed out to the column with the 44" belt before belt alignment was correct.

Mine was modified to use a jack-shaft, of course, but I didn't see evidence that a screw was used to tighten the belt. I thought it was just gravity that held the belt tight.

Dave
 
OP
F

FrankLee

Well-known member
Joined
Sep 13, 2010
Messages
3,548
Location
seMI, 48317
Mine was modified to use a jack-shaft, of course, but I didn't see evidence that a screw was used to tighten the belt. I thought it was just gravity that held the belt tight.

Dave
That's how the motor mount is on my keeper machine... gravity to some degree; no stud/clip. There were three designs for the pivot motor mount.

....
Early Craftsman 150 with hinged motor mount. Some have a female threaded boss spot welded onto the mounting plate.

Late Craftsman 150 with hinged motor mount with clip: The stud is threaded into the head frame.

The hinged motor mount was introduced to allow easy and rapid changing of belt position. I presume that the hinge mount was updated with a locking clip to eliminate any bouncing of the motor. I believe this would occur with a stiff v-belt that retains the memory of the tight curve of the pulleys. I haven't noticed much, if any, motor bouncing with a linked or cogged belts.

....
 
Last edited:
OP
F

FrankLee

Well-known member
Joined
Sep 13, 2010
Messages
3,548
Location
seMI, 48317
I picked up this Craftsman 397.19391, 1/3 hp, 6" bench grinder this morning... cheap! It's rough, but most everything is there. It's only missing three rubber feet and the quench tray. One shield is slightly cracked at the bracket. It'll be a lucrative part-out project.

 
Last edited:
OP
F

FrankLee

Well-known member
Joined
Sep 13, 2010
Messages
3,548
Location
seMI, 48317
Firstly, welcome to The Garage Journal and the Craftsman Drill Press thread!

Secondly, I didn't realize you had attached a link to a photo until I started a reply. Imgur photos typically do not show up for others unless you remove the "s" from "https".
[IMG]https://i.imgur.com/0vEcbIk.jpg[/IMG]
[IMG]http://i.imgur.com/0vEcbIk.jpg[/IMG]

Thirdly, my comments are interspersed below.

Froomja said:
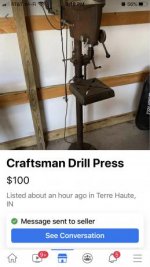
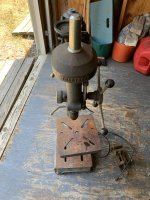
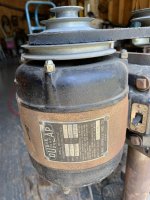
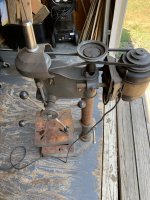
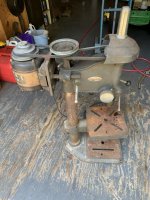
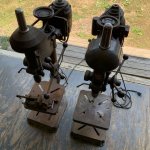
Recently purchased a 103.21300 for a decent price, and this thread was a HUGE help in my decision making process, legitimately studied all your links for about 6 hours the night before I went to check out the unit. Externally, it is in great shape, minimal surface rust, no cracks, and not a an ungodly amount of grime. It started up and ran with minimal noise, and only a small bit of run-out; which I figured was caused by the comically small belt the previous owner had thrown on it.
Any spinning part can have runout. If you are referring to runout at the bit, the pulley/shaft should have very little effect. The spindle, spindle bushings/bearings or chuck are usually the primary cause.

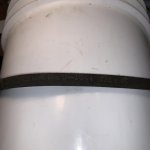
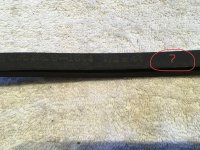
However it seems to have done a number on the pulley shaft. It is very badly galled, to the point I had to pop it out of the bushing with a dowel and a mallet (fortunately it does not look like it damaged the brass bushing). Is the spindle shaft salvageable at all, or should it be binned?
It looks to me that the shaft is still usable, but then I don't see the entire shaft. That set screw witness mark is very high on the shaft. That tells me the shaft was not fully seated into the pulley.
How loose is it in the pulley?
What are the ID and OD dimensions of the bushing?
What is the OD of the shaft?


If it is salvageable is it something that can be done with sanding/filing and elbow grease as I do not have access to a lathe. If it is scrap do you have any recommendations on a replacement?
I would just smooth the high spots on the portion of the shaft that is inserted into the pulley. I might also file two new flats on the opposite side for the set screws if that portion of the shaft is out-of-round.

I also want to thank you for this making and continually updating this massive repository of images and knowledge.

Lastly, thanks for your comments! This thread is a group effort and your experiences and participation will be helpful to someone else in the future.

Froomja, Any updates?


....
I picked up a Craftsman 100 yesterday, it looks to be a '53 model (103.23131) in pretty good condition. I got most of the table rust off of it with a Scotch-Brite pad and some WD40. I did have some questions though and was wondering if people could help me out.
....
Two Bit, Any updates?
 
Last edited:

T.K.B.

Member
Joined
Jan 19, 2020
Messages
19
Location
Central Massachusetts
When checking run-out, what is the method.
If you chucked a 1/2" drill rod, how would you check.
Close to the chuck, 6" from the chuck?
Quill up, quill down?


Should it be the same run-out for all of these?
Would you use a plunger or lever dial indicator?
 
Last edited:
OP
F

FrankLee

Well-known member
Joined
Sep 13, 2010
Messages
3,548
Location
seMI, 48317
When checking run-out, what is the method.
If you chucked a 1/2" drill rod, how would you check.
Close to the chuck, 6" from the chuck?
Quill up, quill down?


Should it be the same run-out for all of these?
Would you use a plunger or lever dial indicator?
I have a post regarding runout, but as I say in the post, I am no expert.
https://www.garagejournal.com/forum/showthread.php?p=6507328

Depending on what is causing runout, I think readings could change if measuring from different locations.

I use a plunger DI and measure on a rod near the chuck. When I can, I also measure on the spindle taper on both the small end and the large end.

I'm hoping the see some other comments and opinions on this.
 

Outlawmws

Well-known member
Joined
Aug 9, 2011
Messages
39,107
Location
The Badlands
Frank what you are doing is fine.

But consider this; if measuring 6" from the chuck, and if the rod is griped exactly parallel, then yes same or close top and bottom. if the rod is being gripped slightly non parallel, OR the quill shaft is bent, it will be larger at the end than at the chuck..

There are many pats involved here.

Measuring runnout in different places can be a valuable diagnostic tool for what to go after.

Having said that, getting all the moving parts clean and lightly oiled will get you the most useful readings; in particular the chuck and its workings. any dirt up inside will throw things off..
 

DaveT

Well-known member
Joined
Feb 14, 2019
Messages
238
Location
St. Louis area
Boy I wish I was closer to Terre Haute IN
Nice Table lifting mechanism on this one for $100
Hope someone here gets to it first
Facebook Marketplace
attachment.php
 

Attachments

  • 6AF42B6D-44DF-456D-936D-9DE87F9D709B.jpg
    6AF42B6D-44DF-456D-936D-9DE87F9D709B.jpg
    21.8 KB · Views: 342
OP
F

FrankLee

Well-known member
Joined
Sep 13, 2010
Messages
3,548
Location
seMI, 48317
Many posts in this and other threads on GJ are missing since 6/27 due to a restore.

If you were a new member, you may need to rejoin(?) and repost.
 
Last edited:

GreyEyes

Well-known member
Joined
Mar 25, 2019
Messages
54
Location
Florida
OK, so many posts in this and other threads are missing since 6/27 due to a restore.


Well I'm glad it's not just me. I got emails saying there were new posts but when I went to view them they weren't there. Thought maybe I was just having browser not-refreshing issues.
 

RHJO51

Well-known member
Joined
Feb 27, 2015
Messages
242
Location
Red Hook, NY 12571
Gents. I posted a couple of weeks ago about a Atlas DP I stumbled across with a MSA. Very nice, all original, paid $100. Then last night on FBMP I see an ad for a Craftsman DP also with a MSA and it's 3 miles from me - $75. Was posted for 8 hrs so I figured it was gone bu no, and it's now mine. 101.03633. Very nice condition, original grey paint looks great, 1/3 HP (original?) Dunlap motor runs nice and quiet, no parts missing. And there was a nice Palmgren vise thrown in to boot. Thought you might enjoy the side by side pics. Not sure which one is better, they are both 1940s Atlas machines. Funny how these machines just kind find you sometimes, - Jim
 

Attachments

  • IMG_0867.jpg
    IMG_0867.jpg
    137.1 KB · Views: 33
  • IMG_0869.jpg
    IMG_0869.jpg
    120.3 KB · Views: 33
  • IMG_0871.jpg
    IMG_0871.jpg
    124 KB · Views: 33
  • IMG_0872.jpg
    IMG_0872.jpg
    147.3 KB · Views: 33
  • IMG_0876.jpg
    IMG_0876.jpg
    151.5 KB · Views: 37
  • IMG_0866.jpg
    IMG_0866.jpg
    146.8 KB · Views: 38
  • IMG_0875.jpg
    IMG_0875.jpg
    151.1 KB · Views: 35
OP
F

FrankLee

Well-known member
Joined
Sep 13, 2010
Messages
3,548
Location
seMI, 48317
Gents. I posted a couple of weeks ago about a Atlas DP I stumbled across with a MSA. Very nice, all original, paid $100. Then last night on FBMP I see an ad for a Craftsman DP also with a MSA and it's 3 miles from me - $75. Was posted for 8 hrs so I figured it was gone bu no, and it's now mine. 101.03633. Very nice condition, original grey paint looks great, 1/3 HP (original?) Dunlap motor runs nice and quiet, no parts missing. And there was a nice Palmgren vise thrown in to boot. Thought you might enjoy the side by side pics. Not sure which one is better, they are both 1940s Atlas machines. Funny how these machines just kind find you sometimes, - Jim

Very nice finds!
<MARQUEE behavior="alternate" direction="right" scrollamount="20">:bowdown:</MARQUEE>
<MARQUEE behavior="alternate" direction="left" scrollamount="20">:bowdown:</MARQUEE>
 
OP
F

FrankLee

Well-known member
Joined
Sep 13, 2010
Messages
3,548
Location
seMI, 48317
DP#85, Craftsman #2432 Milling Vise

Dp#85 found me today.

I believe it's a '49, 13-1/2" Craftsman 80, (well technically a Craftsman 100 because it's pre-1950). The model number is 103.23640.

Yeah, it's rough, and I paid more than I wanted to, but I've never had a milling vise before.


I believe the milling vise is original to the machine. Below is an excerpt from the 1950 catalog. Aren't they all missing the jaws?


This group was also included with the deal. One ratchet should be good after cleaning, one may be ok after cleaning, the other has a fubar quick release.


7/3/2020

The milling vise refurb is complete.


I also got dp#85 dismantled. With liberal use of penetrants, it was much easier than I expected. Lots of cleaning and de-rusting to do.


I found a huge mud nest in the nose cavity of the head frame casting.


7/5/2020

The table base and column are complete.


7/7/2020

Making progress.


7/10/2020

Dp#85 is complete.

 
Last edited:

whateg01

Well-known member
Joined
Mar 13, 2006
Messages
11,193
Location
doo dah, kansas, usa
Gents. I posted a couple of weeks ago about a Atlas DP I stumbled across with a MSA. Very nice, all original, paid $100. Then last night on FBMP I see an ad for a Craftsman DP also with a MSA and it's 3 miles from me - $75. Was posted for 8 hrs so I figured it was gone bu no, and it's now mine. 101.03633. Very nice condition, original grey paint looks great, 1/3 HP (original?) Dunlap motor runs nice and quiet, no parts missing. And there was a nice Palmgren vise thrown in to boot. Thought you might enjoy the side by side pics. Not sure which one is better, they are both 1940s Atlas machines. Funny how these machines just kind find you sometimes, - Jim

I always like to look at the differences in equivalent models that are labeled differently. The Power Kraft DP I bought a couple weeks ago is identical to the Delta model, but for the label and the front pulley cover. It's interesting to see what they do to differentiate them. Kinda like domestic cars up until the 90s when they started to use different sheetmetal. Up to a point, they might change the grille or the headlights/tail-lights to make them different, but beyond that, they were nearly identical. Change for the sake of change.

Dave
 
To avoid these ads, REGISTER NOW!
Top Bottom