Regarding the McMaster Carr springs. I just received a pack of the springs Frank and 11b30b4: If you haven't already ordered some let me know and I'll send you one to try out. Mine is still so much apart that it will be a while till I can try it.
Thanks. My springs arrived ~1:00 pm today and I was able to complete some preliminary testing.
I don't have an oe spring to compare, but I do have an earlier spring with the single loop.


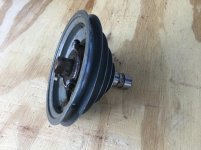
Everything looks pretty good and as expected, the substitute spring is a bit longer. Below is the spring installed in the hub/pinion.

Below is the hub/pinion/spring assembly installed in a head casting. This casting is an Emerson gen 3/gen 4, but the hub/pinion/spring assembly is the same back to the 150 series.
Notice the gap between the hub and head casting. The oe spring draws the hub inward. Not shown is the fiber thrust washer.

There are at least two options to address the extra spring length; re-drill the pinion or add a spacer on the pinion.
The pinion shaft is 1-1/4" diameter. I had a couple 1-1/4" plumbing drain compression washers. The narrow washer on the left fit and worked quite well.


With a spacer, there is another issue. The spacer causes the teeth of the pinion gear to retract somewhat from the quill gear rack. I'm not sure how much of an issue this could be yet. Maybe more prone to breaking teeth off the pinion gear during high torque feed?


A sideways video:
<iframe width="640" height="360" src="https://www.youtube.com/embed/v5W49ARdYNs" frameborder="0" allowfullscreen></iframe>
I cycled the quill feed several times and did not see any distortion of the loop on the spring.

I'll complete more testing tomorrow, but I think this spring is a winner!
3/13/2021
Today's test involved re-drilling the pinion shaft which was pretty straight forward. I drilled a new 9/32" through-hole 1/4" away horizontally from the original hole. I cut the original pin to allow the hub to pass over the pin when installed. If I were doing this for real, I'd drill a 1/4" through hole and cut a new 1/4" diameter pin.
I then then tapped the original holes to 5/16-18. The original through-hole is 9/32" which is over-sized for tapping 5/16-18, but still deep enough threads for a 3/8" long set screw. If I were doing this for real, I'd use a blue thread locker on the set screws. This way, it can all go back to stock if necessary.
So now the test.
The installation was the same as any other hub/pinion/spring assembly. I installed the quill assembly and tensioned the spring. IIRC, it took 2-1/2 to 3 hub revolutions to get the spring tensioned correctly. It took another ~1-1/2 revolutions to fully extend the quill. So that's about 4-1/2 revolutions total. After several cycles of extending the quill, I'm pleased with these results. It's looking very good.
So, the next test. How many revolutions can the spring tolerate before failure?
I removed the quill and with the spring at rest, I rotated the hub 5 times before the loop over the roll pin failed. The other loop inside the pinion shaft was still intact. Five revolutions is too close to the 4-1/2 revolutions needed for normal installation and use.

Next, I bent the loop back and tucked the end behind the crook of the original bend at the barrel.

I reinstalled the assembly and was able to rotate the hub 7 times before failure. This time, though, the loops of the spring did not fail, the loop simply slipped off of the roll pin.
The diameter of the spring wire is 0.080. Every revolution of the spring lengthens the barrel of the spring by 0.080. After 7 revolutions, the spring was 0.560" longer than at rest. That's more than 1/2" ! So, it's not surprising that the loop slipped off the pin.
I'm calling this a win.
Another factor to consider is that quill feed on 2nd gen Emerson machines is ~6". That is probably close to another full hub revolution to fully extend the quill over other machines.