To avoid these ads, REGISTER NOW!

Craftsman Model 100 Drill Press Refurbish

Joined
Jun 17, 2012
Messages
12
Location
land of the huskers
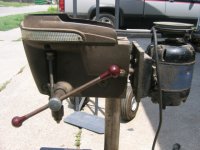
Hello, first time posting here on the board. The press is a Craftsman Model 103.23640 which I believe is a 13” that I got for 75 bucks. The unit looks mostly complete and runs great. I am knee deep in refurbishing it and really excited to clean this old gem up. This is the first time I have ever done something like this so I am relying almost solely on looking at old threads from The Garage Journal. And may I say what a wonderful resource it is. Nice job guys.

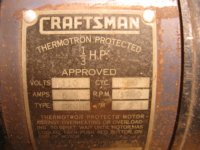
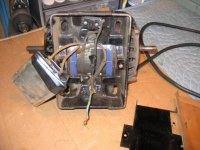
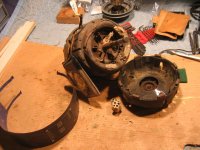
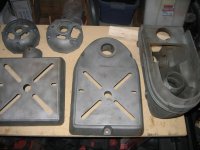
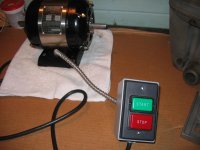
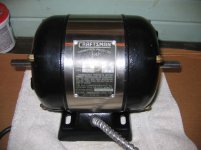
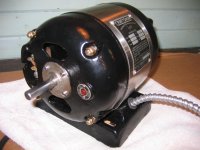
I have disassembled most of the press except for taking the quill out of the head and taking apart the motor. I am firmly committed to really going through the entire press, cleaning, lubing, and repainting it. I would like it to last another lifetime. I just started looking at the original craftsman 1/3 hp motor and well, pretty much just scratched my head. I opened up the back and noticed a flat rectangular box with two wires coming out if it. Is this some sort of resistor or transformer? I guess I was just going to clean the motor and paint it but I am thinking about checking the bearings, and maybe updating the wiring and change the switch. Any thoughts? Plus I read somewhere that I may need to get a puller to get the motor apart… is this true?
 

Attachments

  • IMG_3950.JPG
    IMG_3950.JPG
    106.8 KB · Views: 159
  • IMG_3951.JPG
    IMG_3951.JPG
    111 KB · Views: 153
  • IMG_3959.JPG
    IMG_3959.JPG
    108 KB · Views: 113
  • IMG_3960.jpg
    IMG_3960.jpg
    140.5 KB · Views: 106
  • IMG_3961.jpg
    IMG_3961.jpg
    141.2 KB · Views: 114
To avoid these ads, REGISTER NOW!
OP
C
Joined
Jun 17, 2012
Messages
12
Location
land of the huskers
Not sure yet... After I pulled the aluminum head band off that the press I noticed the factory job was a boring grey. I'll probably paint the motor the factory colors. Maybe for the press a sleek machine light green like I have seen before on this board.
 

1982fxr

Well-known member
Joined
Jan 7, 2012
Messages
10,010
Location
Phoenix
I'm painting mine Rustoleum gloss Regal Red. I think it's turning out really cool. How did you post your pics? I still haven't figured that out yet
 

balane

Well-known member
Joined
May 4, 2011
Messages
2,996
Location
Pacific Northwest
I did mine in a green like you are describing, in fact I did all my old Craftsman bench power tools in that color. I really like it. Mine is Krylon Italian Olive.

Good luck with your resto. The drill press was the most fun one I did.
 
OP
C
Joined
Jun 17, 2012
Messages
12
Location
land of the huskers
1982fxr,

When you post a new thread, you'll notice a window below the one that you are typing in. Its called the "Additional Options " window. In that window there is a button called "Manage Attachments." Click on that and it will open another window where you can pick files to upload to the message board.

Cheers
 

930dreamer

Super Moderator
Staff member
Joined
Oct 7, 2009
Messages
22,954
Location
Amarillo,TX and Stinnett,TX
Carefully remove each bell end (side cover) this will expose the bearings on the shaft. Use a bearing puller (HF has a decent set) to remove. That looks like a start/run capacitor.
 
OP
C
Joined
Jun 17, 2012
Messages
12
Location
land of the huskers
I dug a little deeper into the motor and found a surprise... mud wasp nests throughout the inside of the motor. I am amazed the motor ran so smooth with the **** inside prior to disassembling. So I feel I need to clean the windings and most of the inside of the motor but I noticed lost of little strips of leather or cardboard in between the windings. Can I still spray that stuff with cleaner? What should I do?
 

Attachments

  • IMG_3967.jpg
    IMG_3967.jpg
    141.4 KB · Views: 81
  • IMG_3966.jpg
    IMG_3966.jpg
    142.9 KB · Views: 86
Last edited:
To avoid these ads, REGISTER NOW!

thehazmatguy

Well-known member
Joined
Apr 5, 2009
Messages
129
Location
Tempe, Arizona
I dug a little deeper into the motor and found a surprise... mud wasp nests throughout the inside of the motor. I am amazed the motor ran so smooth with the **** inside prior to disassembling. So I feel I need to clean the windings and most of the inside of the motor but I noticed lost of little strips of leather or cardboard in between the windings. Can I still spray that stuff with cleaner? What should I do?

I found a wasp nest inside my motor too:

http://www.garagejournal.com/forum/showthread.php?t=150684

I was tempted to use a cleaner but I didn't. I used compressed air to blow the dust out and that's it.
 
OP
C
Joined
Jun 17, 2012
Messages
12
Location
land of the huskers
Well, I have been working on my Craftsman 1/3 HP Thermotron motor and I am getting closer to getting it back together again. During the disassembly I noticed that the overloading/overheating reset button was dismantled by the PO. Both wires were clipped to it. Is it bad not to have that hooked up?

Anyway, I just finished fabricating a new motor jacket out of stainless to go between the two bell ends. Its gonna look pretty nice I think. Also ordered a new switch and new bearings... now if I can only remember how the bearings go back in with the springs, gaskets, felt etc. Does anyone know?
 

HeloMech

Active member
Joined
Jul 21, 2012
Messages
39
Location
Huntsville, AL
I'm cleaning up my first drill press now. It's a Craftsman also. I'll probably get grief for it, but i painted mine canary yellow. All the original badging was trash. I did it because the press was cheap but now I'm having a blast redoing it.
 
OP
C
Joined
Jun 17, 2012
Messages
12
Location
land of the huskers
Sorry all, it has been a half a year since I posted. I got all of the parts blasted and I also finished the 1/3 HP Cman motor with new switch assembly. The motor bell ends were primed and painted gloss black and I also fabricated a stainless motor jacket. I think it looks pretty good. It had been soooo long since I took the motor apart I had some real head scratching moments putting it back together. The biggest problem was trying to remember which side of the motor the pair of bearing springs went to. I found a manual to a similar motor on the owwm website that had an exploded view drawing that was very helpful. I put the pair of bearing springs on the side opposite the governer. I hope that is correct. The motor does make a few very minute clicking noises but I think it's not a real problem.
 

Attachments

  • IMG_4093.jpg
    IMG_4093.jpg
    139.2 KB · Views: 74
  • IMG_4091.jpg
    IMG_4091.jpg
    132.3 KB · Views: 73
  • IMG_4090.jpg
    IMG_4090.jpg
    135.9 KB · Views: 92
  • IMG_4094.jpg
    IMG_4094.jpg
    136.3 KB · Views: 72
To avoid these ads, REGISTER NOW!
Top Bottom