MatthewM
Well-known member
Craftsman Compressor Wheel Upgrade
Hi gents,
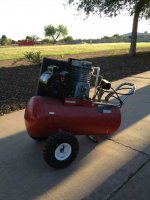
I have a small craftsman air compressor that picked up off craigslist that I really have come to love. I used it to paint the inside of my house and frequently use it out back to work on all jobs. I like almost everything about it, it's a single stage oil lubricated pump with a true 3.5 hp motor that can be wired for 110,or 220. The one thing I don't like are the wheels. They are small and wobbly. And when I use the handle to pick the compressor up, the back of the tank hits the ground and I have to stoop down real low to walk. Also, I have to take it through gravel to get out to my back yard workspace and the wheels always dig in.
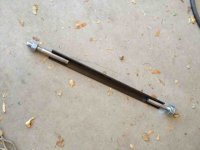
I decided this weekend to finally fix the annoying little wheels on this otherwise great compressor. The plan was to replace the small wheels with some HF Dolly wheels, which just happen to be on sale for $6 bucks this weekend. They have a 5/8" inner diameter on the bearings. I started the project out by first creating an axle with two 2 x 5/8" bolts(with the galvanized coating wire wheeled off and with the heads cut off) and a piece of scrap angle iron. I cut the angle iron to size and then test fit the wheels to determine how much bolt needed to stick out. Next I tack welded the bolts into place. I again tested the wheels to make sure everything worked well and finally welded the bolts to the angle iron.
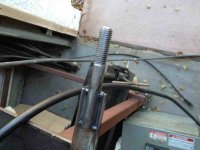
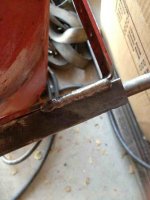
Next I ensured the tank was drained and removed the old wheels. I then removed the powder coat from the brackets on the tank in preparation for welding. I tacked the axle into place and made sure every thing fit together right. When I was happy with where everything was, I finish welded a few short beads attaching the axle to the tank. Finally I put a washer on the axle, the put the wheels on with a nut and some loctite. The nut compresses the inner race but still allows the bearing and wheel to rotate freely. I still need to paint the welded parts and raise the feet in the front but the main fabrication is done so enjoy!
-Matt
Hi gents,
I have a small craftsman air compressor that picked up off craigslist that I really have come to love. I used it to paint the inside of my house and frequently use it out back to work on all jobs. I like almost everything about it, it's a single stage oil lubricated pump with a true 3.5 hp motor that can be wired for 110,or 220. The one thing I don't like are the wheels. They are small and wobbly. And when I use the handle to pick the compressor up, the back of the tank hits the ground and I have to stoop down real low to walk. Also, I have to take it through gravel to get out to my back yard workspace and the wheels always dig in.
I decided this weekend to finally fix the annoying little wheels on this otherwise great compressor. The plan was to replace the small wheels with some HF Dolly wheels, which just happen to be on sale for $6 bucks this weekend. They have a 5/8" inner diameter on the bearings. I started the project out by first creating an axle with two 2 x 5/8" bolts(with the galvanized coating wire wheeled off and with the heads cut off) and a piece of scrap angle iron. I cut the angle iron to size and then test fit the wheels to determine how much bolt needed to stick out. Next I tack welded the bolts into place. I again tested the wheels to make sure everything worked well and finally welded the bolts to the angle iron.
Next I ensured the tank was drained and removed the old wheels. I then removed the powder coat from the brackets on the tank in preparation for welding. I tacked the axle into place and made sure every thing fit together right. When I was happy with where everything was, I finish welded a few short beads attaching the axle to the tank. Finally I put a washer on the axle, the put the wheels on with a nut and some loctite. The nut compresses the inner race but still allows the bearing and wheel to rotate freely. I still need to paint the welded parts and raise the feet in the front but the main fabrication is done so enjoy!
-Matt
Attachments
-
 ImageUploadedByTapatalk1333331875.865738.jpg114.1 KB · Views: 29
 -
 ImageUploadedByTapatalk1333332975.288302.jpg74.3 KB · Views: 20
 -
 ImageUploadedByTapatalk1333332989.461280.jpg85.8 KB · Views: 21
 -
 ImageUploadedByTapatalk1333332999.225307.jpg69.1 KB · Views: 23
 -
 ImageUploadedByTapatalk1333333010.464995.jpg74.6 KB · Views: 24
 -
 ImageUploadedByTapatalk1333333022.196922.jpg44.1 KB · Views: 24
 -
 ImageUploadedByTapatalk1333333041.646330.jpg70.6 KB · Views: 29
Last edited: