To avoid these ads, REGISTER NOW!

Craftsman RHFT Ratchet tear down

b.well

Well-known member
Joined
May 13, 2020
Messages
391
Location
NY
Hello

I've been working on cleaning/greasing my RHFT (round head fine tooth) ratchets. There is a good video by gearwolf up on youtube to disassemble most of the ratchet.

I have not seen anyone disassemble the QR mechanism. Do you know how?

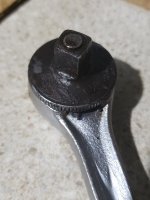
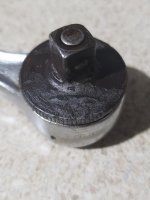
I have a 3/8 RHFT 1971 that I found frozen. I got it cleaned up and mostly functional but the QR mechanism sticks pretty hard in the tighten position. In the loosening position the QR function moves easily, smooth. So far I haven't found how to take it apart. I am guessing the key is getting the ball bearing out first.

When disassembled should the QR button spin around 360 degrees freely?

I haven't tried on another RFHT ratchet but I can answer/confirm that question. Right now the QR turns around about 90% then gets stuck. I think that is the root cause of the stuck QR too.

Thanks to advice from Outlawmws I have the QR soaking in ATF (automatic transmission fluid). And I will push that QR button 100+ times. Hoping that will help free things up but I'd still like to take the QR apart.
 

Attachments

  • 20200817_201525.jpg
    20200817_201525.jpg
    137.9 KB · Views: 30
  • 20200817_201541.jpg
    20200817_201541.jpg
    126.1 KB · Views: 32
  • 20200817_201608.jpg
    20200817_201608.jpg
    66.7 KB · Views: 23
  • 20200817_201618.jpg
    20200817_201618.jpg
    58.3 KB · Views: 26
To avoid these ads, REGISTER NOW!

d.mcfarland

Well-known member
Joined
Jun 18, 2012
Messages
6,581
Location
Western PA
Looks like the QR button sustained some damage. Might have been used as a makeshift hammer. Might not be sticking because of being dirty/rusty, but rather, being damaged.
 

DadsTools

Well-known member
Joined
Jul 27, 2017
Messages
1,852
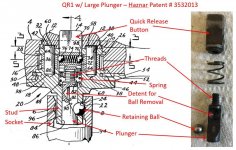
This is from the TT Thread. I borrowed Todd F.'s photo of the breakdown for the QR1. Apparently, the plunger was made to thread onto the button so they could turn independently (Sardo finally solved this). It appears as if the plunger was threaded down most of the way, it would tighten inside the button like a bolt. The trick seems to have been to have it set so that the button can turn with the selector while the plunger remains orbitally stationary. That these two parts would thread together like this is counter-intuitive. When they redesigned these to the small plunger late 1977-78, they replaced the thread means with an un threaded pivot. Hope this helps.

Be aware there are two friction balls with a spring on both sides of the button when you try to remove it.
 

Attachments

  • QR1 Figure 2.jpg
    QR1 Figure 2.jpg
    132.6 KB · Views: 46
OP
B

b.well

Well-known member
Joined
May 13, 2020
Messages
391
Location
NY
Looks like the QR button sustained some damage. Might have been used as a makeshift hammer. Might not be sticking because of being dirty/rusty, but rather, being damaged.

Possibly. I have seen marks like this in various RHFT ratchets. Not sure what they are all from. Very said if used as a hammer. The inside of the ratchet was not too bad, the pawls still black oxide.Getting it apart would hopefully answer the question. And if bent I could hammer it straight.

The button and the plunger are different pieces. When I turn the QR button the plunger does not move.

Attached is the patent for the Quick Release mechanism for fine tooth ratchets. Interesting to look at. Would be great if the QR button just unscrewed!!!
 

Attachments

  • 3532013.pdf
    53.5 KB · Views: 12
OP
B

b.well

Well-known member
Joined
May 13, 2020
Messages
391
Location
NY
This is from the TT Thread. I borrowed Todd F.'s photo of the breakdown for the QR1. Apparently, the plunger was made to thread onto the button so they could turn independently (Sardo finally solved this). It appears as if the plunger was threaded down most of the way, it would tighten inside the button like a bolt. The trick seems to have been to have it set so that the button can turn with the selector while the plunger remains orbitally stationary. That these two parts would thread together like this is counter-intuitive. When they redesigned these to the small plunger late 1977-78, they replaced the thread means with an un threaded pivot. Hope this helps.

Be aware there are two friction balls with a spring on both sides of the button when you try to remove it.

Dad this is great! Also interesting it does not want to turn 360 degrees. I need to test this with another RHFT. Is preventing the turn to keep the ratchet together? OR are these threads really damaged.....

Progress!!!!

Those two balls have alot of energy on them and will fly far if you are not careful. Take the pawls off in a gallon ziplock to be safest. Holding them to slowly release the pressure/energy works too.
 

DadsTools

Well-known member
Joined
Jul 27, 2017
Messages
1,852
Once you gt those pawls out and the balls and spring, it should come apart for you. Once it all does, you should be able to find the problem.

I must confess that with all the round heads that have passed through my hands of various brands, I have never once tried to disassemble the cores. A man's got to know his limitations.
 
OP
B

b.well

Well-known member
Joined
May 13, 2020
Messages
391
Location
NY
Once you gt those pawls out and the balls and spring, it should come apart for you. Once it all does, you should be able to find the problem.

I must confess that with all the round heads that have passed through my hands of various brands, I have never once tried to disassemble the cores. A man's got to know his limitations.

All of that is already apart. I disassembled it as part of a thorough cleaning when I first got it. Went from Red and Frozen to looking pretty good. Just need to fix this last issue. Disassembled down to removing the pawls again today. The QR assembly is currently soaking in ATF.
 

DadsTools

Well-known member
Joined
Jul 27, 2017
Messages
1,852
All of that is already apart. I disassembled it as part of a thorough cleaning when I first got it. Went from Red and Frozen to looking pretty good. Just need to fix this last issue. Disassembled down to removing the pawls again today. The QR assembly is currently soaking in ATF.
When I was speaking about limitations, I was referring to my own!

I'm sure you'll have it figured out in short order.
 

bonneyman

Well-known member
Joined
Apr 22, 2010
Messages
8,844
Location
Desert SW
The hardest thing for me with the RHFT ratchet is removing and re-engaging the lockring. I prefer the knurl disc on the front of the ratchet - but it makes it a real pain sometimes to get to the retainer spring tabs! :mad:
 
To avoid these ads, REGISTER NOW!

fightintxag

Member
Joined
Aug 10, 2020
Messages
12
Location
TX
Were the pawl pins interference fit and pressed into place in at least some of these RHTFs--or maybe in the repair kits? I have 9 of these ratchets between Cman and Easco. And in two 1/2-drives and one 3/8, neither pivot pin will budge. I tried using a pick tool to pry them up because there's a little impression in the surface near the tip of the pins. I tried using needle nose pliers with the mechanism held in a vise. But those pins would not slide, spin, or anything. No rust, no substantial grime, and the pawls pivot freely around the pins. The pins themselves just won't move. In my others, the pawl pins fell out pretty easily.

None of mine have the ejector pin in the QR, so I just pulled the QR plunger up and out of the assembly in order to lube the spring-loaded QR ball bearing that lives in the anvil, and the two small spring-loaded ball bearings that press against the pawls. Those two small ball bearings go flying when you do this though. And for reassembly, they're not easy to get pressed into the QR plunger while pushing the QR plunger back down into place.
 
OP
B

b.well

Well-known member
Joined
May 13, 2020
Messages
391
Location
NY
Were the pawl pins interference fit and pressed into place in at least some of these RHTFs--or maybe in the repair kits? I have 9 of these ratchets between Cman and Easco. And in two 1/2-drives and one 3/8, neither pivot pin will budge. I tried using a pick tool to pry them up because there's a little impression in the surface near the tip of the pins. I tried using needle nose pliers with the mechanism held in a vise. But those pins would not slide, spin, or anything. No rust, no substantial grime, and the pawls pivot freely around the pins. The pins themselves just won't move. In my others, the pawl pins fell out pretty easily.

None of mine have the ejector pin in the QR, so I just pulled the QR plunger up and out of the assembly in order to lube the spring-loaded QR ball bearing that lives in the anvil, and the two small spring-loaded ball bearings that press against the pawls. Those two small ball bearings go flying when you do this though. And for reassembly, they're not easy to get pressed into the QR plunger while pushing the QR plunger back down into place.

Thank you for the method to take apart what we call the QR2 assembly.

My Pawls do stay just enough above the surface to grab them with needle nose pliers. However, on my subsequent dis-assemblies I used a magnet. I have an old telescoping magnet probably meant for picking up dropped hardware around car engines. It's strong and pulled the pawls out no problem.
 
OP
B

b.well

Well-known member
Joined
May 13, 2020
Messages
391
Location
NY
QR assembly successfully removed from my 1971 RHFT ratchet!!! Thanks for your post Dad!

Disassembled testing:
The threads were in good condition.
The plunger and QR button screwed together and apart no issues.
The plunger spun freely in the drive tang.
Some light rust hear and there but not much. I cleaned it off with a brass wire brush. I don't have wire that can get inside the drive tang. I used qtips sprayed with pb blaster and it took a few to clean it out.
Stretched the spring out a bit; it's been compressed a long time!

Assembling:
Greased everything up
Screwing back together the QR assembly it got hard to turn again the last few turns. So it doesn't seem I fixed the root cause. The assembly does work better greased up in there and good enough really I think it's fine.
If it starts sticking more some day I'll dig deeper.
 

Attachments

  • 20200825_165312-01.jpg
    20200825_165312-01.jpg
    45.7 KB · Views: 33
  • 20200825_165415-01.jpg
    20200825_165415-01.jpg
    78.9 KB · Views: 32

Draftpick1

Well-known member
Joined
Mar 22, 2018
Messages
326
This is from the TT Thread. I borrowed Todd F.'s photo of the breakdown for the QR1. Apparently, the plunger was made to thread onto the button so they could turn independently (Sardo finally solved this). It appears as if the plunger was threaded down most of the way, it would tighten inside the button like a bolt. The trick seems to have been to have it set so that the button can turn with the selector while the plunger remains orbitally stationary. That these two parts would thread together like this is counter-intuitive. When they redesigned these to the small plunger late 1977-78, they replaced the thread means with an un threaded pivot. Hope this helps.

Be aware there are two friction balls with a spring on both sides of the button when you try to remove it.


DadsTools What thread did this picture come from?
 

fightintxag

Member
Joined
Aug 10, 2020
Messages
12
Location
TX
Thank you for the method to take apart what we call the QR2 assembly.

My Pawls do stay just enough above the surface to grab them with needle nose pliers. However, on my subsequent dis-assemblies I used a magnet. I have an old telescoping magnet probably meant for picking up dropped hardware around car engines. It's strong and pulled the pawls out no problem.
"QR2" - Got it. Thanks for helping me get my nomenclature right. :thumbup:

This thread is going to be very useful if I ever find myself in possession of a QR1.
 

DadsTools

Well-known member
Joined
Jul 27, 2017
Messages
1,852
Were the pawl pins interference fit and pressed into place in at least some of these RHTFs--or maybe in the repair kits? I have 9 of these ratchets between Cman and Easco. And in two 1/2-drives and one 3/8, neither pivot pin will budge. I tried using a pick tool to pry them up because there's a little impression in the surface near the tip of the pins. I tried using needle nose pliers with the mechanism held in a vise. But those pins would not slide, spin, or anything. No rust, no substantial grime, and the pawls pivot freely around the pins. The pins themselves just won't move. In my others, the pawl pins fell out pretty easily.

None of mine have the ejector pin in the QR, so I just pulled the QR plunger up and out of the assembly in order to lube the spring-loaded QR ball bearing that lives in the anvil, and the two small spring-loaded ball bearings that press against the pawls. Those two small ball bearings go flying when you do this though. And for reassembly, they're not easy to get pressed into the QR plunger while pushing the QR plunger back down into place.
According to Todd F, disassembly of his QR2 required drilling because a part I can't recall was staked in.

Just for clarity's sake, the QR1 is the one where the 'plunger' (MDF/Sears's terminology for it) extends out a hole in the top of the 'stud' (again, their terminology). The QR1 comes in two variations, the second having a smaller diameter plunger and with a different interface between the plunger and the button introduced circa 1977-78. The QR2 introduced on 1981 is what we called the 'blind' stud with no hole or protruding plunger.

See the complete explanation for a this in the RHFT Type Study:
https://www.garagejournal.com/forum/showthread.php?t=455802
 

DadsTools

Well-known member
Joined
Jul 27, 2017
Messages
1,852
DadsTools What thread did this picture come from?
The other thread I mentioned is on the Tool Talk forum. So there's basically two different RHFT Type Study threads out there. The first is the GJ thread started by b.well along with several essays I wrote concerning the approach, typing and other details. That thread is here as posted above:

https://www.garagejournal.com/forum/showthread.php?t=455802

The duplicate thread is on the Tool Talk forum. It is in this thread that TT member Tood F. and myself went into a detailed discussion concerning the internals of the RHFT mechanism along with descriptions and photos. We had several opposing opinions about the historical placement. meaning and typing of certain details, all of which I ultimately resolved in the as-published study's favor.:thumbup: The exchange brought up a number of interesting details and photos of the internals that do not exist in the GJ thread. You can find it at:

http://www.papawswrench.com/vboard/index.php?topic=25659.msg146499#msg146499
 

Gear Wolf

Well-known member
Joined
Feb 25, 2015
Messages
567
You know what? When I originally made that video, I was so gun-ho about finishing it that I didn't end up talking about this unique aspect of the mechanism's engineering.

Back when you could directly message creators on YouTube, someone gently let me know that I missed that a good 4 years ago. Heck, there were quite a few things I either missed, made mistakes on, or just didn't know what I do now. Doh! Hopefully things will be better moving forward, hahaha! ^_^

This is a cool thread! Thanks for sharing this.
 
To avoid these ads, REGISTER NOW!
Top Bottom