To avoid these ads, REGISTER NOW!

Crest Ultrasonic Cleaner shorted out --- help!

catalytic

Well-known member
Joined
Jul 16, 2011
Messages
636
Location
Boston, Los Angeles, Cleveland
I have a Crest 575HTA 1.5gal heated ultrasonic cleaner. Today I made sure the heater & ultrasonic were both off and the tank was full of water. I plugged it in, got a saw a nice spark at the power outlet, and tripped my 20A circuit breaker :eek:😭. It has tripped my breaker and/or GFCI a few times in the past, but only while running, and I never thought much of it as the manual says the ultrasonic action may trip a GFCI.

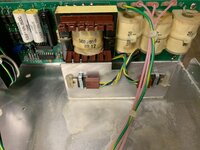
I opened it up and I don't see any signs of burning/shorting on the board or internal components.

It does look like the drain hole in the tank might be slowly leaking water onto the nearby capacitor and around the circuit board.

Also, the large center component (marked 5003058 03 12) looks like it may be swollen, but maybe it's supposed to look like that.

-Can anyone help diagnose the problem?
-Does anyone have a good repair shop (I'm in SoCal, but also kept the shipping box/padding for it).

IMG-3616.jpgIMG-3609.jpgIMG-3612.jpg

**UPDATE** The power cord alone works fine, and the heater/light/temp knob also work fine when I disconnect the ultrasonic/timer. I saw a nice arc/bit of smoke in the large black Timer component attached behind the ultrasonic Timer knob, even though the Timer knob was in the '0/off' position (pictured below). There is no master on/off switch on this unit, just Heat(on/off), Temp, and Timer.

IMG-3628.jpgIMG-3649.jpg
 
Last edited:
To avoid these ads, REGISTER NOW!

LXCam

ALLIANCE MEMBER
Joined
Apr 23, 2013
Messages
19,200
Location
AZ
Does that thing have an actual on/off switch?. If it does, did you have it in the on position?. If it does and it was in the off position I'd disconnect the power cord internally and test it all by itself. You said you've been having issues with the GFI and that shouldn't happen either. That's the first place I'd look.
 

Davefr

Well-known member
Joined
Jan 7, 2010
Messages
11,847
Location
OR
So it was totally off, you plugged it in and got a spark and tripped breaker. Does it have mechanical controls or a touch screen? I'd start with the cord and work you way up to the power switch looking for a short. If it has a touch screen then I'd look for a power relay that possibly failed. Most of the time it's the output transistors or transducers that are the first to go but if the unit wasn't energized, I don't see how they would be affected.
 

Jswain

Well-known member
Joined
Apr 26, 2013
Messages
2,465
Location
Calgary, AB
Like they said if machine was switched off likely a problem in the power cord itself or the switch. Check power cord with a multimeter to see if it is shorted between the leads. If you don't have a multimeter completely unhook it from machine(take pics first) make sure the leads are separated/good idea to marrette or electrical tape over them individually, plug in the end then flip on the breaker. If the breaker trips now then replace the power cord
 
OP
C

catalytic

Well-known member
Joined
Jul 16, 2011
Messages
636
Location
Boston, Los Angeles, Cleveland
Update: The power cord alone works fine when disconnected, and the heater/light/temp knob also work fine when I disconnect the ultrasonic/timer. When I reconnected the ultrasonic Timer knob, I saw a nice arc/bit of smoke in the large black Timer component attached behind the ultrasonic Timer knob (marked Diehl Type 600), even though the Timer knob was in the '0/off' position (pictured below). There is no master on/off switch on this unit, just Heat(on/off), Temp, and Timer.


IMG-3628.jpgIMG-3649.jpg
 

Jswain

Well-known member
Joined
Apr 26, 2013
Messages
2,465
Location
Calgary, AB
You could try now unhooking the ultrasonic from the timer and see if the timer function still trips it, then possibly try bypassing the timer and hooking straight to the ultrasonic to see if it will run with the timer out of the loop
 
OP
C

catalytic

Well-known member
Joined
Jul 16, 2011
Messages
636
Location
Boston, Los Angeles, Cleveland
Update 2: Pretty sure it's the Diehl 600 timer component---I disconnected the board & ultrasonics, and it still shorted out (arc/flames on the timer unit). I found a replacement online.

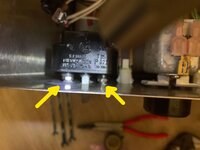
But Does anyone know how to remove it? The knob came off so it's only attached by two screws, but the screw heads are hidden under the big blue 'CREST' decal on the front, which I don't want to remove if possible.. Turning the two pictured stainless 5/16" (or 8mm) hex nuts does nothing---maybe they're just spacers?

IMG-3664(1).jpg
 

Davefr

Well-known member
Joined
Jan 7, 2010
Messages
11,847
Location
OR
I'm guessing there are two small F.H. machine screws securing the timer to the front panel with standoffs. You probably only need to remove a tiny part of the nameplate/decal under the knob which should be invisible once the knob is in place. (two small X slits with an Xacto knife should expose the screw heads.)

I assume the unit is out of warranty?
 
Last edited:
OP
C

catalytic

Well-known member
Joined
Jul 16, 2011
Messages
636
Location
Boston, Los Angeles, Cleveland
I'm guessing there are two small F.H. machine screws securing the timer to the front panel with standoffs. You probably only need to remove a tiny part of the nameplate/decal under the knob which should be invisible once the knob is in place. (two small X slits with an Xacto knife should expose the screw heads.)

I assume the unit is out of warranty?
^^ Clever idea! I'm standing right next to some punches I use to punch drive screw holes in vinyl decals for replacing machine nameplates, but it didn't occur to me to use them to get access to the screw heads.

Crest's warranty is just 2 years and their repair facility is on the opposite coast.
 
OP
C

catalytic

Well-known member
Joined
Jul 16, 2011
Messages
636
Location
Boston, Los Angeles, Cleveland
Update:
I have ultrasonic and heat when I bypass the timer switch!

Unfortunately I found 2 additional issues:

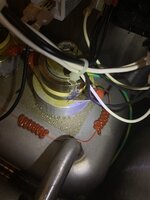
1) When I bypass the timer it runs, but I see a spark/arc when I turn it on that spans the two poles of the transducer closest to the drain pipe (this machine has 3 transducers). I *think* it looks like the TIG'ed drain pipe leaks a few drops of water that drip right where the arc is, although it's currently bone dry and still arcing. I do notice less waves & tin-foil-test pinholes over this transducer.


Screen Shot 2021-12-25 at 1.24.03 AM.png (pic of transducer arc) IMG-3661.jpg (pic of same transducer without arc)


2) It also looks like there's a swollen/cracked lump in the center of the heating element (the heater still works great).

You all are a lot more familiar with these machines than me---what are your thoughts?

Merry Christmas all!🎅

IMG-3668.jpg
 
Last edited:

Davefr

Well-known member
Joined
Jan 7, 2010
Messages
11,847
Location
OR
Update:
I have ultrasonic and heat when I bypass the timer switch!

Unfortunately I found 2 additional issues:

1) When I bypass the timer it runs, but I see a spark/arc when I turn it on that spans the two poles of the transducer closest to the drain pipe (this machine has 3 transducers). I *think* it looks like the TIG'ed drain pipe leaks a few drops of water that drip right where the arc is, although it's currently bone dry and still arcing. I do notice less waves & tin-foil-test pinholes over this transducer.


Screen Shot 2021-12-25 at 1.24.03 AM.png (pic of transducer arc) IMG-3661.jpg (pic of same transducer without arc)


2) It also looks like there's a swollen/cracked lump in the center of the heating element (the heater still works great).

You all are a lot more familiar with these machines than me---what are your thoughts?

Merry Christmas all!🎅

IMG-3668.jpg
That arcing looks like it could be the corrosion causing a conductive path across the transducer. I'd get all that corrosion cleaned off. Maybe try some very fine sandpaper or a little vinegar. Get it to where it looks like the other transducers and give it a try. The arcing could kill the output transistors but I doubt it would kill a transducer. The fact that it's arcing suggests the output circuit is OK for now. I hope you're not testing this unit empty. Running a US cleaner dry is a sure way to kill it.

The bulge in the heater is probably just the thermocouple sensor. I won't worry about it.

It sounds like most of the units problems are the result of a leak. You need to pinpoint the leak and try and seal it. Does the inner tank bottom have signs of erosion? Repairing erosion leaks is usually futile but if it's the drain plumbing then it might be repairable. Try and post a close up image of the inner tank tank bottom in the proximity of the arcing transducer and drain hole. Hairline cracks in the tanks usually result in having to toss these units. Most erosion starts at the transducer and radiates out like a cobweb.
 
Last edited:
To avoid these ads, REGISTER NOW!
OP
C

catalytic

Well-known member
Joined
Jul 16, 2011
Messages
636
Location
Boston, Los Angeles, Cleveland
It sounds like most of the units problems are the result of a leak. You need to pinpoint the leak and try and seal it.

Dave is spot on, just clean that transducer up with a scotch bright pad and hit it with some insulating varnish.

Update: UGGGGHH---Found the problem---there's a tiny pinhole through the tank near the arc'ing transducer (it's tiny, but the flashlight on the other side + bad camera focus make it look big). Someone maybe let the workpiece touch the tank there at some point.

What are the options? can it be TIG'ed? Should I try plugging it with some of the red glue they use on the inside (looks like hi-temp silicone sealant glue)?

The transducer cleaned up nicely with scotch brite, and the insulating varnish is on order.

ZV_00110(1).pngZV_00111.pngZV_00113(1).png
 

Jswain

Well-known member
Joined
Apr 26, 2013
Messages
2,465
Location
Calgary, AB
Get yourself a stainless machine screw/bolt 8-32 or whatever and drill it out to the proper size, flat washer on each side with a nylock nut and install it with some 3m 4200 or 5200.

Both are good enough for below waterline fasteners on a boat so will easily do the job.
 
Last edited:

Rinspeed

Well-known member
Joined
Apr 26, 2020
Messages
1,832
Location
NY
You don't want to create a lot of heat that close to the transducer but I would Tig weld it up letting it cool a little between passes. Then hit it with some dye penetrant to make sure. I would grind a little of that excess epoxy away next to the hole.
 

Davefr

Well-known member
Joined
Jan 7, 2010
Messages
11,847
Location
OR
Update: UGGGGHH---Found the problem---there's a tiny pinhole through the tank near the arc'ing transducer (it's tiny, but the flashlight on the other side + bad camera focus make it look big). Someone maybe let the workpiece touch the tank there at some point.

What are the options? can it be TIG'ed? Should I try plugging it with some of the red glue they use on the inside (looks like hi-temp silicone sealant glue)?

The transducer cleaned up nicely with scotch brite, and the insulating varnish is on order.

ZV_00110(1).pngZV_00111.pngZV_00113(1).png
It's certainly worth a try and you're lucky it's not directly under the transducer. I'd remove a section of that pad up to the transducer base to give you as much surface area as you can get. Then I'd start with a cut circle of Waterproof Gorilla Patch and Seal Tape applied to the underside of the unit's tank. (it's really good stuff and remains rubbery). Make sure you clean that area really good before you apply the tape.

83-57f386edb5bb_1.7f0cdf5a8f45da9cc23539d2193a3207.jpg

That might be all the repair you need so start with an easy non invasive repair first. If it doesn't work out then I'd try the smallest SS machines screw and washer like jswain suggested.

You could also do a search for silver epoxy. It's often used to bond transducers to tanks but it's pretty spendy.

Welding it would be the last option IMHO.
 
OP
C

catalytic

Well-known member
Joined
Jul 16, 2011
Messages
636
Location
Boston, Los Angeles, Cleveland
That might be all the repair you need so start with an easy non invasive repair first. If it doesn't work out then I'd try the smallest SS machines screw and washer like jswain suggested.

You could also do a search for silver epoxy. It's often used to bond transducers to tanks but it's pretty spendy.
Interesting. I was just wondering about trying epoxy---I've seen a 2-part epoxy putty product used to fix boats and fuel tanks below the waterline/fuel level (it's solvent resistant):

https://www.amazon.com/dp/B000BRQ0TW/?tag=atomicindus08-20

It looks like the wires are attached to the bottom of the tank with hi-temp Silicone sealant (good stuff but might not hold up if directly exposed to the cleaning solution/ultrasonic bubbles), whereas the transducers are epoxied with the help of what looks like a sheet of fiberglass soaked in epoxy, which I've seen before when making boats/longbows/RC airplane wings (fiberglass adds the structure/backbone for the epoxy patch).

Ahh decisions...
 

Jswain

Well-known member
Joined
Apr 26, 2013
Messages
2,465
Location
Calgary, AB
I would want something mechanical with the heat/vibration/chemicals all at once. That's a pretty good hole for water to leak on some powered probably unattended electronics if the epoxy decides to fail in 6 months time.
 

Davefr

Well-known member
Joined
Jan 7, 2010
Messages
11,847
Location
OR
Interesting. I was just wondering about trying epoxy---I've seen a 2-part epoxy putty product used to fix boats and fuel tanks below the waterline/fuel level (it's solvent resistant):

https://www.amazon.com/dp/B000BRQ0TW/?tag=atomicindus08-20

It looks like the wires are attached to the bottom of the tank with hi-temp Silicone sealant (good stuff but might not hold up if directly exposed to the cleaning solution/ultrasonic bubbles), whereas the transducers are epoxied with the help of what looks like a sheet of fiberglass soaked in epoxy, which I've seen before when making boats/longbows/RC airplane wings (fiberglass adds the structure/backbone for the epoxy patch).

Ahh decisions...
Epoxy might work and it would be easy enough to try. The issue is, will there be a difference in coefficient of expansion between epoxy and stainless steel and will ultrasonic energy eventually destroy the epoxy? I suggested the tape because it's flexible and very easy to try.
 
OP
C

catalytic

Well-known member
Joined
Jul 16, 2011
Messages
636
Location
Boston, Los Angeles, Cleveland
Most of the time it's the output transistors or transducers that are the first to go but if the unit wasn't energized, I don't see how they would be affected.

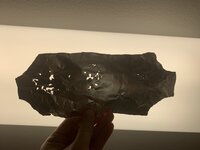
So here's a puzzle---I installed the replacement timer, made sure the transducer near the tank leak was cleaned up, temporarily sealed the tank leak with waterproof tape, and tried a 45sec Alum Foil Test. This machine has 3 transducers--- on the foil, you can see that two are very strong, but the one near the leak that was arcing before (which was under the right side of the alum foil) is weaker (still works, but noticeably less). Wonder if that transducer is still shorting a bit/losing power like before. Or maybe it's fine and the stainless drain pipe next to this transducer absorbs some energy?

IMG-3694.jpg
 
Last edited:

Davefr

Well-known member
Joined
Jan 7, 2010
Messages
11,847
Location
OR
So here's a puzzle---I installed the replacement timer, made sure the transducer near the tank leak was cleaned up, temporarily sealed the tank leak with waterproof tape, and tried a 45sec Alum Foil Test. This machine has 3 transducers--- on the foil, you can see that two are very strong, but the one near the leak that was arcing before (which was under the right side of the alum foil) is weaker (still works, but noticeably less). Wonder if that transducer is still shorting a bit/losing power like before. Or maybe it's fine and the stainless drain pipe next to this transducer absorbs some energy?

IMG-3694.jpg
Did you outgas the tank before starting the foil test. Outgassing should be done for 10-15 minutes whenever the bath is changed in order to increase the effectiveness. When I do a foil test I give it more time. (5 minutes min.) I'd suggest you outgas the tank and run 3-4 more foil tests. I guess it's possible that the transducer with the arcing has become out of tune with the output circuit. If that's the case you'll likely need to send it in for repair. Crest transducers can be replaced but they must be matched and mounting torque is critical. You might want to contact Crest support and see what they say.
 

BillK

Well-known member
Joined
Aug 24, 2006
Messages
9,361
Location
Beautiful Southern Maryland
Somehow I just cant see any type of epoxy or other sealer working long term. The ultrasonic "bubbles" will get into it and probably make it fail. I would wait till Monday and call Crest and ask their advice. I have one of their larger units and they have always been very helpful.
 
To avoid these ads, REGISTER NOW!
Top Bottom