Shortbed70
Member
Well I'm working on a truck (66 Chevy) and it needed two small patches on the outside skin of the door. Well lmc wants $40+ for a 1/4 skin and I didn't see paying that for two small patches soooo;
Step 1: I trace the panel onto the door and oriented it where it's resting place would be. I like to round the inside corners also, adds a little strength.
Step 2: I made a few lines to follow. Some make a grid but I've found a few simple lines give a starting point.
Step 3: Use a convex headed hammer and start on the middle line and work out by going side to side and hammer on a thin dense piece of wood to keep from galling the outside. The wood also makes the curve smooth. If you need a sharper curve concrete works well.
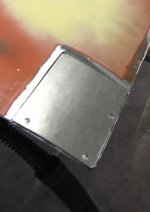
Step 4: Test fit the panel often an see where you need to adjust...
Step 5: Tack on slowly and after every few rounds of tacks use a cutoff wheel on edge to remove the top of tack. Saves on a lot of heat and going too far later.
Here's some pics in individual post from my phone!
Step 1: I trace the panel onto the door and oriented it where it's resting place would be. I like to round the inside corners also, adds a little strength.
Step 2: I made a few lines to follow. Some make a grid but I've found a few simple lines give a starting point.
Step 3: Use a convex headed hammer and start on the middle line and work out by going side to side and hammer on a thin dense piece of wood to keep from galling the outside. The wood also makes the curve smooth. If you need a sharper curve concrete works well.
Step 4: Test fit the panel often an see where you need to adjust...
Step 5: Tack on slowly and after every few rounds of tacks use a cutoff wheel on edge to remove the top of tack. Saves on a lot of heat and going too far later.
Here's some pics in individual post from my phone!