To avoid these ads, REGISTER NOW!

Cyclone Separator for Shop Vac, Compact Setup

gahrajmahal

Well-known member
Joined
Dec 12, 2008
Messages
2,519
Location
Cincinnati, Ohio
This thread has been edited due to all of the original photos being lost from Photo Bucket. Some of the comments are out of sequence, but the photos are now on the GJ server.

Hey all, I never was a fan of the typical round shop vac due to the unwieldy hose and wand that comes crashing down any time you are working around around it. We actually had a central vac installed in our house over 15 years ago and it is one of my most favorite purchases. The fine dust from vacuuming gets deposited outside, and the noisy vacuum is in the garage.

But everyone still needs a good shop vac for cleaning out the car and for those messy tasks you wouldn't dream of using a central vac for, like house remodeling and the dreaded drywall dust!

Our trusty round shop vac that came from my dad, was passed along to my son during his kitchen remodel. Now he can put up with that wand crashing to the floor when you walk by it!

It was during his remodel I bought this Rigid Tool box style vacuum. Hose
and cord are contained in a compartment, wand extensions clipped to the side. I often take my tools on-the-road when I am working on projects, and this vacuum is easy to transport and has great suction!

DSCN3986.jpg

DSCN3987.jpg

DSCN3988.jpg

DSCN3989.JPG

It was several years ago now, and the vacuum bags are often not available in the stores so I just buy them online.

The one dislike I have had with the Rigid vac is the hose. In order to be able to store it it has to compress to a short length. Great for storage, but when vacuuming the suction causes it to shorten up actually pulling quite strongly out of your hand and back to the unit. Really a pain say when vacuuming out the car. Also, like any shop vac, the performance really suffers when vacuuming up drywall dust, or being able to connect it to the vacuum port on a sander.

So I started researching how I could upgrade the hose and came up with one from Rockler.

DSCN3998.jpg

The new hose worked great when attached to my sander and also when working on an extended project. No more pulling hose!

But now I am back to the old problem of where to store the long hose? I have a two car attached garage for my work space (the Gahrajmahal) and keep two cars in there at all times, one being the 17 foot long barge in my avitar, so space is at a premium.

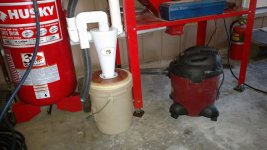
I was using the new setup with the sander on a drywall job and the larger bits tore the bag inside causing a massive plume of drywall dust into the room. That is when I decided I needed to try a cyclone separator to keep most of the dirt out of the bag. I did not want to have another round can and was hoping to get storage for that new 12 ft. hose. So, I took the hose into the big box stores with the idea of buying a tool box to convert to the cyclone container. Not wanting to spend too much money in case it did not work, I purchased a Chinese cyclone from Google http://www.banggood.com/High-Efficiency-Cyclone-Powder-Dust-Collector-Filter-Top-Quality-For-Vacuums-IA1-p-1028998.html?currency=USD&createTmp=1&utm_source=ebay&utm_medium=cpc&utm_content=cathy&utm_campaign=hg3-US&ebay

The box I ended up with was another Rigid item

DSCN4103.JPG

DSCN4102.JPG
 
Last edited:
To avoid these ads, REGISTER NOW!
OP
G

gahrajmahal

Well-known member
Joined
Dec 12, 2008
Messages
2,519
Location
Cincinnati, Ohio
After making sure the hose would fit inside (did this at the store) I found a flat spot to cut the hole and add the mounting bolts for the cyclone. I drilled and threaded the box lid so the 1/4-20 screws could be threaded into the plastic lid making it easy to fasten and unfasten the cyclone for storage. I will let the photos tell the tale about the cyclone box.

DSCN4016.jpg

DSCN4015.jpg

DSCN4011.JPG

The hose was the same size as the cyclone opening. I just connected temporarily with duct tape. Later I purchased a rubber plumbing "Keflex" connector that uses hose clamps.

DSCN4001.JPG

DSCN4013.JPG

DSCN4014.JPG

DSCN4004.jpg
 
Last edited:
OP
G

gahrajmahal

Well-known member
Joined
Dec 12, 2008
Messages
2,519
Location
Cincinnati, Ohio
If any of you have vacuum attachments you have made, or hack's you have made that include a cyclone, please feel free to post up a picture or two or a link to your post.
 

Marctrees

Well-known member
Joined
Mar 5, 2015
Messages
6,265
Location
TX/LA border - Toledo Bend
I'm curious, with the fine sheetrock dust, like how much falls in the cyclone box as compared to how much makes the trip to the filter bag?

I understand the cyclones do a great job with chunks and heavier particles, but that fine dust, pretty good also? Marc
 
OP
G

gahrajmahal

Well-known member
Joined
Dec 12, 2008
Messages
2,519
Location
Cincinnati, Ohio
Marctrees, I was skeptical too just how well it would keep out the fine dust so I gave it a good bit of abuse recently. I repaired 21 cracks in the walls and ceiling at a friend's house (I actually really hate drywall work and am not that good at it either). I sawed 3/4 wide openings the length of the crack, which was 24" on center at several places. I slid some 3/4 plywood in the opening so i could reinforce both sides with many drywall screws. I also added lots of screws along the length og the rafters or wall stud. I cut 2ft square openings out where two can lights had cracks. Then after taping and mudding I used the electric orbital sander with the vac and cylone attached. I sucked up all the large chunks and everything else I had spewed all over the room. It was starting to get heavy so I decided to empty it out. It was about 1/3rd full in the cyclone box, but the paper filter on the shop vac was sort of empty, so I just put it all back together without changing the paper filter. The photo shows it after I finished the job. Still the same bag and no dust on the round final filter. So, I would say the cyclone lives up to its reputation. I would put one together if I were you. It is definitely worth the effort.

Thanks for all the positive comments everyone! It is appreciated!
 
Last edited:

Denwood

Well-known member
Joined
Sep 22, 2014
Messages
4,180
Location
Thunder Bay, Ontario, Canada
Nicely done! With regard to the dust efficiency of the Dust Deputy (pretty much the same thing), I've been using it in the shop managing a lot of sanding dust. The vacuum ends with pretty much nothing in it..just a small amount of fine dust in between cyclone canister empties.

The stacking solution makes good sense. Surprised none of the players in this market have not sorted a compact cyclone shop vac yet...
 

csp

Well-known member
Joined
Mar 23, 2010
Messages
5,719
Location
Franktown, CO
Was out at a job site when I put this together the first time, so I just taped this junction together. The hose and cyclone are the same size (good for maximum particle size) I will find a piece of radiator hose or other to make this connection more permanent, but the tape actually worked pretty well.

I use a Fernco to attach the same size hose to the dust bag outlet on my miter saw.

402790_K_L.jpg


The stacking solution makes good sense. Surprised none of the players in this market have not sorted a compact cyclone shop vac yet...

Oneida has a dust deputy mount for the Festool vacs. Not exactly a compact unit, but it's the only company I'm aware of to incorporate the two into one unit that moves together instead of two pieces.
 
Last edited:

BearsFan315

Well-known member
Joined
Jun 12, 2014
Messages
689
Location
Portsmouth, VA
building a dust collection system for my media blast cabinet with the dust deputy. want to keep the separator and bucket with the cabinet at all times and only connect my 5g shop vac to it when i am using the cabinet.

plan to put the cabinet on a shelf and the bucket under it with easy access to connect vacuum and dump the bucket as needed.
 

mark11

Well-known member
Joined
Jul 8, 2013
Messages
135
Great job. I've got the Oneida dust deputy on my Festool vac and love it. The Rigid box is a great choice for your project.
 

tylerg1

Well-known member
Joined
Mar 28, 2014
Messages
173
I love it to, just been trying to figure out something like the ridged box but with the ability to see inside......
 

MarlynOC

Well-known member
Joined
Jan 6, 2017
Messages
2,158
Location
Warrington PA
Have been using the DD for years the regular way with a 5 gal vac and the bucket. But I definitely like your kit concept. The bucket, vac unit take up a lot of storage space and are a pain to move around.
 

dreamingmuscle

Well-known member
Joined
Dec 4, 2005
Messages
3,472
Location
Tryon Oklahoma
I bought one of those ridged vacuums at a yard sale last year for 10 bucks I love it. But I think I've used it more as a step stool while working on my truck than as a vacuum. I LOVE your dust collection system. I do believe that I'm going to have to use this idea.


Glen
 
To avoid these ads, REGISTER NOW!

ColoMid

Member
Joined
Nov 5, 2013
Messages
22
Location
Canton, Ga
I just finished adding a cyclone separator to the HF blast cabinet.
A test run of ten minutes with glass bead produced a cup of dust in the
separator bucket, but NOTHING in the vac! Previously I had to empty and
clean the vac filter often to keep the cabinet from blowing dust out the vent.
I'm very pleased with the performance.
RichD, Canton, Ga
 

Attachments

  • DustCollector.jpg
    DustCollector.jpg
    79.9 KB · Views: 223

csp

Well-known member
Joined
Mar 23, 2010
Messages
5,719
Location
Franktown, CO
it would be way easier to just get a shop vac hose coupler at the depot for a few bucks. no screws to mess around with.

It would if the shop vac coupler would stay attached to the miter saw, however that's not the case. Also assumes that the dust outlet of the miter saw is the same size as the coupler.

Yeah, I thought of that.;)
 

mike93lx

ALLIANCE MEMBER
Joined
Dec 9, 2013
Messages
37,384
Location
Richmond, VA
It would if the shop vac coupler would stay attached to the miter saw, however that's not the case. Also assumes that the dust outlet of the miter saw is the same size as the coupler.

Yeah, I thought of that.;)

Sorry i was referring to the op's need for a connection at the cyclone.
 
OP
G

gahrajmahal

Well-known member
Joined
Dec 12, 2008
Messages
2,519
Location
Cincinnati, Ohio
I did buy the Fernco plumbing cooler as csp recommended. It worked great (thanks) even when sanding the ceiling with my oscillating sander while standing on a ladder and pulling the whole rig by the hose occasionally.
 

Homerr

Well-known member
Joined
Mar 16, 2012
Messages
379
Location
Seattle, WA
I just finished adding a cyclone separator to the HF blast cabinet.
A test run of ten minutes with glass bead produced a cup of dust in the
separator bucket, but NOTHING in the vac! Previously I had to empty and
clean the vac filter often to keep the cabinet from blowing dust out the vent.
I'm very pleased with the performance.
RichD, Canton, Ga

Ditto! I like your hard plumbing connections.
 

Attachments

  • 20170123_181132.jpg
    20170123_181132.jpg
    151.2 KB · Views: 191
OP
G

gahrajmahal

Well-known member
Joined
Dec 12, 2008
Messages
2,519
Location
Cincinnati, Ohio
Hey all, I am repairing the Photo Bucket photos to this thread. Another member had saved this for later reference and was disappointed to find that in 2018 all the photos went away. There is a 7 photo limit per post when dropping them directly to the GJ server, so my posts are out of numerical order. I will add the grout attachment and other relevant photos following this addition. Sorry for the confusion. Will get back to it soon. Got to get to work.
Gahrajmahal...
 

BukitCase

Well-known member
Joined
Apr 11, 2017
Messages
1,075
Location
Oregon
I have 2 of the small plastic Dust Deputies set up, one vertical and one horizontal, plus I'm working on an all metal version for metal shop cleanup - all work as previously mentioned, UNTIL you make the mistake of picking up styrofoam peanuts - too large and light to follow the right path, they do a U-turn in flight and end up in the vacuum - pix are in the (presently absent) camera, I'll try to post later... Steve
 

dfiler2

Well-known member
Joined
Dec 15, 2014
Messages
2,858
Location
NW Minnesota
Thanks for doing this gahrajmahal, I probably never would have stumbled across this. I had been considering a dust collector system for saw dust but really needed something before I decided on a stationary system. I had a 6hp shop vac and decided to build a separator for it temporarily. It has worked so well I'm not sure I will do anything else except get a different vac for smaller jobs. I plan on running a loop of 4" pipe around the outside wall with several blast gates sometime this winter. Then I'll put that setup out in the cold storage area. I looked at a Dust Deputy and I think it works great for what you're doing but I decided to get this kit. I am amazed how well a separator works, I've been using it for about six months and the bag in the shop vac is still almost empty and I've emptied the barrel 4 or 5 times. I really like that cube vacuum and I think that's what I would like for a second unit.
 

Attachments

  • IMG_20180201_173823.jpg
    IMG_20180201_173823.jpg
    149.5 KB · Views: 123
  • IMG_20180201_175603.jpg
    IMG_20180201_175603.jpg
    138.5 KB · Views: 111
Last edited:
OP
G

gahrajmahal

Well-known member
Joined
Dec 12, 2008
Messages
2,519
Location
Cincinnati, Ohio
Dfiler2, you will love the "toolbox" style vacuum because you won't have the hose and wand constantly falling over. It is a bit of a pain to pack it away, but it is well worth it for how compact it is plus it has the same performance as a regular round shop vac. Wear your ear plugs though. It is not a $1000 festool quiet vac.
 
OP
G

gahrajmahal

Well-known member
Joined
Dec 12, 2008
Messages
2,519
Location
Cincinnati, Ohio
The Dust Catching Attachment

I have a project of replacing the grout in the kitchen tile. It is about 10-12 years old and has cracked and separated at several places. To minimize the dust cloud from my Fein ultrasonic trim tool I created a dust catcher to attach to the vacuum cyclone.

DSCN4006.jpg

Made from a clear plastic shoe container, I added self adhesive felt tape around the bottom acting as a gasket and eliminating any scratching. A rectangle hole with rounded corners was put in the bottom of the box. A plastic plumbing hub was matched up at the hardware store with the hose in tow. This one is a very tight fit.

DSCN4005.jpg

The ends of the box have 1/4" birch plywood reinforcement for the hose connecting port, and as a place to mount two 1" dia. round dowels giving you somewhere to rest your wrists on while using the dust containment box.

DSCN4007.jpg

Using the setup is very simple. The rectangular hole is large enough to see the carbide or diamond tipped half round blade as you make your way through the grout. The airborne dust gets sucked up by the rear port. After a length or two of the box, I usually turn off the grinding tool, remove the hose from the box and **** the removed grout from the tile gap so I can get remaining pieces.

DSCN4008.jpg

DSCN4010.jpg

To further enhance the dust contamination of my setup, I place the whole unit outside if the hose will reach through an open window or door.

IMG_1047.jpg

DSCN6301.JPG

Hey, where did you come from?
 
OP
G

gahrajmahal

Well-known member
Joined
Dec 12, 2008
Messages
2,519
Location
Cincinnati, Ohio
The first time I used the grout removing setup was over at my son's house. The setup worked great and I gave the "white glove test" to the countertops and other surfaces and the dust was imperceptible.

Getting over to my own house I wanted to make a few improvements. Mainly lighting. At my son's house I had my LED spot light shining through the box lighting the work.

DSCN4100.jpg

I had a few of those free Harbor Freight magnetic closet lights and I thought that might work good if I could replace the batteries which I had never done. A few tiny phillips screws and three new AAA batteries and some sanding of the corroded contacts and this one was back in business. Pretty bright too!

DSCN9033.JPG

I used some industrial velcro to attach it inside the box.

DSCN9036.JPG

DSCN9034.JPG

I also had been on the lookout for a way to connect the shop vac to the cyclone box and found it in the isles of IKEA. Unlike the Harbor Freight and other light duty nylon straps with hooks, the IKEA set ($7 for 2) has no hooks. One end is looped and sewn to the ratchet and the other free end goes through the slot, then ratchets tight. Worked great when I started my kitchen grout as I strapped the rig to a ladder outside the window so if the hose pulled on the cyclone it wouldn't fall 4 feet to the ground.

DSCN9037.JPG

DSCN9035.JPG

Now I just need to find some decent grout tools since the original Fein grinder finally is worn out. My first purchase (HF I believe) made it about 12" before slowing the pace. Turning it off I find the grit has already come off. A replacement from Home Depot didn't fare any better. Suggestions?
 

machsnell

Well-known member
Joined
Jun 12, 2010
Messages
942
Location
Northern Virginia
This is brilliant. I like it.

Curious in the grout removal blade also.

How wide are joints? I know a 4.5 diamond wheel will remove easily but then you would have some dust. And harder to control.

Sent from my SM-G930V using Tapatalk
 

Jim_No_Garage

Well-known member
Joined
Jan 15, 2011
Messages
3,301
Location
Millington NJ
I have 2 of the small plastic Dust Deputies set up, one vertical and one horizontal, plus I'm working on an all metal version for metal shop cleanup - all work as previously mentioned, UNTIL you make the mistake of picking up styrofoam peanuts - too large and light to follow the right path, they do a U-turn in flight and end up in the vacuum - pix are in the (presently absent) camera, I'll try to post later... Steve

This reminds me of a High School wood shop memory. At the end of the year they received their delivery of new supplies for the next year in huge boxes filled with foam peanuts.

The head of the industrial arts department suggested we use the central vac to get rid of the peanuts - so we did. Of course we filled up the 55 gallon drum and made it snow outside from all the peanuts. When we realized what had happened we shut the cyclone down and slunk away . . . .

Jim
 

myredracer

Well-known member
Joined
Nov 1, 2015
Messages
557
Location
Langley, BC
Here is my Dust Deputy setup on my blast cabinet. The vacuum is a Shop-Vac ash vacuum. I like it because it's compact, it's metal and it creates a crazy amount of suction. The black can is an ash canister I got off ebay. It too is metal (meant for hot ashes) and compact. Both the vac and canister fit nicely under the cabinet.

I've been using this for about a year now and it has gotten a real workout lately. I just opened the ash canister and it's about 2/3 full and the vacuum has almost zip in it. At first I thought the Dust Deputy was an overpriced gimmicky piece of plastic, but dang, it sure works great! Recommended!!

Can anyone tell me if the stuff below the Dust Deputy can be re-used by running it through a sieve or is it going to be mostly useless dust? Or maybe it's just time to go get another bag o' beads...
 

Attachments

  • DSCF0311.jpg
    DSCF0311.jpg
    137.4 KB · Views: 51
  • DSCF0312.jpg
    DSCF0312.jpg
    145.9 KB · Views: 58
Last edited:
OP
G

gahrajmahal

Well-known member
Joined
Dec 12, 2008
Messages
2,519
Location
Cincinnati, Ohio
Hey Myredracer, back when I had a blast cabinet, I would re-use the sand after sifting out the rust and crud but it would work only half as well. This was OK if I could not get to a store for more sand, but when the job takes twice as long, I preferred to keep plenty of replacement on hand. Dig your setup!
 
To avoid these ads, REGISTER NOW!
Top Bottom