To avoid these ads, REGISTER NOW!

Between 705 & 1200 SQ/FT "DaBarn"

Workspaces between 705 and 1200 squarefeet.
OP
B

Bears Fan

Well-known member
Joined
Jan 26, 2012
Messages
3,437
Location
Indiana
That's exactly what I did for insulation after closed cell between the studs. You're going to enjoy the heating and cooling efficiency better then your house!


Power Sedan

I'm real happy with the insulation job, I can't believe the difference it has made! I could hear someone whispering outside the barn before now its like walking into a sound booth :thumbup:
 
Last edited:
To avoid these ads, REGISTER NOW!

bcoke

Well-known member
Joined
Mar 8, 2013
Messages
341
Location
Pawlet Vermont
This is exactly how I lit my 24x48 wood workshop,36x40 barn with loft, house basement and 32x30 attic..........In the attic I ran wire above each truss and had the wires hang down below the trusses.......then insulated.......put up sheetrock with wires poking through.....than used a grey plastic round box with an offset hole to allow the wires to protrude and two screw holes to secure the box to the cieling a plastic lamp holder [wired in series to a switch] and a curly bulb........neat looking and @$6 per light.........24 in attic on two switches = 2400 watts of light for 552 watts of power great light cheap cost <$150 in the other buildings same MO but surfaced mounted boxes with plastic condiut between the boxes.............Cheap easy and not too bad to look at but great lighting [I overdid the amount of lights but better to many rather than not enough ...Bcoke!!!!!http://www.garagejournal.com/forum/...nt.php?attachmentid=519447&stc=1&d=1453648183
 

Attachments

  • P1120802.jpg
    P1120802.jpg
    140.4 KB · Views: 586
  • P1120804.jpg
    P1120804.jpg
    143.5 KB · Views: 488
OP
B

Bears Fan

Well-known member
Joined
Jan 26, 2012
Messages
3,437
Location
Indiana
This is exactly how I lit my 24x48 wood workshop,36x40 barn with loft, house basement and 32x30 attic..........In the attic I ran wire above each truss and had the wires hang down below the trusses.......then insulated.......put up sheetrock with wires poking through.....than used a grey plastic round box with an offset hole to allow the wires to protrude and two screw holes to secure the box to the cieling a plastic lamp holder [wired in series to a switch] and a curly bulb........neat looking and @$6 per light.........24 in attic on two switches = 2400 watts of light for 552 watts of power great light cheap cost <$150 in the other buildings same MO but surfaced mounted boxes with plastic condiut between the boxes.............Cheap easy and not too bad to look at but great lighting [I overdid the amount of lights but better to many rather than not enough ...Bcoke!!!!!http://www.garagejournal.com/forum/...nt.php?attachmentid=519447&stc=1&d=1453648183

bcoke

Thanks for checking out my barn! I would like to use some vintage light fixtures eventually like the picture I added below. With some galvanized steel on the ceiling, It should give it a little bit of a vintage look. I would like to go with a little higher watt bulb too, my eyes just aren't what they used to be :lol:

Retro_zpsbqzlg9h9.jpg
 
Last edited:
OP
B

Bears Fan

Well-known member
Joined
Jan 26, 2012
Messages
3,437
Location
Indiana
Bears Fan,

Great progress, Great barn. Absolutely jealous of the space around your house :thumbup:
Must be a great place to live.
I'm really curious of what you're going to do with the inside.


Sunbimmer


Thanks for checking out my barn and all the compliments! I lived all my life here in northern Indiana in the same small town, I have 2 1/2 acres of land and enjoy it very much, just my little piece of the American Dream...For the inside I will use 1/2" OSB on the walls and galvanized steel on the ceiling, stay tuned in I will show more :thumbup:
 

JC23

Well-known member
Joined
Dec 31, 2009
Messages
11,718
Location
Northcoast
bcoke

Thanks for checking out my barn! I would like to use some vintage light fixtures eventually like the picture I added below. With some galvanized steel on the ceiling, It should give it a little bit of a vintage look. I would like to go with a little higher watt bulb too, my eyes just aren't what they used to be :lol:

Retro_zpsbqzlg9h9.jpg

Make sure you check the lights for their max wattage. They may need to be rewired for bigger lights. It's an easy fix. I did it on two, outside lights.
 

jumpstart

Well-known member
Joined
Jan 11, 2009
Messages
399
Location
Central MA
Very nice job. Great sense of accomplishment when you can pull off most of the work yourself. When I built mine, I only had someone assist with putting up the trusses and did the rest myself. Nothing better than seeing the piles of lumber and steel getting smaller and smaller.

Well done!!
 
OP
B

Bears Fan

Well-known member
Joined
Jan 26, 2012
Messages
3,437
Location
Indiana
Make sure you check the lights for their max wattage. They may need to be rewired for bigger lights. It's an easy fix. I did it on two, outside lights.


JC23

Thanks for checking out the barn! Thanks for the heads up on the specs, I will have to watch for that, I'm thinking of maybe going with some 85 watt CFL's.
 
OP
B

Bears Fan

Well-known member
Joined
Jan 26, 2012
Messages
3,437
Location
Indiana
Very nice job. Great sense of accomplishment when you can pull off most of the work yourself. When I built mine, I only had someone assist with putting up the trusses and did the rest myself. Nothing better than seeing the piles of lumber and steel getting smaller and smaller.

Well done!!


jumpstart

Thanks for the kind words, It does make you feel good to do it yourself. That's just the way I was raised, I spent a lot of my youth helping my dad do it all, we never had to many service guys showing up to our house, you just fixed it yourself! I only hired out the overhead door, the insulation job and the gutters, I learned a lot along the way :)
 
OP
B

Bears Fan

Well-known member
Joined
Jan 26, 2012
Messages
3,437
Location
Indiana
Interior316Custom_zpsb6438d09-1.jpg


I had Momper Insulation install 24" foam air deflectors in the eaves as well, this is a must if I blow insulation in the attic, I'm still undecided on what I will do in the attic yet :headscrat 
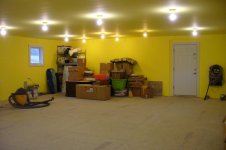
You can also see in this picture the Simpson strong-tie hurricane tie downs I installed on the trusses where they meet the top plate...
 
OP
B

Bears Fan

Well-known member
Joined
Jan 26, 2012
Messages
3,437
Location
Indiana
From one BearsFan to another, looks great, and coming along nicely !!

Spray insulation looks great, and should serve you well...


BearsFan315

Thanks for checking out my Barn and the kind words! How did you become a Bears Fan being from Virginia? I went in and was checking out your profile, Have you decided on what kind of building your going to put up?
 

UpNorther

Well-known member
Joined
Jan 20, 2016
Messages
318
Location
Brainerd, MN
Great build, enjoyed it from beginning to end.
I have to compliment you on your lawn to, looks very nice !

I really liked following your insulation of it. I just got the shell up on my pole barn, and was already thinking towards the direction of what you did. Spray first, then fiberglass batts over that. After seeing what you did, that pretty much clinched the decision for me.
looking forward to seeing more of your build, and subscribed.
 

Duker

Well-known member
Joined
Sep 25, 2010
Messages
10,861
Location
Livingston, TX
Bears Fan, loved checking out the build. Us Texans take for granted what it's like to build in the winter! Looking forward to seeing the progress.


Sent from my iPad using Tapatalk
 

don long

Well-known member
Joined
Mar 31, 2012
Messages
8,841
Location
southern california
Hi Bears fan
Have a few minutes before leaving for the roadster show so I thought I would check in and catch up.

Nice progress on dabarn. That insulation job looks like it would be good in alaska. lol All is looking great and I like the light idea Happy hunting.

Don
 
OP
B

Bears Fan

Well-known member
Joined
Jan 26, 2012
Messages
3,437
Location
Indiana
Machinist%20Vise%203_zpswsbqu1cf.jpg


I got side tracked with a little project...I was at a sale the other day and spotted this old machinist vise, I knew what it was right away, after looking it over close, it appeared to be in pretty good shape other then the surface rust, so I asked how much they wanted for it and they said $20.00 I came back with how about $10.00 The kind gentleman said okay :D
 

wasfast

Well-known member
Joined
Apr 10, 2014
Messages
874
Location
San Diego CA
Who was the manufacturer of that vice? I've seen lots of Kurt's for milling machines and various others for drill presses but never seen one quite like that. Nice score.......deserves a YOU ****:)
 
OP
B

Bears Fan

Well-known member
Joined
Jan 26, 2012
Messages
3,437
Location
Indiana
Machinist%20Vise%202_zpsd5j3crqi.jpg


I was real excited with my new purchase! I stopped on the way home at the local Kroger store and picked up a gallon of apple cider vinegar $2.50, so I'm now $12.50 into this project :shocking:
 
OP
B

Bears Fan

Well-known member
Joined
Jan 26, 2012
Messages
3,437
Location
Indiana
Machinist%20Vise%204_zpsxj7szsys.jpg


I just pulled the handle off and dropped it in a 5 gallon bucket and poured in the apple cider vinegar, I was real careful not to shake it, stirred not shaken :bounce: I left it in the vinegar for 24 hours then I pulled it out and tore it all apart and put all the pieces back into the vinegar for another 24 hours...
 
To avoid these ads, REGISTER NOW!
OP
B

Bears Fan

Well-known member
Joined
Jan 26, 2012
Messages
3,437
Location
Indiana
Machinist%20Vise%205_zpsee7mpjy6.jpg


After soaking in the vinegar I pulled out all the parts and scrubbed them down with scotch brite pads and this is how it turned out :thumbup:
 
OP
B

Bears Fan

Well-known member
Joined
Jan 26, 2012
Messages
3,437
Location
Indiana
Machinist%20Vise%206_zpsvnuo0q27.jpg


I added a little machine gray paint to the one end, It looked liked the original paint may have been green?
 

Power Sedan

Well-known member
Joined
Nov 15, 2015
Messages
287
Location
SE Wisconsin
Wow, a Brown & Sharpe, with the engravement Providence RI, USA! You did very well, truly a gem, in my eyes, as machinist myself! I love the original old school tooling equipment. The quality then still surpasses today's manufacturing tooling accessories.
 
OP
B

Bears Fan

Well-known member
Joined
Jan 26, 2012
Messages
3,437
Location
Indiana
Machinist%20Vise%207_zpskbfmhub4.jpg

After $12.50 cents and some elbow grease here's what I ended up with. A Brown & Sharpe NO. 1 Machinist vise, Its 8" long 4" wide and 2 1/2" Tall. It operates as smooth as if it was brand new. It has one hole in it where some one drilled into it :( I thought about welding it up and grinding it down, but I can live with it :)
 
Last edited:
OP
B

Bears Fan

Well-known member
Joined
Jan 26, 2012
Messages
3,437
Location
Indiana
Great build, enjoyed it from beginning to end.
I have to compliment you on your lawn to, looks very nice !

I really liked following your insulation of it. I just got the shell up on my pole barn, and was already thinking towards the direction of what you did. Spray first, then fiberglass batts over that. After seeing what you did, that pretty much clinched the decision for me.
looking forward to seeing more of your build, and subscribed.


UpNorther

Thanks for checking out my barn, Thanks for the compliments. I really like how my insulation job turned out...I liked your wood shop too, that will be nice to have it in your barn :thumbup:
 
OP
B

Bears Fan

Well-known member
Joined
Jan 26, 2012
Messages
3,437
Location
Indiana
Bears Fan, loved checking out the build. Us Texans take for granted what it's like to build in the winter! Looking forward to seeing the progress.


Sent from my iPad using Tapatalk


Duker

Thanks for checking in, I do like it in Indiana but we do have some cold winters up here :eyecrazy: I really liked checking out how you put all of your equipment on casters :thumbup:
 
OP
B

Bears Fan

Well-known member
Joined
Jan 26, 2012
Messages
3,437
Location
Indiana
Hi Bears fan
Have a few minutes before leaving for the roadster show so I thought I would check in and catch up.

Nice progress on dabarn. That insulation job looks like it would be good in alaska. lol All is looking great and I like the light idea Happy hunting.

Don

Don

Thanks for checking in, My insulation job is awesome :thumbup: I'm excited to here about your time at the roadster show in Pomona...
 
OP
B

Bears Fan

Well-known member
Joined
Jan 26, 2012
Messages
3,437
Location
Indiana
Who was the manufacturer of that vice? I've seen lots of Kurt's for milling machines and various others for drill presses but never seen one quite like that. Nice score.......deserves a YOU ****:)


wasfast

Thanks for checking out the barn, My first official Garage Journal "YOU ****", thanks! After I got the rust off my vise I could see that its a Brown & Sharpe, great vise in great condition and at a great price :thumbup:
 
OP
B

Bears Fan

Well-known member
Joined
Jan 26, 2012
Messages
3,437
Location
Indiana
Wow, a Brown & Sharpe, with the engravement Providence RI, USA! You did very well, truly a gem, in my eyes, as machinist myself! I love the original old school tooling equipment. The quality then still surpasses today's manufacturing tooling accessories.


Power Sedan

Thanks for stopping back! The vise turned out better than even I thought it would, You can't by quality like this today...It operates as good as new :thumbup:
 

Power Sedan

Well-known member
Joined
Nov 15, 2015
Messages
287
Location
SE Wisconsin
Power Sedan

Thanks for stopping back! The vise turned out better than even I thought it would, You can't by quality like this today...It operates as good as new :thumbup:

What's really unique, you still have the original handle. I've seen several with aftermarket handles (B&S machinist 6" vice) with far more abused condition sell for $200-$300. That seller had absolutely no idea of the value.

I purchased a 2 1/2" Kingman magnetic sine bar at a flee market ($20) several years ago in excellent condition. Not only hard to come across, but usually in great condition run $140-180.
 

quicknova

Member
Joined
Nov 25, 2012
Messages
20
Location
Bethlehem Pa
Interior33Custom_zps25502c7e-1.jpg


I contacted Momper Insulation out of Fort Wayne Indiana and got a estimate. I went with 1 1/2" spray urethane R-10 foam on all four walls and R-19 fiberglass batts then covered with visqueen..


What did the spray foam cost? I would like to do mine but have heard quite a spread in costs..
 
OP
B

Bears Fan

Well-known member
Joined
Jan 26, 2012
Messages
3,437
Location
Indiana
Insulation_zps51pykzs7.jpg


quicknova

I felt a little weird posting this so I cropped it so only part of my estimate was showing, Sorry I don't have a itemized bill, this is for everything listed on the estimate and they done a great job. The barn is 30x40x12 so quite a large area.

This is just my personnel opinion and experience, for anyone putting up and insulating a barn if you can spare the extra cost of foam I suggest you do it, you will be so happy with it and it will save you money in heating costs down the road.

The foam has so many advantages, first of all they sprayed in every single little crack and crevasse, second it also acts as a bonding agent and strengthens your entire structure, third it is a good insulator and four it acts as a great sound deadener :thumbup:
 
Last edited:

Kburk09

Well-known member
Joined
Jul 10, 2013
Messages
69
Location
Kansas
Ive Been interested in putting up a pole building in KS for a while now. The cost savings over stick built and the amount of work you can DIY is pretty amazing. Thanks for showing us your build.
 
OP
B

Bears Fan

Well-known member
Joined
Jan 26, 2012
Messages
3,437
Location
Indiana
Ive Been interested in putting up a pole building in KS for a while now. The cost savings over stick built and the amount of work you can DIY is pretty amazing. Thanks for showing us your build.


Kburk09

Thanks for checking out my barn and the compliments! I enjoyed doing the work myself and you get a great deal of satisfaction from DYI, I made mistakes along the way, but I sure have gained a wealth of knowledge on pole barns along the way...
 
OP
B

Bears Fan

Well-known member
Joined
Jan 26, 2012
Messages
3,437
Location
Indiana
Interior%203%2032%20Custom_zpsmi4jcemh.jpg


Got started with putting up the 1/2" OSB, Had a good friend stop over to help out, Here is a shot of the south east corner, I had several things to trim around so this corner took a while, I have several outlets, light switch's and wiring to deal with. I even mounted the TV bracket, I will be adding a desk, TV and refrigerator here in this area :thumbup:
 
OP
B

Bears Fan

Well-known member
Joined
Jan 26, 2012
Messages
3,437
Location
Indiana
Interior335Custom_zpsd1c5c953-1.jpg


Got carried away on the OSB install and didn't get a lot of pictures, Once I got around the first corner things went really fast, not much to trim around except for the power outlets, I'm just standing the pieces vertically and shimming them up off the floor. I'm using 2 1/2 drywall screws to attach the OSB.

I got a neighbor that works at the local lumber yard and he runs their mold shop, "its good to know people" He ran me the trim for my barn, I will be running a 4" piece around the base and a 2" piece over the seam where the first 8' piece of OSB and the 4' piece meet, then when the ceiling is finished I will run another 2" piece around the top. I will be painting the trim a dark blue color.

That stack of OSB is getting smaller :thumbup:
 

Homebody

Well-known member
Joined
Dec 14, 2007
Messages
1,347
Location
Northern Illinois
That's looking great!
In hindsight I wish I had done my small shop with foam but I just don't remember seeing much about it 12 years ago.

Are you painting the OSB also or just the trim?
 
To avoid these ads, REGISTER NOW!
Top Bottom