To avoid these ads, REGISTER NOW!

Dance Hall Redux

Jettback50

Well-known member
Joined
Feb 28, 2010
Messages
55
Location
Olympia, WA
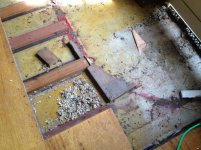
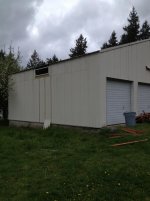
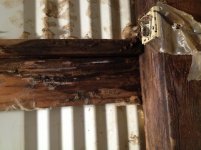
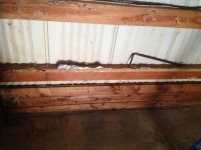
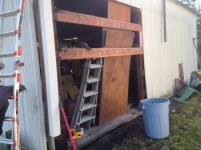
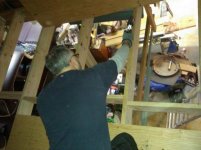
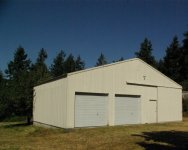
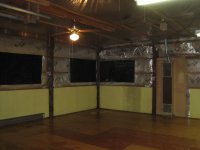
I finally have the opportunity to work indoors. I am moving into an old steel pole barn that was used by the original owners to host county Square Dances for 20 years. The concrete floor is covered with removable wood panels to create the dance floor.

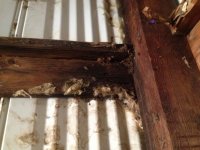
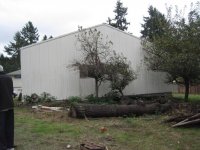
This place needs some work. There are leaks, not enough outlets, only one window, and is ugly as anything. It does have a pretty good electrical system, gas for heat, and the bones are good so it is a very good starting point.

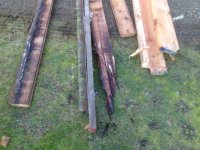
I am thinking of painting, fixing the roof and all the leaks, finish insulation, run 220V, add a bathroom and wash sink, some windows, and a front façade.
 

Attachments

  • Shop B.jpg
    Shop B.jpg
    97.3 KB · Views: 207
  • Shop A.jpg
    Shop A.jpg
    88.9 KB · Views: 172
  • Shop C.jpg
    Shop C.jpg
    137.4 KB · Views: 172
  • Shop D.jpg
    Shop D.jpg
    146.8 KB · Views: 188
  • Shop E.jpg
    Shop E.jpg
    148.9 KB · Views: 289
  • Shop F.jpg
    Shop F.jpg
    140.7 KB · Views: 309
  • Shop G.jpg
    Shop G.jpg
    141.6 KB · Views: 301
To avoid these ads, REGISTER NOW!

crazytrain

Well-known member
Joined
Mar 4, 2011
Messages
1,550
Location
Amish Country, Pa
So when's the next HO DOWN? :lol_hitti


Looks like that building has a lot of potential. Do you have any plans to recycle the panels on the floor to cover the walls or ceiling? Looks great please keep us posted as work moves forward. :)
 

Kevin54

MEMBER EMERITUS
Joined
Jan 12, 2005
Messages
29,341
Location
Urbana, Ohio
So when's the next HO DOWN? :lol_hitti


Looks like that building has a lot of potential. Do you have any plans to recycle the panels on the floor to cover the walls or ceiling? Looks great please keep us posted as work moves forward. :)

That was my first thought also. You know that there is enough to do the ceiling as it's the same sq. footage. It may give you a real good start on the walls. Or if the concrete is like new on the floor, you may just want to leave it there until you get everything else finished. It doesn't look bad for a floor.
 
OP
J

Jettback50

Well-known member
Joined
Feb 28, 2010
Messages
55
Location
Olympia, WA
You know, I didn't even think of that! That is a great idea! The floor it plywood that is stained and coated and mounted on some bed to get it off the concrete, 2x4 I think. I get access to the place next week. I want to put a floor up in the rafters for a loft storage area so that might just work out perfect.

Thanks guys!
 

Camper

Well-known member
Joined
Apr 21, 2011
Messages
183
Location
NE Pa
Ok...I may be a bit slow today but what is the slider covering ??
A third BIGGER door ???
 
OP
J

Jettback50

Well-known member
Joined
Feb 28, 2010
Messages
55
Location
Olympia, WA
The slider is a 11' x 12' door for trailer or RV. I like sliders but don't like that it has to cover the man door and half of the roll up. I like Ryan's idea of building carriage doors and the place he used is local to me. I may use the slider on the side for better access to the work area.
 
OP
J

Jettback50

Well-known member
Joined
Feb 28, 2010
Messages
55
Location
Olympia, WA
It has been a little while before I was able to return to this project. Working on pulling up the dance floor. Man, this guy was serious! 7 joists per sheet and nail every inch! All ring shank so they don't pull out and a finish nail at the end of each row. Under each joist, two strips of 30lbs tar paper and then plastic.

This is very is very slow going.

Also took some time out to find a new work table. The lower support panel was damaged so out it went I will replace it with some kind of cross tie/ kick stand and a shelf.

I also had to start moving some parts in. Can't always wait until just the right time or everything gets done.
 

Attachments

  • IMG_0252.jpg
    IMG_0252.jpg
    136.2 KB · Views: 117
  • IMG_0238.jpg
    IMG_0238.jpg
    139.8 KB · Views: 138
  • IMG_0167.jpg
    IMG_0167.jpg
    148.2 KB · Views: 1,262
Last edited:
OP
J

Jettback50

Well-known member
Joined
Feb 28, 2010
Messages
55
Location
Olympia, WA
Looks like there have been some un-invited guests in the past. Also found a large nest of small ants by the fuse box so all that insulation will be going.
 

Attachments

  • IMG_0239.jpg
    IMG_0239.jpg
    148.7 KB · Views: 161
Last edited:

Kevin54

MEMBER EMERITUS
Joined
Jan 12, 2005
Messages
29,341
Location
Urbana, Ohio
attachment.php


Nice C10 :thumbup::thumbup: '71 or '72?
 

ZRX61

Well-known member
Joined
Aug 15, 2006
Messages
28,716
Location
Solar Blight Valley, SoCal
Also found a large nest of small ants by the fuse box so all that insulation will be going.
2tbs of borax
1tbs sugar
+ enough baking soda to make a thick paste. put it in a small tin can (catfood can is ideal) & put it by the nest. Ants will take it back to the nest & they'll all be dead within 24 hours.
 
OP
J

Jettback50

Well-known member
Joined
Feb 28, 2010
Messages
55
Location
Olympia, WA
There has been a lot of work but not a lot to look at yet. Pulling insulation and put in the first Clerestory window on the south side.

Built the frame and pulled off the siding to mount the window and just started raining as the flashing went on and rushed to put the siding back on. Here is a shot of the view out of the new hole. Well, from up on a ladder.

Did pretty good about materials. Used the sleepers from the dance floor for the window frame, tar paper from under the sleepers, nails from a garage sale 2 years ago, and a window from Habitat store. Reused and recycled as much as possible.
 

Attachments

  • IMG_0258.jpg
    IMG_0258.jpg
    147.3 KB · Views: 61
  • IMG_0262.jpg
    IMG_0262.jpg
    141.5 KB · Views: 56
OP
J

Jettback50

Well-known member
Joined
Feb 28, 2010
Messages
55
Location
Olympia, WA
Had a little helper stop by. She was very interested in what was going on...for about a minute.

After the first section was cleaned, used a 2" foam insulation to prevent more bugs and water, then built a 2x4 frame to mount a water proof recycled PVC panel on the top before putting up a shelving unit.

Working the way down the wall, found more bugs, every kind of spider (at least 12 different kinds) and in the corner was a large nest of carpenter ants! Looks like the damage is limited to the purlins and not the treated beams.
 

Attachments

  • IMG_0270.jpg
    IMG_0270.jpg
    154.3 KB · Views: 72
  • IMG_0265.jpg
    IMG_0265.jpg
    146.3 KB · Views: 56
  • IMG_0266.jpg
    IMG_0266.jpg
    135.2 KB · Views: 51
  • IMG_0293.jpg
    IMG_0293.jpg
    142.3 KB · Views: 74
  • IMG_0292.jpg
    IMG_0292.jpg
    141.9 KB · Views: 75
  • IMG_0291.jpg
    IMG_0291.jpg
    138.3 KB · Views: 60
OP
J

Jettback50

Well-known member
Joined
Feb 28, 2010
Messages
55
Location
Olympia, WA
Have been working on the house and other items that need my attention including trying to get enough money to keep the projects going. Working on a 10' section at a time, all of the purlins were replaced in the last section on the South wall. Was able to frame and install windows.

Put another slider window at the 4' level for natural light over the workbenches and to be able to get some fresh air in when working with some nasty stuff.

Put together a small tall bench out of some of the scraps from the old dance floor and an old door from the former utility room of the house.


Did some wiring that I will do into better detail later but the short is added 8 outlets into the workbench corner and some upper runs for lights.

With the changing weather and other project there is a lot of stuff jammed in here before I think it is ready so just have to work around as I go.
 
OP
J

Jettback50

Well-known member
Joined
Feb 28, 2010
Messages
55
Location
Olympia, WA
The pour in the back of the shop was done very poorly and looks like the forms may have given out before it set. There was about a 1" gap between the concrete and the batten boards. This left a very thin patch that was crumbling and letting in every known beast onto the dance floor.

After chipping out the patch, set in a new PT T&G 2x6 and then put a PT 2x4 face flat on the floor and screwed it in from outside. Then caulked all the seams from every angle possible. Filled with insulation and put up the framing for the panels to follow. Started the wiring adventure.

This will be the workbench area and now has 4 quadblock outlets and a 220v just about the future bench on two different circuits.
 

Attachments

  • Dance Hall Shop (24) (900x675).jpg
    Dance Hall Shop (24) (900x675).jpg
    71.8 KB · Views: 37
  • Dance Hall Shop (25) (1024x768).jpg
    Dance Hall Shop (25) (1024x768).jpg
    75.4 KB · Views: 32
To avoid these ads, REGISTER NOW!
OP
J

Jettback50

Well-known member
Joined
Feb 28, 2010
Messages
55
Location
Olympia, WA
Lower is clad in Galv panels and the upper is sections on the old dance floor. It is thick and will allow me to mount just about where ever I want.
 

Attachments

  • Dance Hall Shop (29) (1280x960).jpg
    Dance Hall Shop (29) (1280x960).jpg
    142.9 KB · Views: 22
  • Dance Hall Shop (30) (1280x960).jpg
    Dance Hall Shop (30) (1280x960).jpg
    142.1 KB · Views: 29
OP
J

Jettback50

Well-known member
Joined
Feb 28, 2010
Messages
55
Location
Olympia, WA
Jumped over to the opposite corner (NE) to take a look into another leak that the roofers who came in to seal the all the nails in the sheet roof and replace the panel where the old stack penetrated roof for the broken furnace.

Pulled off another 10'x12' of wet critter bedding and pulled back the sheeting to find rot on this corner just like the other. Replace all the purlins up to the roof. Problem here was water coming in at the top of the corner trim, roof edge flashing too short, and opening at the top of the slider trim. New flashing, flexible flashing, and tightening up the gaps would take care of that.
 

Attachments

  • Dance Hall Shop (34) (1280x960).jpg
    Dance Hall Shop (34) (1280x960).jpg
    138.2 KB · Views: 33
  • Dance Hall Shop (33) (1280x960).jpg
    Dance Hall Shop (33) (1280x960).jpg
    149.1 KB · Views: 26
  • Dance Hall Shop (32) (1280x960).jpg
    Dance Hall Shop (32) (1280x960).jpg
    142.7 KB · Views: 26
  • Dance Hall Shop (31) (1280x960).jpg
    Dance Hall Shop (31) (1280x960).jpg
    146.2 KB · Views: 30
OP
J

Jettback50

Well-known member
Joined
Feb 28, 2010
Messages
55
Location
Olympia, WA
Came across a cool find at the last swap meet. Gaffer's ties for rigging on movie sets. These came from 20th Century Fox in Hollywood and were used up until the 1960's. Best idea so far is to turn them into drawer pulls but I would like to have more of them cast. Have to see if I can find someone who would be able to make them.

Took a break from the walls to get a little more working space and build a loft. May add more sections later, first one is about 12' wide and 10' deep. Overbuilt it a bit to help support the extra weight and had to deal with the old building being out of square and beams that are cupped, twisted, or bent into place. Laying down the deck came one of the supports that was up about 5/8" and planed it down flush so the floor could lay secure.

Got all of the joists and supports up myself and had a buddy come over for a few hours to help get the floors up and well, down. Then I laid down a good bead of adhesive to tie it all together.

The extra space is going to be nice.
 

Attachments

  • Dance Hall Shop (35) (1280x960).jpg
    Dance Hall Shop (35) (1280x960).jpg
    125.2 KB · Views: 66
  • imagejpeg_0 (2).jpg
    imagejpeg_0 (2).jpg
    57.8 KB · Views: 37
  • imagejpeg_0 (1).jpg
    imagejpeg_0 (1).jpg
    58.8 KB · Views: 36
  • imagejpeg_0.jpg
    imagejpeg_0.jpg
    57.1 KB · Views: 35
  • S__44C0.jpg
    S__44C0.jpg
    57 KB · Views: 31
  • Dance Hall Shop (36).jpg
    Dance Hall Shop (36).jpg
    131.2 KB · Views: 31
Last edited:

rixtrix1

Well-known member
Joined
Aug 25, 2013
Messages
3,010
Location
Chandler, AZ (from west NE)
Nice work on the ol dance hall. What kind of car is that on the left of your panoramic picture of the inside? Looks familiar but the distortion makes it hard to figure out.
 

Kiwi Tinbender

Active member
Joined
Dec 13, 2013
Messages
28
Location
Vancouver, WA
I have a contact for casting your `drawer pulls`.He casts and patterns Speed Equipment down here....Imperial is the brand name. May be able to google it, but I could put you in touch if you want....
 

rubberrodder

Well-known member
Joined
Jul 6, 2007
Messages
616
Location
Tacomatose Wa.
Jettback50,
I was wondering where you went! Good to see you're still in the pacific north west. Is that the same truck you had before with a black paint job? It looks good !
 
OP
J

Jettback50

Well-known member
Joined
Feb 28, 2010
Messages
55
Location
Olympia, WA
Fit gutters and downspouts to stop the wet rot getting a hold again.

It is in the plan. Once I get all the structure repaired and weather-tight. Think it will help.

I have a contact for casting your `drawer pulls`.He casts and patterns Speed Equipment down here....Imperial is the brand name. May be able to google it, but I could put you in touch if you want....

Yes, would like to find out more about that!

that is a great barn
I think you can fill it up with no problem

jan

You know it!

Jettback50,
I was wondering where you went! Good to see you're still in the pacific north west. Is that the same truck you had before with a black paint job? It looks good !

Still here just moved south. Same year Chev truck but this is a CST. Haven't seen you for a while. We need to get together when you get a day off!

looks good ,, nice chevy also:thumbup:

Thanks!
 
OP
J

Jettback50

Well-known member
Joined
Feb 28, 2010
Messages
55
Location
Olympia, WA
Once the floor was down started on a railing. This was the prototype. Very secure but too short to feel safe when moving around up top. Wanted it to be low enough to have light and pass larger items over the side.

Decided on going with more of a "code-based" railing, which is min 36" tall. The second version has uprights of 35.5" plus a top and bottom plate so total is 38.5." Much safer.


OP
J

Jettback50

Well-known member
Joined
Feb 28, 2010
Messages
55
Location
Olympia, WA
Found this little guy up in the rafters under a bunch of other stuff. A hold over from the hoedown days. Rope pull with wheels to pull the tikes around.
 

Attachments

  • IMG_0697 (1024x768).jpg
    IMG_0697 (1024x768).jpg
    122.2 KB · Views: 9
OP
J

Jettback50

Well-known member
Joined
Feb 28, 2010
Messages
55
Location
Olympia, WA

Did finish up the loft, railing, and even a load door. Spent a little extra time to get a bit artistic. Like how it came out. Don't get a chance to use this style on the house so it is a nice change.


Had a crazy blast of weather over the last month and now snow! Bet the 'islander' was freezing his rocks off...


Then took enough time off to celebrate my birthday with some friends and take in some roller derby. What a blast! Going to have to check out some of the other teams in the near future!


After that restored a vintage shop light with new electronic ballast and end sockets. Works like a charm.
 
To avoid these ads, REGISTER NOW!
Top Bottom