To avoid these ads, REGISTER NOW!

Deburring 2.25" diameter holes in steel

tarbellb

Well-known member
Joined
Apr 17, 2011
Messages
5,809
Location
Oregon
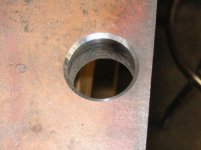
Looking for suggestions on how to deburr a laser cut edge in some .25" AR500 steel plate holes?

Picked up a piece of scrap for a project and it has a bunch of holes that are just sharp enough that I want to knock them down to be finger friendly.

What tools besides hand filing could I use quickly and effectively?

I thought about using a cone stone, but they max out at 2" it seems, I need 2.25"+?

Also maybe a pipe deburring tool like Ridgid?

Ideally its something I can chuck up in a 1/2" hand drill, or maybe a varispeed angle grinder (5/8")?

2a0m4ao.jpg


r10w74.jpg
 
To avoid these ads, REGISTER NOW!
OP
T

tarbellb

Well-known member
Joined
Apr 17, 2011
Messages
5,809
Location
Oregon
Good suggestion Whowhatnow, I actually have the Shaviv version. I would really like to not use that on this AR500 plate.

cvairwerks- can you elaborate? Do you mean use a large angle grinder with soft backing pad to cup inside? Or use a 7/9" stone?
 

yaidunno

Well-known member
Joined
Feb 10, 2011
Messages
1,336
Location
WI
A 2.5" single flute countersink would be ideal, but at $500, its probably not in your budget.

You could get creative and use a cone shape Tool and Cutter Grinding Wheel backwards on a mandrel. At $30, its much more reasonable.
 

dr_clyde

Well-known member
Joined
Jan 7, 2009
Messages
6,511
Location
Holland, MI
A die grinder mounted flap wheel, as shown above, would be my first choice. They will develop a small groove the thickness of the material, then they do a great job deburring both sides at once.
 

ER70S-2

Well-known member
Joined
Jan 2, 2015
Messages
813
Hit one of the laser cut edges with a file and then hit a non-laser cut edge with the same file. Is the laser cut edge hardened? If so, you will probably be better off using some sort of grinding method than a deburring tool.
 
OP
T

tarbellb

Well-known member
Joined
Apr 17, 2011
Messages
5,809
Location
Oregon
Nice! I always forget that I have the Makita corded version of the Dynafile. I will try that first.

But I really like the idea of a 2" flap wheel, seems it would make quick work of it. Chuck that in my varispeed Metabo die grinder and go at it.

The edges dont have to be perfectly beveled, just not sharp.

I would love a single (or even 2/3) cutting edge countersink bit, but yaidunno is right about pricing. Yikes.

Will try my best to report back about method and maybe pics of the final product.
 

sqznby

Well-known member
Joined
Oct 26, 2013
Messages
993
Location
Coastal NC
Haha, I forgot I have a varispeed Metabo die grinder to. 2" in that would work well to.

I think the flexibility in the belt of the dynafile will be a little easier though on knocking both edges down. Plus one belt will go a long way. Though once you get a groove in the 2" that'll also make for quick work and a smooth finish.
 

LXCam

ALLIANCE MEMBER
Joined
Apr 23, 2013
Messages
19,372
Location
AZ
Well having been down almost the exact same road plus being a rather lazy person who likes to get **** like done as quickly as possible. I'd go with 60 or 80 grit 4-1/2" flap wheels on a angle grinder. Then all you'd need to do is go straight down on the hole and just do a slight wobble with it so it limits grooving the disc. All those other suggestions absolutely work but some of them require you constantly repositioning yourself to get a good angle.

Good luck and since no one else has asked yet, wth is that thing for anyhow? :p
 

Tinner

Well-known member
Joined
Aug 31, 2013
Messages
1,101
Location
N.E. Wisconsin
AR500 is going to chew up some abrasives. I'd try a flap wheel first. You will need several. At work, I would go straight to a Dynafile with 60 grit Norton orange belts
 

2oolhound

Well-known member
Joined
Dec 18, 2010
Messages
5,918
Location
BC Canada
How about turning a wood cone on a wood lathe then stapling a sheet of emery on the narrow end and again on the wide end so the mid section has no staples. You may get away with cutting a saw cut slot into the cone and just tucking an end of the emery in the slot then wrapping the emery around tightly until you insert it in the hole. That way it would be easier to reposition the emery sheet as an area wears a groove.
 
To avoid these ads, REGISTER NOW!

ER70S-2

Well-known member
Joined
Jan 2, 2015
Messages
813
This dude has 235.7 feet of edges to debur, and each circle has a little slice that will grab the deburring tool, making for a ***** of a time. Hand held deburring tools are not appropriate for this job.
 
OP
T

tarbellb

Well-known member
Joined
Apr 17, 2011
Messages
5,809
Location
Oregon
This dude has 235.7 feet of edges to debur, and each circle has a little slice that will grab the deburring tool, making for a ***** of a time. Hand held deburring tools are not appropriate for this job.

My thoughts exactly! (minus the math)

Like I said earlier, I have the Shaviv, use it enough to know its not what I want to do.

Playing with the 4.5" grinder and a 29 dished out flap might work, dyna for sure, but I ordered some 2" flappers to chuck into my die grinder.

I will play with all 3 options to see what works best.
------------

The final product isnt all that cool, shelving units for a restaurant. They like the whole "reclaimed/repurposed" look.

But now the lady wants a table from it too....
 
OP
T

tarbellb

Well-known member
Joined
Apr 17, 2011
Messages
5,809
Location
Oregon
AND THANKS FOR ALL THE SUGGESTIONS. Seriously appreciate how helpful the forum is.
 

MJD1

Well-known member
Joined
Dec 28, 2014
Messages
612
Flap disk for the edges that are straight and the top and bottom of sheet. For the holes get a grinding cone. They are available in many sizes. They also make straight cylinders as well. Either of these would be 5/8" 11 thread to fit an angler grinder.
 

kaymccampbell

Well-known member
Joined
Feb 27, 2015
Messages
29,838
Location
Upstate New York
How about putting a cone shape on a worn out 6" grinding wheel with a wheel dresser? Then put it in one of those drill mounted grinder wheel hubs you buy at Ace?
 

4 FN 27

ALLIANCE MEMBER
Joined
Oct 19, 2015
Messages
4,635
Location
Minnesnowta
Find a local fab shop with a Timesaver. A couple of passes is all it should take.

Option 2 would be a Industrial type DA with 60 grit...

We do things like this all the time. Timesave deburr first, then DA creates the best results.
 

dr_clyde

Well-known member
Joined
Jan 7, 2009
Messages
6,511
Location
Holland, MI
Find a local fab shop with a Timesaver. A couple of passes is all it should take.

Option 2 would be a Industrial type DA with 60 grit...

We do things like this all the time. Timesave deburr first, then DA creates the best results.

A timesaver wouldn't deburr the ID of the holes though, would it? I don't have one, never used one, so I'm genuinely curious.
 

bsg

Well-known member
Joined
Feb 10, 2009
Messages
330
Location
Imlay City, MI
How about turning a wood cone on a wood lathe then stapling a sheet of emery on the narrow end and again on the wide end so the mid section has no staples. You may get away with cutting a saw cut slot into the cone and just tucking an end of the emery in the slot then wrapping the emery around tightly until you insert it in the hole. That way it would be easier to reposition the emery sheet as an area wears a groove.

Or you could by one of these?

https://goodson.com/collections/chamfering-cones-mandrels

We bought them at work for chamfering the top of the cylinders in engine blocks! A little pricey but work very well!

Kevin
 

4 FN 27

ALLIANCE MEMBER
Joined
Oct 19, 2015
Messages
4,635
Location
Minnesnowta
A timesaver wouldn't deburr the ID of the holes though, would it? I don't have one, never used one, so I'm genuinely curious.

Dr, No a Timesaver would not get the inside of the hole...

The world I come from deburring a Lasered holes means the edge opposite the pierce surface and the cut surface from one surface to the other is always clean...again in my world based our customer expectations (we strive to have smooth laser edges inside and outside). After reading your reply to my reply I reread the original post and putting 2 & 2 together and now see the OP is trying to clean up the laser surface...

In that case some sort of drum sanding device that will fit in the hole will be required. A Timesaver will only knock down the raised burrs and in some cases roll them back into the hole...thus the DA afterwards. They do have machines capable of removing the burr in 1 step too: http://www.timesaversint.com/solutions/deburring-with-a-timesavers/

Thank you for bringing this to light...
 

2oolhound

Well-known member
Joined
Dec 18, 2010
Messages
5,918
Location
BC Canada
Or you could by one of these?

https://goodson.com/collections/chamfering-cones-mandrels

We bought them at work for chamfering the top of the cylinders in engine blocks! A little pricey but work very well!

Kevin

Those are nice!

You might get away with buying a cone, inserting a bolt through it and pouring a hardening liquid into it. If it was true it would be a cheap way to make a mandrel.
 

ER70S-2

Well-known member
Joined
Jan 2, 2015
Messages
813
Here's a cheap option for you which uses what you probably already have. Use a 3" roloc sanding disc with a small diameter backup pad. Cut six or eight slits from the outside of the disc to the backup pad. Press the "blades" back to form a cone shape, tucking the leading edge of each blade under the trailing edge of the next blade. If you only have a 3" backup pad, they can be cut down. Not sure if this makes sense, but I can see it in my head!
 

MoonRise

Well-known member
Joined
Nov 5, 2010
Messages
4,045
Location
NJ
A conical burr or grinding wheel in a die grinder. Zip it around the top and bottom edge to knock off the sharp edge and/or dross burr (top versus bottom edge of the laser cut holes). Done.

Still not all that much fun, but beats going around each hole by hand with a Noga or Shaviv deburring tool!

This dude has 235.7 feet of edges to debur, and each circle has a little slice that will grab the deburring tool, making for a ***** of a time. Hand held deburring tools are not appropriate for this job.

Hmm, I calculated only 235.62 feet of edges to deburr, counting both sides of the plate. :lol_hitti

(seriously, I calculated it. 2.25" x pi x 200 holes x 2 sides = 235.62 feet of edge to deburr)

Taking your time with the die grinder, lets say 10 seconds per edge x 200 holes x 2 sides = 4000 seconds of work That's 67 minutes of work with the die grinder. Get to it! :willy_nil
 

ER70S-2

Well-known member
Joined
Jan 2, 2015
Messages
813
Hmm, I calculated only 235.62 feet of edges to deburr, counting both sides of the plate. :lol_hitti

(seriously, I calculated it. 2.25" x pi x 200 holes x 2 sides = 235.62 feet of edge to deburr)

You have too many significant digits! The correct answer is 236, so I was closer than you :D

The actual diameter of the holes appears to only be 2" after looking at the photo again, so I will give you another shot at being right. I already came up with the best, cheapest deburring method.:D
 

ER70S-2

Well-known member
Joined
Jan 2, 2015
Messages
813
Taking your time with the die grinder, lets say 10 seconds per edge x 200 holes x 2 sides = 4000 seconds of work That's 67 minutes of work with the die grinder. Get to it! :willy_nil

Don't forget the time required to move the grinder from one hole to the next! He'll have 399 moves at about a half second each. Allow 5 seconds to flip the plate and he's eaten 3.4 minutes.
 

Milton Shaw

Well-known member
Joined
Feb 11, 2011
Messages
4,868
And old cycle bar sharpening stone is what you need mounted on a flex shaft instead of a bench grinder unless the piece is light enough to easily move around. These stones were cone shaped on both sides and the center was about a 4" or so diameter as I remember. You might have to dress it down as it will wear a grove after awhile. This is the old style hay cutter that goes back and forth and shakes the heck out of the tractor, that's what I am talking about the sharpening stone for.
 
Last edited:

Tinner

Well-known member
Joined
Aug 31, 2013
Messages
1,101
Location
N.E. Wisconsin
I guess most of the people responding to this thread don't know what AR500 plate is. AR stands for abrasion resistant. It comes in 5 different grades, 200 through 600 with 600 being the hardest. The number indicates the Brinell hardness. So, AR500 is harder than Chinese algebra but not as hard as the hubs of hell.

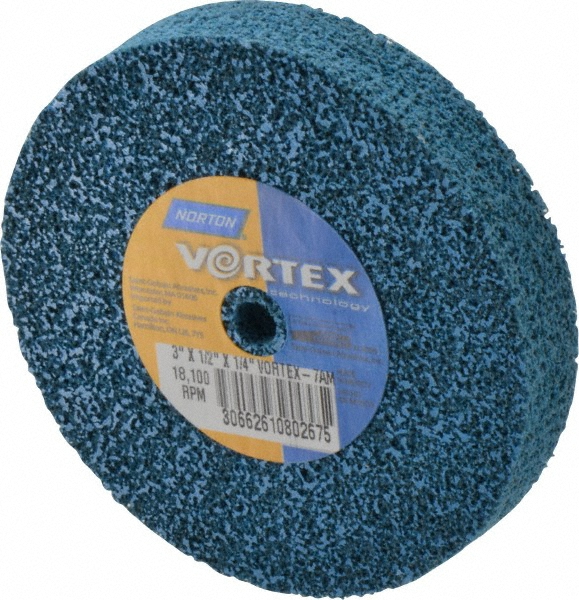
This material laughs at most abrasives. Chuck up some of those blue deburring wheels and you'll have spent $500 and be standing in a pile of blue dust long before you're done. It will dull a good file and wear grooves in cobalt countersinks. Aluminum oxide abrasives will cut it but ceramic is far better.

We make plates similar to that at my job, a Dynafile with ceramic belts works best, but flap wheels will, too. There are probably stones that would work, but I really don't have a good recommendation. Any way you choose, it's not cheap, fast or easy.
 
OP
T

tarbellb

Well-known member
Joined
Apr 17, 2011
Messages
5,809
Location
Oregon
Well I am happy to report back, especially with all the positive and useful remarks.
I tried several methods:

4.5" dished flap disc chucked in Metabo grinder

Makita 1" sanding file (corded version of Dynabrade)

2" flap wheel chucked into Metabo die grinder

3" 3M Coarse Surface Conditioning roloc chucked in Metabo die grinder
------------

The 4.5" disc only worked on the top surface, not good enough.

Makita file sander was my go to for a little, but without enough slack in the belt I could only do one side at a time. Which resulted in a) rotating the entire sander in 360+ º, b) less then ideal visual edges due to uneven application.

The 2" flap + die grinder probably would have been effective but I ran out
of holes to test on. I think it would have chewed up a lot of flap disc tho. Positive side
I bet it would deburr both sides at one gaining time.

Winner was the 3" 3M roloc pads, I had a surplus of these sitting around and they were awesome. First I would run them on edge to take down surface burrs, but once they were about 2.5" ø I could plunge them into the hole and remove both surface and interior burrs quickly! After they were to worn from that I then used the small ø to deburr the pierce in point that had nasty edges.

All in all, took less then 30 mins and maybe 5 pads to do all 200 (estimated, did a bunch w/ the Makita but redid them with this).

Just look at those edges...

2wpqn13.jpg
 
Last edited:
To avoid these ads, REGISTER NOW!
Top Bottom