To avoid these ads, REGISTER NOW!

deburring - copper tubing

PoorOwner

Well-known member
Joined
Feb 10, 2007
Messages
5,032
Location
CA
I bought a ridgid 223 reamer. It has a lot of blades so it works like a file and leave alot of copper shaving. Having to cleaning out the tubing have me worried.

If any burrs is missed, it dislodge as a hair of copper when flaring and make an imprint across the flare or cause some galling. Sometimes the outer edge gets jaggedly if not deburred enough.

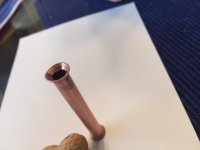
After alot of prep I was able to produce what I think is usable, however the tube in the first picture was not prepped enough. I finally found out alot of burrs hidden when I use a "V" blade on the cutter across the tubing. That needs to be paired, then reamed until no little hair comes off.

So is this the wrong reamer to use, should I use the "pen" type deburring tool?

Do you also ream the outside of the tubing?

I have not done a 1/4" which is common for liquid line yet, I don't know if the pen debur blade will fit in there

Thanks
 

Attachments

  • IMG_1560.jpg
    IMG_1560.jpg
    107.2 KB · Views: 106
  • IMG_1561.jpg
    IMG_1561.jpg
    107.5 KB · Views: 108
Last edited:
To avoid these ads, REGISTER NOW!
OP
P

PoorOwner

Well-known member
Joined
Feb 10, 2007
Messages
5,032
Location
CA
Thanks. Did it work well on 1/4 tubing? I didn’t realize how small that line is for normal reamers
 
OP
P

PoorOwner

Well-known member
Joined
Feb 10, 2007
Messages
5,032
Location
CA
this is a 1/4 tubing (peanut for scale).

I have a little galling, is this ok to use if this was a real line set?

I know nylog would fill in any little voids.

attachment.php
 

Attachments

  • IMG_1562.jpg
    IMG_1562.jpg
    52.8 KB · Views: 277

Brian_WK

Well-known member
Joined
Jun 30, 2015
Messages
1,177
Location
NE South Dakota
Use a pen style or a narrow blade pocket knife, or what I do a uni-bit/step bit with a Hex head in a screw driver handle. Perfect cleans every time and comes off as a nice single "chip"

Use a small bit of oil on the flare tool head to prevent galling. Wipe it off when done.

Brian
 

Git

Well-known member
Joined
May 18, 2008
Messages
6,894
Location
S Cal
The deburring tool I posted worked fine on my 1/4" line

The Nylog is also supposed to also act as a lubricant. For example, just a little bit on the actual face of the flare mating surfaces is supposed to help prevent the copper from galling or cracking as you tighten the connection. The stuff is compatible with the refrigerant, but don't get carried away
 

Jackfre

Well-known member
Joined
Dec 26, 2010
Messages
4,406
Location
N CA
I use the hand held reamer as well as a countersink in my drill. Keep the copper pointed down so you do not loose those small pieces. I have seen warranty support refused by mini split manuf when any type of pipe dope or sealant is used. Put a little wipe of the vacuum pump oil on the face of the fitting and on the flare itself. Nothing more.
 
OP
P

PoorOwner

Well-known member
Joined
Feb 10, 2007
Messages
5,032
Location
CA
I used the depth gauge on the flare tool, but it seems the flare diameter could be a bit bigger,

it could be almost as big as the 45 angle area on the back of the nut? I would leave a bit of room for compressing.

Mitsubishi specs a "stub" out of 0 mm for R410 tool..
Pioneer lists stub out 1.3 to 1.6mm max depending on the diameter.
 
Last edited:

Git

Well-known member
Joined
May 18, 2008
Messages
6,894
Location
S Cal
That is one of the reasons why I bought the YellowJacket 60278 flaring tool. It has a little stop that pivots over to properly set the tube to the proper height - pretty foolproof

 
To avoid these ads, REGISTER NOW!

brewchief

Well-known member
Joined
Sep 20, 2008
Messages
2,370
Location
Michigan
A couple weeks ago I spent a full day in a mini-split install class put on by one of our wholesalers, there were 2 Daikin reps there and they said 90% or more of the problems they see are install related, mostly poor flareing and the use of sealants.

We spent a LOT of time making flares, I've done a fair amount of work with flare fittings in the past and have never spent the time making flares to such a tight tolerance. I had a brand new Hilmor flare tool and it wouldn't make a consistent, centered flare.

They had a flare tool kit from CPS, BFT850K is the part number, it comes with flare tool, cutter, deburring tool and a size gauge plate that insures that you get an exact size flare. It made making good flares pretty easy, if nothing else the gauge plate makes checking your flares easy.

The other thing that they pushed was making sure that the fittings were torqued to spec with a torque wrench.

I found that the pen style deburring tool can leave a very fine scratch on the face of the flare if you move it wrong. It took 500 psi of nitrogen to show this as a leak, it would have been a problem if left as is.

They said NO sealants, no leaklock, no nylog, warranty could be refused if used.
 

Dagny

Well-known member
Joined
Jul 25, 2014
Messages
2,980
Location
Northern Wi.
A sharp tubing cutter leaves a lot less bur. Then I use a small boy scout knife to debur use the tip and avoid gouging. A little refer oil on front and back of flare good to go. You can clean up some minor imperfections in the mating portion of the flare but if it is ugly start over.
 
OP
P

PoorOwner

Well-known member
Joined
Feb 10, 2007
Messages
5,032
Location
CA
A couple weeks ago I spent a full day in a mini-split install class put on by one of our wholesalers, there were 2 Daikin reps there and they said 90% or more of the problems they see are install related, mostly poor flareing and the use of sealants.

We spent a LOT of time making flares, I've done a fair amount of work with flare fittings in the past and have never spent the time making flares to such a tight tolerance. I had a brand new Hilmor flare tool and it wouldn't make a consistent, centered flare.

They had a flare tool kit from CPS, BFT850K is the part number, it comes with flare tool, cutter, deburring tool and a size gauge plate that insures that you get an exact size flare. It made making good flares pretty easy, if nothing else the gauge plate makes checking your flares easy.

The other thing that they pushed was making sure that the fittings were torqued to spec with a torque wrench.

I found that the pen style deburring tool can leave a very fine scratch on the face of the flare if you move it wrong. It took 500 psi of nitrogen to show this as a leak, it would have been a problem if left as is.

They said NO sealants, no leaklock, no nylog, warranty could be refused if used.

I am using the same tool, just the bare tool without the extras. I think it is better to "roll" the flare so it doesn't heavily compress the copper and leave some thickness until you tighten the joint. Apparently shiny is a sign of high pressure being applied. It looks the same as the yellow jacket "ultra light weight". I checked the diameter from daikin publish and they are spot on except for the 1/4 line, need to push it up a little more. They want 9.1mm and it measured 8.9mm.

I think I would increase the size of the flares a little bit (like at least 1mm+ of stub out) so for any scratched up area will be pushed out to the area that is less critical.. not to the point of interfering of course.

I have read the nitrogen will pass through smaller gaps than R410A molecule since their sizes are very different. But was your joint using nylog too? I would have thought it would have closed any fine scratches.
I think I could only test to 350 psi as the regulator don't really go too much higher than that.

My first mini split was installed by a pro: 2 adjustable wrenches.. tighten still hand shakes, dry on dry, factory lineset flare. I had used the heat every weekend so far (knock on wood) ok. I was naive and didn't check the flares but I looked at the other identical lineset I ordered (mitsu diamond back) the flares are pretty bad.
 
Last edited:
OP
P

PoorOwner

Well-known member
Joined
Feb 10, 2007
Messages
5,032
Location
CA
A sharp tubing cutter leaves a lot less bur. Then I use a small boy scout knife to debur use the tip and avoid gouging. A little refer oil on front and back of flare good to go. You can clean up some minor imperfections in the mating portion of the flare but if it is ugly start over.

Bought a new yellow jacket "premium" cutter, so I think it is sharp.. for some reason the one I have been using for plumbing seems to cut with less burr.

is it better to do light pressure with many passes, which seems to leave hair like burrs across the cut because of each pass. maybe heavier touch will do it but I found it can deform the tubing.
 

brewchief

Well-known member
Joined
Sep 20, 2008
Messages
2,370
Location
Michigan
I am using the same tool, just the bare tool without the extras. It looks the same as the yellow jacket "ultra light weight". I checked the diameter from daikin publish and they are spot on except for the 1/4 line, need to push it up a little more. They want 9.1mm and it measured 8.9mm.

I think I would increase the size of the flares a little bit (like at least 1mm+ of stub out) so for any scratched up area will be pushed out to the area that is less critical.. not to the point of interfering of course.

I have read the nitrogen will pass through smaller gaps than R410A molecule since their sizes are very different. But was your joint using nylog too? I would have thought it would have closed any fine scratches.
I think I could only test to 350 psi as the regulator don't really go too much higher than that.

My first mini split was installed by a pro: 2 adjustable wrenches.. tighten still hand shakes, dry on dry, factory lineset flare. I had used the heat every weekend so far (knock on wood) ok.

No nylog for me, I installed one after the class and tested to 500 psi nitrogen, one barely noticeable mark had a very slight leak so it got reflared.

After the class we bought the flareing kit and a digital torque wrench along with a mighty bracket(hold the indoor unit during install), can I do it without? Sure but I feel way better about it when I know that everything is 100% to factory spec.
 
OP
P

PoorOwner

Well-known member
Joined
Feb 10, 2007
Messages
5,032
Location
CA
could I use synthetic engine oil on the flare tool? I think it will work better than nylog as a lube, but I am afraid of contamination or that oil falling into the tubing.
I clean with 100% alcohol wipe down the flare afterwards
 

chrispyny

Well-known member
Joined
Nov 7, 2013
Messages
467
Location
albany, ny
Why would you consider using something like synthetic engine oil which is completely unrelated to the hvac industry, when Nylog Blue is a product MADE for lubricating and preventing leaks in flares?

How or where do you make the assumption that engine oil will lubricate better than a product meant for your specific purpose?

Cmon man. nylog blue is super cheap.
 
OP
P

PoorOwner

Well-known member
Joined
Feb 10, 2007
Messages
5,032
Location
CA
I am talking using another more suitable oil only when using the flare tool. And then cleaning it off.

I would still use nylog for installation.
 

Warrenator

Well-known member
Joined
May 31, 2008
Messages
781
Location
Newberg, OR
I used Nylog on my one DIY install, no problems. My Dad has a new AC professionally installed and there is a service call every single year since it was put in 3 years ago. I think this particular company wants the callback business. Grrrrr.
 
OP
P

PoorOwner

Well-known member
Joined
Feb 10, 2007
Messages
5,032
Location
CA
I found that the pen style deburring tool can leave a very fine scratch on the face of the flare if you move it wrong. It took 500 psi of nitrogen to show this as a leak, it would have been a problem if left as is.

I got the pen style deburrer today and I can see what you are talking about, if I keep the tip as far out as possible then it seems ok. When I went a bit more careless with it I scratched the wall, I am not going to bother flaring that.
 
To avoid these ads, REGISTER NOW!
Top Bottom