To avoid these ads, REGISTER NOW!

Decals on my restored compressor

burgie

Well-known member
Joined
Mar 26, 2007
Messages
239
Location
Falcon, Colorado
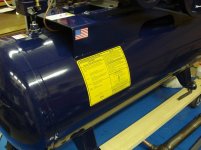
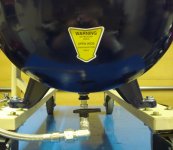
OK...so those who have followed my restoration remember that FS Curtis generously provided me with a free set of authentic decals for my overhaul project.

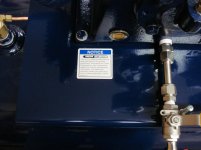
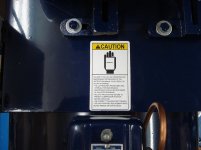
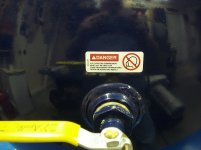
While their exact placement may not necessarily be exact per specifications, I placed them where they made the most sense and, let's face it, where I thought they would look the coolest :rocker::rocker::rocker:

With no further ado...this is what it looks like with decals applied...
 

Attachments

  • decal_00.jpg
    decal_00.jpg
    145.3 KB · Views: 221
  • decal_01.jpg
    decal_01.jpg
    140 KB · Views: 194
  • decal_02.jpg
    decal_02.jpg
    139.7 KB · Views: 169
  • decal_03.jpg
    decal_03.jpg
    148.4 KB · Views: 154
  • decal_04.jpg
    decal_04.jpg
    143.7 KB · Views: 151
  • decal_05.jpg
    decal_05.jpg
    151.6 KB · Views: 142
  • decal_06.jpg
    decal_06.jpg
    148.4 KB · Views: 131
To avoid these ads, REGISTER NOW!

kams1973

ALLIANCE MEMBER
Joined
Oct 3, 2010
Messages
1,582
Location
Amarillo, TX
Sweet! I bought several sheets of the generic decals from ebay. Decals seem to give it a 'factory' look and feel.

Everything you did on this project was over that top and oozing with class!
 

Herb

Well-known member
Joined
Apr 15, 2006
Messages
739
Location
CT
i think if you really wanted to do an authentic restoration you should have put a couple of the decals on a little bit crooked:lol:. Nice job, though!
 
OP
B

burgie

Well-known member
Joined
Mar 26, 2007
Messages
239
Location
Falcon, Colorado
I must say that FS Curtis has been GREAT to work with throughout this project :thumbup::thumbup::thumbup:.

Their customer service team provided me with top-notch technical support whenever I called with questions...and I have spoken with them on several occasions. They sent me .pdf files with torque specs, exploded view, manuals, etc...and they were always courteous and professional.

I would definitely have purchased a set of professional decals but a free set was a very kind gesture!! I have also sent pictures to them and they are quite pleased with the restoration of the compressor...

Yes, I agree that a set of official decals really "dresses up" the compressor and gives it that finished look.

The next step is to start fabricating the belt guard!!!

PS: Great avatar Herb!!!
 

Todd.Brock

Well-known member
Joined
Jul 15, 2008
Messages
4,250
Location
Cincinnati
I am impressed with your paint job.... My 80 gallon IR is needing some love. I cleaned it up, but needs painted. Did you spray that I assume? Stickers make it look like its straight off the factory floor. Nice job!
 
OP
B

burgie

Well-known member
Joined
Mar 26, 2007
Messages
239
Location
Falcon, Colorado
Thanks folks...

Todd...you can view my other posts for the start-to-finish process. But to answer your question: Once the tank was sanded smooth (which means 90% was down to bare metal) I applied 3 coats of primer with light sanding in between. Then I applied 4 coats of Navy Blue. I allowed the paint to dry for several days (between each coat) then did a wet color sanding using 600 grit wet-or-dry paper.

The paint was just Rustoleum in a can and all sanding between coats was done by hand...

The pump components were sandblasted and/or hand sanded using those sponge-type sanding blocks, washed thoroughly and repeatedly in warm, soapy water and then dried with compressed air and a heat gun. Then each was masked off and primed and painted. The cast parts were just sprayed but the air filter housing received the same process as the tank...

My neighbors think I am sick for going through such meticulous attention to detail for a compressor...but that's just the way I do things. I am proud of the finished product and know it will last me forever...
 
To avoid these ads, REGISTER NOW!

alan camby

Well-known member
Joined
Dec 3, 2011
Messages
1,566
Location
South of Indianapolis, Indiana
Looks great:thumbup:

Remember that if you send a link to Curtis of this thread, they will not see the pictures. Only members can see attachments.

That is why I host with photobucket. I can link my projects to friends who are not members at GJ.

Great job.
I look forward to the cooler and belt gaurd.
Did you router the boards on the roller stand for the comp?:shocking:
You are going way to far with this:lol_hitti


edit: just logged out to see if i could still get the pics. I can but have to click on each one to see them. I have had people tell me that they joined the forum just so that they could view my pictures. That is one reason i started using photobucket.
 
Last edited:

BWS

Well-known member
Joined
Sep 3, 2006
Messages
923
Location
Mnts of Va
You hit that one out of the park!

Cool story about Curtis on the finishing touches.Just sayin...If I was in their mrkt/sales dept....would be asking to use your resto in advertisements.

We don't do resto's on everything here.....But gotta say,when you do a nice job on a pce,it gets put into service,.....one day,a cpl years down the rd,you'll look at it and just grin.Very much,worth the effort.
 

PT Doc

Well-known member
Joined
Nov 12, 2010
Messages
3,197
Thanks folks...

Todd...you can view my other posts for the start-to-finish process. But to answer your question: Once the tank was sanded smooth (which means 90% was down to bare metal) I applied 3 coats of primer with light sanding in between. Then I applied 4 coats of Navy Blue. I allowed the paint to dry for several days (between each coat) then did a wet color sanding using 600 grit wet-or-dry paper.

The paint was just Rustoleum in a can and all sanding between coats was done by hand...

The pump components were sandblasted and/or hand sanded using those sponge-type sanding blocks, washed thoroughly and repeatedly in warm, soapy water and then dried with compressed air and a heat gun. Then each was masked off and primed and painted. The cast parts were just sprayed but the air filter housing received the same process as the tank...

My neighbors think I am sick for going through such meticulous attention to detail for a compressor...but that's just the way I do things. I am proud of the finished product and know it will last me forever...

What type of rust oleum in the can did you use? Are you happy with the results? Do you think it will be a hearty finish?
 
OP
B

burgie

Well-known member
Joined
Mar 26, 2007
Messages
239
Location
Falcon, Colorado
Thanks folks...

PT Doc...the paint is just your basic Navy Blue Rustoleum that one can buy at Home Depot (which is where I purchased mine).

As far as durability...so far it seems to be working fine!! My compressor will be indoors always so weather wont be an issue. Prior to assembling the pump and installing the motor I even threw a coat of Maguire's car wax on the tank :lol::lol::lol:. (Now you know why my neighbors think I'm sick).

And I would be happy to work with Curtis and use this for their advertising. I would consider that the greatest form of flattery :thumbup::thumbup::thumbup:.
 

jonathan75

Well-known member
Joined
Mar 27, 2013
Messages
1,451
Location
NC
I must say that FS Curtis has been GREAT to work with throughout this project :thumbup::thumbup::thumbup:.

Their customer service team provided me with top-notch technical support whenever I called with questions...and I have spoken with them on several occasions. They sent me .pdf files with torque specs, exploded view, manuals, etc...and they were always courteous and professional.

I would definitely have purchased a set of professional decals but a free set was a very kind gesture!! I have also sent pictures to them and they are quite pleased with the restoration of the compressor...

Yes, I agree that a set of official decals really "dresses up" the compressor and gives it that finished look.

The next step is to start fabricating the belt guard!!!

PS: Great avatar Herb!!!

I enjoyed catching up on your rebuild. You did a fantastic job! You got a Saylor Beall also correct? Do you plan to restore that one? Don't expect the same level of customer service with Saylor Beall as you did with FS Curtis, Saylor Beall won't give you the time of day. You have to find a dealer to communicate for you and get all information second hand. If there is a good contact at Saylor Beall I have not found them yet.
 

dwp99

Well-known member
Joined
Apr 18, 2012
Messages
167
Location
West Coast of Florida
Great job on the compressor, I own a Curtis compressor that was built in 1948. I have also contacted Curtis about decals for mine but since mine is so old they couldn't help me. I currently have some projects that need to be completed before I can start on the refurb of mine. Again, great job on you compressor.
 
To avoid these ads, REGISTER NOW!
Top Bottom