Declutter and Garage remodel - Aww ****... need cement work!
I've held off on posting mostly because I didn't think my garage is worthy of posting pics, but now that I have embarked on the re-build i figure it's time.
A little background first:
We bought this house almost 11 years ago new. At the time I had plans for finishing off the garage and making it "purdy" but my 8.5 month pregnant wife had other ideas. So the garage has mostly stayed in it's raw state for the past 11 years. But I'm tired of it, so now is the time.
There are two main goals for this rehab: I want to declutter the garage. It'll be tough, but I think I can manage. Second, I want to make it look nice. Declutter is the first step to making it look nice.
Here's the basic layout. The garage is a 3-car garage, but I would really classify it as a 2 car. It dimensions at 29' x 19'. Pulte, the builder, could have made things a lot nicer by extending things just a tad more. A little wider and a little deeper. But, alas, this is what I'm stuck with.

Tip #1: I found the IKEA kitchen designer program is particularly useful for this project. It's free and pretty easy to use.
The first step was to make some room in the attic for big stuff like the compressor and winter tires. I installed an attic stairway and then put a winch in the existing opening to make it easier to get the heavy stuff up and down. Sorry I don't have a pic of the winch... i'll try and get on if anyone wants to see it.
Tip #2: Home Depot will accept Harbor Freight coupons. I used a 25% off coupon for the attic Stairway and got it for about $140! SMOKIN' DEAL!


So that was last month's project. It took a lot of work getting the wiring, insulation, sub-floor all in place. But now it's in.
Here how the garage looks as of yesterday. I was throwing down a coat of mud and sanding the joints to at least cover the paper. It's not perfect, but loads better. I even managed to get a coat of primer on the ceiling, but don't have a picture of that. These picture are from the four corners.


Obviously it's not much to look at right now. Here's the basic plan. The two columns represent where the MaxJax lift columns are when installed. I will be reconfiguring the existing 4 cabinets (you can see I already moved one) to the 4-bank of cabinets, and then getting some new cabinets to complete the look. Not sure about the wall color, but I like the idea of red and maybe the yellow... not 100% yet.


I'll probably do VCT (BTW, it's a real pain that you cannot do a search here for 'VCT'... ) for the floor mainly because of cost and the age of the floors with their oil stains, etc.. Probably do a checkerboard, but not certain yet. My goal is to have everything done for less than $2k. I think I can do it.
I still need to re-plan the side of the garage with the fridge and freezer and kids' toys. Will probably add-in a sink and and more cabinets. to give a better built-in look for that side.
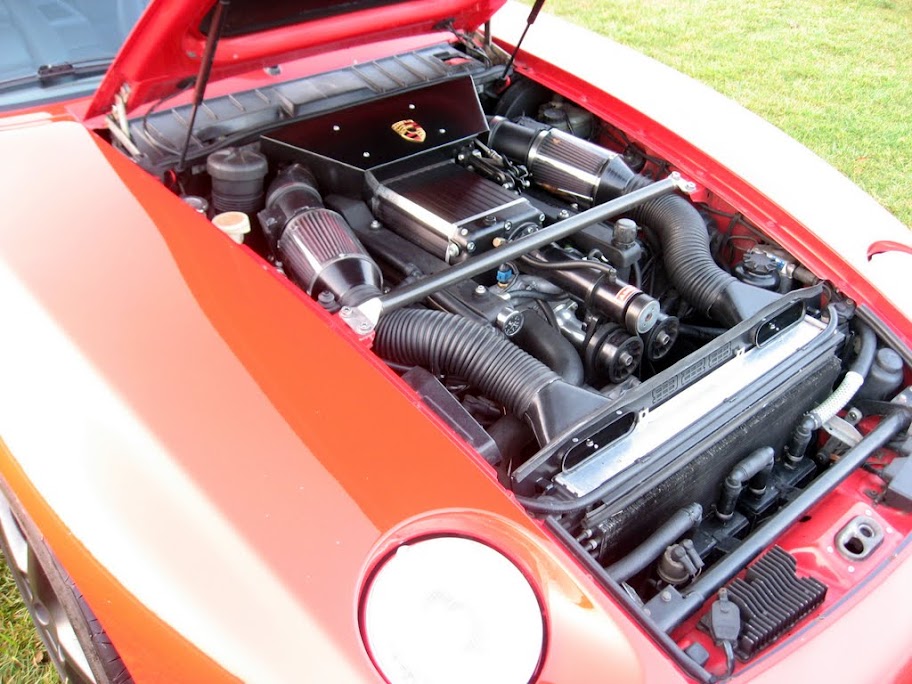
And this is why I'm doing this. I have a 1991 928 that i love and I think it deserves a better living environment.

Comments, questions, suggestions, etc. welcome.

I've held off on posting mostly because I didn't think my garage is worthy of posting pics, but now that I have embarked on the re-build i figure it's time.
A little background first:
We bought this house almost 11 years ago new. At the time I had plans for finishing off the garage and making it "purdy" but my 8.5 month pregnant wife had other ideas. So the garage has mostly stayed in it's raw state for the past 11 years. But I'm tired of it, so now is the time.
There are two main goals for this rehab: I want to declutter the garage. It'll be tough, but I think I can manage. Second, I want to make it look nice. Declutter is the first step to making it look nice.
Here's the basic layout. The garage is a 3-car garage, but I would really classify it as a 2 car. It dimensions at 29' x 19'. Pulte, the builder, could have made things a lot nicer by extending things just a tad more. A little wider and a little deeper. But, alas, this is what I'm stuck with.
Tip #1: I found the IKEA kitchen designer program is particularly useful for this project. It's free and pretty easy to use.
The first step was to make some room in the attic for big stuff like the compressor and winter tires. I installed an attic stairway and then put a winch in the existing opening to make it easier to get the heavy stuff up and down. Sorry I don't have a pic of the winch... i'll try and get on if anyone wants to see it.
Tip #2: Home Depot will accept Harbor Freight coupons. I used a 25% off coupon for the attic Stairway and got it for about $140! SMOKIN' DEAL!
So that was last month's project. It took a lot of work getting the wiring, insulation, sub-floor all in place. But now it's in.
Here how the garage looks as of yesterday. I was throwing down a coat of mud and sanding the joints to at least cover the paper. It's not perfect, but loads better. I even managed to get a coat of primer on the ceiling, but don't have a picture of that. These picture are from the four corners.
Obviously it's not much to look at right now. Here's the basic plan. The two columns represent where the MaxJax lift columns are when installed. I will be reconfiguring the existing 4 cabinets (you can see I already moved one) to the 4-bank of cabinets, and then getting some new cabinets to complete the look. Not sure about the wall color, but I like the idea of red and maybe the yellow... not 100% yet.
I'll probably do VCT (BTW, it's a real pain that you cannot do a search here for 'VCT'...
) for the floor mainly because of cost and the age of the floors with their oil stains, etc.. Probably do a checkerboard, but not certain yet. My goal is to have everything done for less than $2k. I think I can do it. I still need to re-plan the side of the garage with the fridge and freezer and kids' toys. Will probably add-in a sink and and more cabinets. to give a better built-in look for that side.
And this is why I'm doing this. I have a 1991 928 that i love and I think it deserves a better living environment.
Comments, questions, suggestions, etc. welcome.
Last edited:


")