To avoid these ads, REGISTER NOW!

Between 705 & 1200 SQ/FT DeeDubz Powerstroke shop

Workspaces between 705 and 1200 squarefeet.
To avoid these ads, REGISTER NOW!
OP
D

DeeDubz

Well-known member
Joined
Nov 20, 2019
Messages
1,449
Location
Socal
@M.Brane Its a must in CA im afraid. It would be nice to sleep at night with your doors and windows unlocked but the climate and laws here dont really allow that. I found out who the registered owner is. I doubt ill see that car again. Im tried of this heat too. It was 106 here yesterday. Suppose to be 103 today. Good thing we have a pool. Wont be doing much until it cools off. good luck on the 6.0
 
OP
D

DeeDubz

Well-known member
Joined
Nov 20, 2019
Messages
1,449
Location
Socal
Crazy stuff going on in Socal. Theres 3 well established vegetation fires in the area. Its destroyed the air quality around here. I was suppose to start my new job at the college but its been closed till Monday. Same with the kids schools. So its perfect time to catch up on some projects. First photo is from a buddy he works in the High desert. He sent me that yesterday.
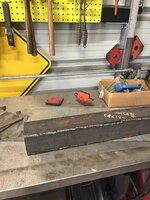
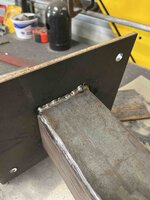
Mail box project. I found a piece of steel that would work great for a post. My plan is to make a post. Pour a little slab and attach the post to some studs in the concrete. Then attach the top of the box on the new post. I started out by cutting 27" sections. After that I started to make a square. I tried to weld in one pass but my arm would get tired and Id miss the area im suppose to weld.
As I finished up the welds the wife informed me that the dryer wasnt spinning. She was afraid that we d have to replace it. I grabbed my impact driver and headed to her garage. Once I got the top plate off I saw the belt was loose around the drum. It looked in good condition too and it didnt separate. Fast forward 20mins later I was able to pull the drum out. The tension pulley was loose. Theres a spring that keeps tension on it but it had fell off. This is a crappy design. The spring can easily fall through the holes that retain it. I crimped both ends. hopefully it no longer slips off. Another 20mins to reassemble the dryer and its working great.

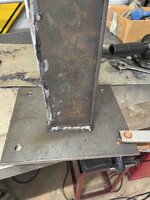
Got back in the shop and started grinding. I used my skill saw for the first time to cut a section of steel. That thing works surprisingly good. Im going to start using that instead of my chop saw. By the end of the day I had the base done. Today I should be able to weld the post to the bast plate.

Cheers
 

Attachments

  • IMG_1656.jpg
    IMG_1656.jpg
    514.4 KB · Views: 203
  • IMG_8118.jpg
    IMG_8118.jpg
    804.4 KB · Views: 127
  • IMG_8119.jpg
    IMG_8119.jpg
    780.6 KB · Views: 39
  • IMG_8122.jpg
    IMG_8122.jpg
    337.1 KB · Views: 36
  • IMG_8123.jpg
    IMG_8123.jpg
    984.7 KB · Views: 35
  • IMG_8124.jpg
    IMG_8124.jpg
    1.1 MB · Views: 34
OP
D

DeeDubz

Well-known member
Joined
Nov 20, 2019
Messages
1,449
Location
Socal
I finished up welding the mailbox post. Made a couple of passes on the bottom. Welds are getting there. I dont weld enough to make it look that good. Gonna hit home depot today and pick up some paint. I might get to install it in a couple of weeks.
 

Attachments

  • IMG_8135.jpg
    IMG_8135.jpg
    580 KB · Views: 31
  • IMG_8134.jpg
    IMG_8134.jpg
    724.7 KB · Views: 30
  • IMG_8133.jpg
    IMG_8133.jpg
    603.5 KB · Views: 29
  • IMG_8132.jpg
    IMG_8132.jpg
    549 KB · Views: 31
  • IMG_8131.jpg
    IMG_8131.jpg
    678.8 KB · Views: 31
OP
D

DeeDubz

Well-known member
Joined
Nov 20, 2019
Messages
1,449
Location
Socal
Finished rattle canning the post. I picked up some studs from home depot. They wouldn't fit in the holes I drilled in the base. I had to drill the holes out a bit so they could fit. I think in a couple of weeks Ill have that in the ground. Once I have the old mail box taken off the post Ill weld the top of the base plate to the top of the post. This will probably last me a while until I upgrade. Id like to put some nice brick/blocks and enclose the mail box. I dont know that much about masonry. That will probably be a few yrs down the road. Its hard to find a guy around here that will do a small job like that without over charging me. Last couple of quotes I got were way out of the ball park.
 

Attachments

  • IMG_8149.jpg
    IMG_8149.jpg
    842.7 KB · Views: 21
  • IMG_8151.jpg
    IMG_8151.jpg
    740.3 KB · Views: 18
  • IMG_8150.jpg
    IMG_8150.jpg
    758.6 KB · Views: 30
OP
D

DeeDubz

Well-known member
Joined
Nov 20, 2019
Messages
1,449
Location
Socal
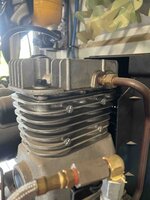
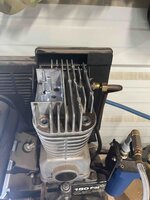
The other day my wife informed that I needed to air up some rafts for her work. It was 6 at night when she told me. She said that once I was done I could put the rafts in her car. Theres 3 "boats", not one would fit in her car. In the process my compressor started to smoke. I shut it down thinking I may have ran it dry. I had changed the oil a yr ago. At the time I didnt have time to figure out wtf was going on. Yesterday after work I was able to trouble shoot it. Finding that theres a leak in the gasket. You cant really see in the photo but its leaking enough where it wont build up air. I ordered a replacement gasket set, should show up in a few days.
 

Attachments

  • IMG_8189.jpg
    IMG_8189.jpg
    584.6 KB · Views: 35
  • IMG_8186.jpg
    IMG_8186.jpg
    620.4 KB · Views: 32
  • IMG_8182.jpg
    IMG_8182.jpg
    1.3 MB · Views: 35
OP
D

DeeDubz

Well-known member
Joined
Nov 20, 2019
Messages
1,449
Location
Socal
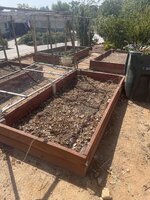
Monday my kids stayed home cause of the smoke in the area. Ive been meaning to get into my garden and hack down my raspberry bush. The thing is over grown and has seen bette days. I took a small portion of it and transferred it. Theres a spot along my fence I planted it. The hope is it grows along the fence. This open planter box Im going to plant some something else. All day The CA state birds would pass over the house. Sometimes coming in pretty low maybe 4-5k feet.

My gasket kit showed up. Its pretty clear where the blow out was. I think this compressor is going on 20 yrs old. I believe this is the first time theres ever been an issue. The compressor no longer leaks so ill take the win.

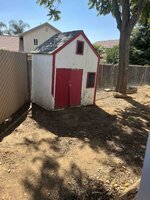
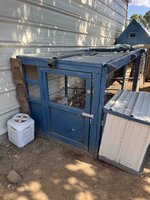
This weekend Im going to be moving my chicken coop to the rear of my shop. Two reason, #1 im tried of stepping in chicken droppings and i dont like them getting into my shop. #2 is they will be out of side out of mind but not to my neighbor. In order to move the coop I have to make room. Theres a small shed that I store my fuels and some misc parts. IT was right up against my shop. I moved it just over toward the fence. Im sure my neighbor isn't happy about where it ends up. Theres still plenty of shade for the shed and the future home my chickens. Im going to build a enclosure for these birds they ll still have plenty of room to range.
 

Attachments

  • IMG_8213.jpg
    IMG_8213.jpg
    1.2 MB · Views: 30
  • IMG_8211.jpg
    IMG_8211.jpg
    1 MB · Views: 31
  • IMG_8210.jpg
    IMG_8210.jpg
    563.3 KB · Views: 30
  • IMG_8208.jpg
    IMG_8208.jpg
    629.2 KB · Views: 29
  • IMG_8207.jpg
    IMG_8207.jpg
    573.9 KB · Views: 30
  • IMG_8206.jpg
    IMG_8206.jpg
    72.2 KB · Views: 25
  • IMG_8203.jpg
    IMG_8203.jpg
    1.5 MB · Views: 24
  • IMG_8201.jpg
    IMG_8201.jpg
    1.8 MB · Views: 45
OP
D

DeeDubz

Well-known member
Joined
Nov 20, 2019
Messages
1,449
Location
Socal
This last Saturday I finally got to a point where I could move my chicken coop. With the wife being home it was nice having here around to make sure I didnt destroy the coop. Where they were located was sorta alright. But it didnt provide much shade. The perfect spot is on the south side of my shop. Theres a big ash tree that provides a good amount of shade in the summer. Prior to moving the coop I had to move my fuel shed to make room. I used my Kubota to move the 3 piece coop. My wife would tilt the coop so I could slide my bucket under it. Once under it Id throw a strap around the coop and attach it to cage of the skid steer. It sure make it easy to move. Not that the coop or the run parts are heavy but I was able to move it without breaking it and not straining my back.
So here's where the drama came in... I started first with the coop. It was piece that I has to go in first. As Im moving it into place I see my neighbor peaking over the fence. Then I see him talking to my wife. I cant hear the conversation so I stop. " You cant move your chickens there" WTF is up with this guy. Every little thing this a hole is up in our business. He picked the wrong day. Im the nice guy my wife takes no ones **** when it comes to our house our family our property. If you read my whole thread on the power stroke shop hes the same neighbor that tried sooooo hard to prevent me from building my garage. Hes been nothing but issues. We go back and fourth for a few minutes. He threatens to call the city on me blah blah blah. I tell him to mind his business, last time I checked he wasnt paying my mortgage.

Later in the day the wife went down to check on our birds. She noticed he was looking over our fence again... She came back to the house and told me that guy was still peeping over the fence making my wife uncomfortable. By the time I went back there he was gone. At this point he starting to cross the line. Next time I see him ill give him a piece of my mind. Now my wife wants to have someone install privacy fencing which will limit his ability to peep over our fence. Already got the quote will probably get it installed in the next month or so.
Why cant ppl just mind their damn business. I dont give a **** about wtf he does in his yard or house. Or any of my neighbors. If this guy persist I might add a few more animals, wind chimes ... ect.
 

Attachments

  • IMG_8234.jpg
    IMG_8234.jpg
    1.4 MB · Views: 33
  • IMG_8233.jpg
    IMG_8233.jpg
    1.3 MB · Views: 34
  • IMG_8232.jpg
    IMG_8232.jpg
    871.8 KB · Views: 35
  • IMG_8224.jpg
    IMG_8224.jpg
    1.4 MB · Views: 59
OP
D

DeeDubz

Well-known member
Joined
Nov 20, 2019
Messages
1,449
Location
Socal
@Xti04 Were pulling the trigger on some privacy fencing. Its going to prevent him from peeping over his fence and seeing my yard. Not so much I can do for his 2nd story window. Im sure im gonna have to deal with this guy until he moves. It seems hes home everyday. Im not sure if hes retired but hes older. If he keeps it up i was gonna get some turkeys, goats, horses... ect. Theres nothing he can do about that ****. Our property is zoned for equestrian. Sadly I no longer have a semi trailer. My dad had one that he paid someone to come haul away. I could really use it right now. Later down the road ill be parking trailers and equipment next to my shop, where he ll be able to see.

@shakenfake you got any you could spare? I ran out
 
OP
D

DeeDubz

Well-known member
Joined
Nov 20, 2019
Messages
1,449
Location
Socal
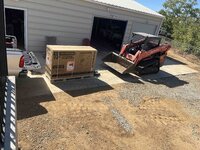
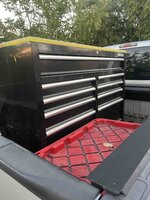
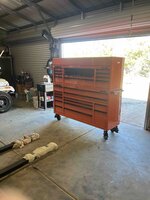
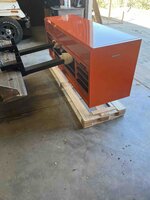
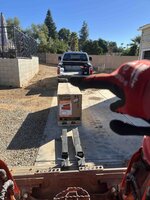
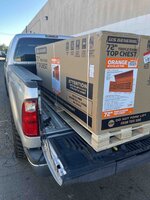
Last week I picked up a set of forks to attach on my skid steer bucket. I figured Id need a pair later down the road. Order online via home depot. Showed up the next day but damn they're heavy. Ive been wanting a new tool box for a while. I have several throughout the shop and would like to consolidate all my tools in one spot. Thats the plan. Ive spent a lot of time looking on offer up or fb marketplace with no deals. Older snap on boxes are still pretty expensive. My budget was 3k. For 3 big ones I could just get a big us general from harbor freight. But I dont know anyone who has one. All the review on youtube had nothing but good things to say. My retirement gift showed up yesterday. I was able to get the bottom chest for 1400. They had a coupon 300 bucks off. The top chest wasnt instock so I ordered it. It could show up in a week or a month. While the guys at harbor freight loaded it, I had noticed its very top heavy and seems to want to tip over. I knew that would be a issue unloading. Good news I had my wife help me get it out. I was afraid that the box would tip and land on her but luckily it came off the truck pretty easy. The fork attachment for the skidsteer did the job but Im not really not happy with them. They seem to move pretty easy.
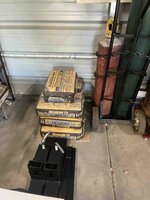
Now that its unloaded i started putting my tools in it. My shop is quite a mess at the moment. This week Ill be going to home depot to buy a f ton of supplies for some projects on the compound.
 

Attachments

  • IMG_8256.jpg
    IMG_8256.jpg
    618.3 KB · Views: 48
  • IMG_8255.jpg
    IMG_8255.jpg
    739.9 KB · Views: 45
  • IMG_8253.jpg
    IMG_8253.jpg
    1.3 MB · Views: 45
  • IMG_8251.jpg
    IMG_8251.jpg
    819.4 KB · Views: 40
  • IMG_8250.jpg
    IMG_8250.jpg
    678.8 KB · Views: 34
  • IMG_8249.jpg
    IMG_8249.jpg
    1.2 MB · Views: 32
  • IMG_8245.jpg
    IMG_8245.jpg
    758.7 KB · Views: 41

Xti04

Well-known member
Joined
Nov 11, 2016
Messages
2,347
Nice pickup on the box. I contemplated grabbing a bottom box this morning as the 2 bank ones are on sale. Dont really have anything pressing to go into it so I held off. I did grab 2 angle grinders though so now I wont have to switch from cutting disc to grinding disc. The 2 grinder move makes me feel like a pro fabricator now.
 
OP
D

DeeDubz

Well-known member
Joined
Nov 20, 2019
Messages
1,449
Location
Socal
Nice pickup on the box. I contemplated grabbing a bottom box this morning as the 2 bank ones are on sale. Dont really have anything pressing to go into it so I held off. I did grab 2 angle grinders though so now I wont have to switch from cutting disc to grinding disc. The 2 grinder move makes me feel like a pro fabricator now.
I got tired of changing discs. I think I have 4 in my shop with different blades/wheels. Cant go wrong with their grinders. I beat my into the ground and they still keep spinning.
 
To avoid these ads, REGISTER NOW!
OP
D

DeeDubz

Well-known member
Joined
Nov 20, 2019
Messages
1,449
Location
Socal
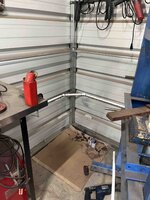
Yesterday Am I made a two cart trip to home depot. Upcoming projects run some water line, add some rain gutters, move some dirt and make a dump run. I decided to do the water line inside the shop. Since I moved my chickens behind my shop theres no water back there. In the mean time I ran a hose back there so I can run their misters and fill up their water trough. Over all I bought 60 ft of 3/4" pvc but I only used about 50ft. First I shut the system off then cut off the pvc coming into the shop right where the utilities. Once I tied into that I put a valve on it just incase i need to isolate. Instead of having to walk up to the top of the property to shut it off. I went about 2ft off the slab. I ran the water line inbetween the slates on my wall. The pvc fit perfectly between the slates and studs. I was able to complete this job without having to move much of my stuff in the shop. However now I need to go through some areas and get rid of some stuff. I added a faucet on the outside and inside. The inside part just to have the ability to wash out my shop. Also added a couple of hooks to hang some hose. The end of the project I up a 4 way. The end I put a 12" section with a cap. Just incase in the future I wanna add a ******* or something. I doubt that will be anytime soon.
 

Attachments

  • IMG_8276.jpg
    IMG_8276.jpg
    615.4 KB · Views: 24
  • IMG_8274.jpg
    IMG_8274.jpg
    686.3 KB · Views: 22
  • IMG_8273.jpg
    IMG_8273.jpg
    688.5 KB · Views: 21
  • IMG_8272.jpg
    IMG_8272.jpg
    775.2 KB · Views: 24
  • IMG_8271.jpg
    IMG_8271.jpg
    690 KB · Views: 19
  • IMG_8269.jpg
    IMG_8269.jpg
    692.2 KB · Views: 17
  • IMG_8268.jpg
    IMG_8268.jpg
    653.2 KB · Views: 37
OP
D

DeeDubz

Well-known member
Joined
Nov 20, 2019
Messages
1,449
Location
Socal
I was able to empty out one of the many tool boxes/work benches after upgrading. I was going to sell this husky box on offer up but I offered it to my buddy for free. Last week we got together for some beer and cigars. He mentioned out of the blue he'd like to get a work bench to put in his garage. Hes a great friend so I offered this thing up to him. Wife is out of town so I didnt have anyone to help me load it into my truck. I figured Id deliver it too so I could help him get it out of his truck. He offered to pick it up but I told him ill just deliver it. I have som errands to run anyway. Having no help to load didnt matter I just put it in the bucket of my machine and put it close to tail gate. The ****** part I didnt have a spotter and couldn't see wtf I was doing. I didnt taco my tailgate or any other part of my truck.

Last night I put my chickens in their coop to roost and noticed I was missing one. I looked all over the yard and assumed that it went missing. I had my garage door open for a while yesterday afternoon. I finished strapping the tool box down and noticed an unwelcome guest. She was content to roost there for the night but thats not her place. Took about 10 mins to get her out of my shop and into the coop. Once in there she wasnt very happy.
 

Attachments

  • IMG_8299.jpg
    IMG_8299.jpg
    859 KB · Views: 30
  • IMG_8300.jpg
    IMG_8300.jpg
    716.4 KB · Views: 38
  • IMG_8304.jpg
    IMG_8304.jpg
    264 KB · Views: 55
OP
D

DeeDubz

Well-known member
Joined
Nov 20, 2019
Messages
1,449
Location
Socal
Yesterday am I dropped off my old husky work bench off today my buddy. After that I hit HF up to return some stuff. While I was there the manager asked how I liked my tool boxes. I told him their good but I havent got the top box yet. He checked and saw that my top box showed up yesterday. I was suppose to receive an email saying come pick it up but I guess they hadn't gotten there yet. Why is it that every HF *at least in socal* is ghetto. I waited in the back ally for 30mins until they opened the roll up door. Had to wait another 10 for the fork lift driver to finish his pre trip. Once it was loaded they closed the door and left me by myself lol. Thats when some not so good looking ppl started showing up. Ended up driving to the front of the store to strap it down.
Once I got it home I unloaded it by myself. I was sweating bullets. My wife wasnt home to help. I could have called a buddy but I didnt wanna bug anyone. Theres a couple of youtube videos that talk about how to put the top box on the bottom box. They all say use a fork lift. Just take out a few drawers and lift it up. I assumed that you could secure the top and bottom with some hardware. I cut 4 holes through the rubber only to find that once I had the box in the air that the top doesn't have any holes on the bottom to attach. I used my pallet forks wrapped in towels to protect the box. This part was difficult. It was really hard for me to see with the bucket in the way of the forks. I had to stop what I was doing a few times and check my work. Once it was put on and rolled into place I started loaded it. At the end of the day I have 4 drawers that are empty. For under 3k its a pretty damn good box. I think im gonna add some side boxes to it down the road.
 

Attachments

  • IMG_8311.jpg
    IMG_8311.jpg
    665 KB · Views: 43
  • IMG_8310.jpg
    IMG_8310.jpg
    613.9 KB · Views: 41
  • IMG_8309.jpg
    IMG_8309.jpg
    625.6 KB · Views: 34
  • IMG_8308.jpg
    IMG_8308.jpg
    677.9 KB · Views: 31
  • IMG_8307.jpg
    IMG_8307.jpg
    456.1 KB · Views: 31
  • IMG_8306.jpg
    IMG_8306.jpg
    924 KB · Views: 32
  • IMG_8305.jpg
    IMG_8305.jpg
    785.8 KB · Views: 38
Last edited:

Nolift911

Well-known member
Joined
May 16, 2011
Messages
1,017
Location
Lansdowne, VA
Yesterday am I dropped off my old husky work bench off today my buddy. After that I hit HF up to return some stuff. While I was there the manage asked how I liked my tool boxes. I told him their good but I havent got the top box yet. He checked and saw that my top box showed up yesterday. I was suppose to receive an email saying come pick it up but I guess they hadn't gotten there yet. Why is it that every HF *at least in socal* is ghetto. I waited in the back ally for 30mins until they opened the roll up door. Had to wait another 10 for the fork lift driver to finish his pre trip. Once it was load they closed the door and left me by myself lol. Thats when some not so looking ppl started showing up. Ended up driving to the front of the store to strap it down.
Once I got it home I unloaded it by myself. I was sweating bullets. My wife wasnt home to help. I could have called a buddy but I didnt wanna bug anyone. Theres a couple of youtube videos that talk about how to put the top box on the bottom box. They all say use a fork lift. Just take out a few drawers and lift it up. I assumed that you could secure the top and bottom with some hardware. I cut 4 holes through the rubber only to find that once I had the box in the air that the top doesn't have any holes on the bottom to attach. I used my pallet forks wrapped in towels to protect the box. This part was difficult. It was really hard for me to see with the bucket in the way of the forks. I had to stop what I was doing a few times and check my work. Once it was put on and rolled into place I started loaded it. At the end of the day I have 4 drawers that are empty. For under 3k its a pretty damn good box. I think im gonna had some side boxes to it down the road.
That thing is a beast - !! I have never been to a HF that was not located in a sketch area.
 
OP
D

DeeDubz

Well-known member
Joined
Nov 20, 2019
Messages
1,449
Location
Socal
That thing is a beast - !! I have never been to a HF that was not located in a sketch area.
It is, I guess if you have 4 solid homies you could lift it up but why blow a back out. I thought it was only in so cal could you find a sketchy HF.
 

Xti04

Well-known member
Joined
Nov 11, 2016
Messages
2,347
It is, I guess if you have 4 solid homies you could lift it up but why blow a back out. I thought it was only in so cal could you find a sketchy HF.
Removing drawers will let 2 guys pick it up and move it. Thats how I always move my top box. Pull drawers and go from there.
 
OP
D

DeeDubz

Well-known member
Joined
Nov 20, 2019
Messages
1,449
Location
Socal
Removing drawers will let 2 guys pick it up and move it. Thats how I always move my top box. Pull drawers and go from there.
One of the you tubers said its still pretty heavy without the drawers. Its just shy under 400lbs. It would be interesting to see how heavy it is without them. Maybe around 3 bills? 150ish each dude seems manageable if the dude doesn't sit down to pee.
 
OP
D

DeeDubz

Well-known member
Joined
Nov 20, 2019
Messages
1,449
Location
Socal
Did a bunch of stuff but sadly didnt take any pictures. Over the weekend I had to cut into my back fence to even up the dirt for the fence thats going to be installed. I still need to do some grade but Ill probably get to that next week after the fence is installed. After that we're gonna get 14 yrs of 3/4 rock dropped off.
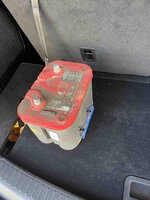
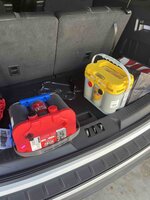
While I was moving my truck back into the shop it had a CEL. I had never seen this code pop up. It sounded like an 02 sensor in the exhaust going bad. They also mentioned it could be a low battery. Monday morning I pulled my truck out of the shop parked it. Got ready for work, went to start it and it wouldn't turn over. I figured the batteries were dead. The patties I had were 8 yrs old. The wife came and picked me up. Got out of wok early bought some new optima batteries red top and yellow top. Prior to spending the 648 i did use a volt meter to test them. Both were 12.3 volts. Good batteries are 12.5 to 12.8. Once installed the truck lived to fight another day.
 

Attachments

  • IMG_8328.jpg
    IMG_8328.jpg
    938.1 KB · Views: 19
  • IMG_8329.jpg
    IMG_8329.jpg
    587.2 KB · Views: 40
OP
D

DeeDubz

Well-known member
Joined
Nov 20, 2019
Messages
1,449
Location
Socal
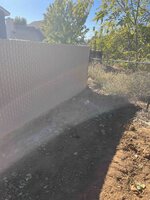
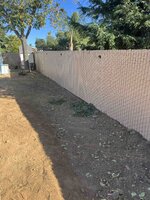
This week the fence contractor was able to come out and start on our privacy fence. Took them 3 days. Most of those days were less than half the day. The first day they showed up I told the boss if he had any problems with my neighbor to let me know. I didnt see them until they finished the job. We went over their work. I was happy with the end result. As they left the boss told me he did end up meeting my neighbor. When they first showed up he was pretty nosey. Peeping over his fence. The day they finished he told them to clean up some dirt in a trench. It wasnt much but peeping tom wanted it all gone.
This week I need to grade the back. The last photo theres quite a step down toward the fence. I need to tapper it with my machine and try and level it out. Im going to get some 3/4 rock in a few weeks. Not sure how much im going to need but im gonna start off with 14 yrds. Ill probably need another 14 yrds.
 

Attachments

  • IMG_8338.jpg
    IMG_8338.jpg
    1.5 MB · Views: 32
  • IMG_8337.jpg
    IMG_8337.jpg
    1.1 MB · Views: 31
  • IMG_8336.jpg
    IMG_8336.jpg
    1.4 MB · Views: 29
  • IMG_8331.jpg
    IMG_8331.jpg
    1.1 MB · Views: 36
OP
D

DeeDubz

Well-known member
Joined
Nov 20, 2019
Messages
1,449
Location
Socal
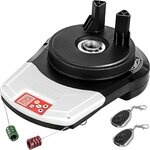
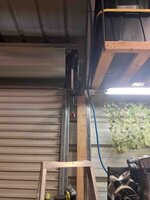
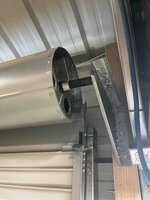
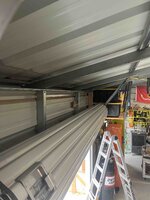
Stumbling down the youtube rabbit hole one night I came across a video of a guy putting in a cheap door opener of a roll up door. The brand is Vevor. They go for about 140 ish bucks. Cant beat it for the price. I assume ill most likely have to modify the opener itself or the drum where the motor attaches. Im going to have to move the bracket that holds the drum. I was thinking about getting a 2x4x12 piece of steel but I can add a 4x4x12 for a portion of the price of steel. It should show up this week. Ill post updates. hopefully it works out.
 

Attachments

  • IMG_8346.jpg
    IMG_8346.jpg
    503.6 KB · Views: 23
  • IMG_8345.jpg
    IMG_8345.jpg
    531 KB · Views: 20
  • IMG_8342.jpg
    IMG_8342.jpg
    356.3 KB · Views: 23
  • us-YHD0-1VJLMJ000001V1-original_img-v6-roller-door-opener-m100-1.2.jpg
    us-YHD0-1VJLMJ000001V1-original_img-v6-roller-door-opener-m100-1.2.jpg
    308.6 KB · Views: 30
OP
D

DeeDubz

Well-known member
Joined
Nov 20, 2019
Messages
1,449
Location
Socal
Finally got around to adding the stud to hold the bracket for the door. I drilled 3/8 holes in 4 places on the metal stud then was able to finish them on the wood side after I was through the metal. Sadly I dont a 3/8 drill bit thats longer than 4 inches. Once I had a pilot hole I took the stud out and finished drilling through the 4x4. But my dumb *** put a hole through my bed handle on my truck. My mistake I was in a hurry and thought I could do it without making extra holes. The bolts I added are 7" 3/8 bolts. At the moment I have them in 4 different places but im going to add another one after im done. Yesterday I moved the bracket to the wood stud that holds up the roll up door. I Secured the drum with ratchet straps that I wrapped around two different rafters.
At this point Im going to get a big piece of c channel that will fit in-between the two arms of the opener. The c channel will be connected to the drum. The arms dont mate in the holes in the drum. In stead of cutting the drum I figure this is the easiest mod. Once thats done ill have to lower the door so I can slip the motor onto the shaft. I think thats going to be the most difficult part. Once thats done Ill add a L bracket closer to the door to hold the opener in place. Wish me luck but I think I got it.
 

Attachments

  • IMG_8358.jpg
    IMG_8358.jpg
    447.5 KB · Views: 19
  • IMG_8357.jpg
    IMG_8357.jpg
    654.6 KB · Views: 17
  • IMG_8356.jpg
    IMG_8356.jpg
    830.4 KB · Views: 16
  • IMG_8355.jpg
    IMG_8355.jpg
    833 KB · Views: 16
  • IMG_8354.jpg
    IMG_8354.jpg
    468.9 KB · Views: 15
  • IMG_8353.jpg
    IMG_8353.jpg
    670.6 KB · Views: 25
OP
D

DeeDubz

Well-known member
Joined
Nov 20, 2019
Messages
1,449
Location
Socal
Vevor door opener is successfully installed. I had to make a few minor mods to make it work but not a big deal. I couldn't find any C channel so I went with a 4inch piece of square steel. This piece fits perfectly in-between the two plastic arms on the motor. I drilled 3/8 holes on the back side. Then over drilled on the side facing out so I could get a deep socket in to tighten the bolts. Also I drilled two 3/8 holes on the drum of the roll up door. Once that was attached I had to cut the plastic arms down to make it flush with the square tube. This point I was not sure how I was going to get the motor on the shaft. Once its rolled up its pretty heavy. I decided to close the door and try and pull the shaft out just a tad so I can slide the moto on the shaft. Well it worked not too bad. Once the motor was on I noticed there was too much of a gap between the motor and the bracket. I still had about 1/2 inch of space I could slide the bracket over on the 4x4. Making everything closer. I had to open the door, strap it to the rafters so I could release the weight of the bracket and slide it over. Once this was done I wasnt happy about how little the motor sat on the bracket. It sat on the bracket but it was only a portion of the mount. To fix this problem I took a thin piece of steel maybe 4x4 inch. I cut the corners off each side sorta making a + symbol. This went under the motor mount and on top of the bracket. I was able to drop in the u bolts and it was secured. Before I set it up I tested it manually. It seemed to open just fine and not hang up.
It took me about 2 mins to program the opener in the closed position and open position. Next I programed the two remotes. This thing works great. For 140 bucks you cant beat it. The opener is very quiet. This went pretty well I think after the holidays im going to install one on the other door.

Cheers
 

Attachments

  • IMG_8380.jpg
    IMG_8380.jpg
    550.1 KB · Views: 15
  • IMG_8378.jpg
    IMG_8378.jpg
    525.8 KB · Views: 15
  • IMG_8376.jpg
    IMG_8376.jpg
    536.6 KB · Views: 15
  • IMG_8375.jpg
    IMG_8375.jpg
    539.5 KB · Views: 15
  • IMG_8374.jpg
    IMG_8374.jpg
    522 KB · Views: 14
  • IMG_8373.jpg
    IMG_8373.jpg
    509.1 KB · Views: 14
  • IMG_8372.jpg
    IMG_8372.jpg
    563 KB · Views: 11
  • IMG_8371.jpg
    IMG_8371.jpg
    552.6 KB · Views: 21
OP
D

DeeDubz

Well-known member
Joined
Nov 20, 2019
Messages
1,449
Location
Socal
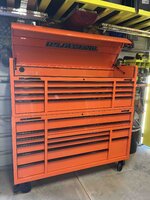
Saturday I finished up running another outlet to the other roll up door I have. Im going to do the same thing that I did on my main door. Theres a few things I still need to do but Now I have power there. Most of the materials needed to complete I had. The only thing I had to get at the hardware store was a 1/2 EMT 90. Maybe this week Ill hit up home depot and get the stuff I need to move the bracket that holds the door. After this project was finished My nephew came by to pick up my dads old tool boxes. Two on top are old school snap on. Way older than me. The roll away is a mac. The mac is pretty heavy I used my skidsteer to old it in his truck. I was initially gonna drop it off at his house but I didnt have the time. I really wanted to get this out of my shop it was taking up some room. He came by after he got off work. I hadn't seen him in a yr or so. I know he could use these boxes and I really wanna keep em in the family.
 

Attachments

  • IMG_8275.jpg
    IMG_8275.jpg
    817.4 KB · Views: 13
  • IMG_8393.jpg
    IMG_8393.jpg
    574.8 KB · Views: 12
  • IMG_8392.jpg
    IMG_8392.jpg
    542.8 KB · Views: 20
OP
D

DeeDubz

Well-known member
Joined
Nov 20, 2019
Messages
1,449
Location
Socal
Hope everyone had a good thanks giving. Mine started off finding a water leak. The water line to my shop sprang a leak. It took me about an hour to find it after digging 10 ft of trench trying to find it. Right at the connection between the two pipes. Lucky I had all the stuff to fix it without having to go to the big box store. Once that was finished I was able to confirm that its not leaking. This is probably my 3 or 4th leak in this line. I hope its the last. Finished putting dirt back in the hold with some 3/4 gravel. Got the bird on the smoker had a cigar. Life is good

Cheers
 

Attachments

  • IMG_8427.jpg
    IMG_8427.jpg
    1.1 MB · Views: 20
  • IMG_8424.jpg
    IMG_8424.jpg
    500.5 KB · Views: 20
  • IMG_8419.jpg
    IMG_8419.jpg
    1 MB · Views: 20
  • IMG_8416.jpg
    IMG_8416.jpg
    1.7 MB · Views: 17
  • IMG_8409.jpg
    IMG_8409.jpg
    1 MB · Views: 14
  • IMG_8408.jpg
    IMG_8408.jpg
    1.3 MB · Views: 15

Balor

Well-known member
Joined
Feb 2, 2014
Messages
452
Location
Florida
Hope everyone had a good thanks giving. Mine started off finding a water leak. The water line to my shop sprang a leak. It took me about an hour to find it after digging 10 ft of trench trying to find it. Right at the connection between the two pipes. Lucky I had all the stuff to fix it without having to go to the big box store. Once that was finished I was able to confirm that its not leaking. This is probably my 3 or 4th leak in this line. I hope its the last. Finished putting dirt back in the hold with some 3/4 gravel. Got the bird on the smoker had a cigar. Life is good

Cheers
Flatheads are good.
 

Bob Heine

ALLIANCE MEMBER
Joined
Oct 24, 2009
Messages
10,708
Location
Boca Raton, Florida
@Balor and @DeeDubz, I scrolled through a bunch of previous posts and even did a search. I thought I missed seeing one of these...
Flathead.jpg
...when you guys were talking about one of these:
Flathead Cigar.jpg
It's OK, I got to Oogle a lot of really beautiful old engines and hot rods.
 
OP
D

DeeDubz

Well-known member
Joined
Nov 20, 2019
Messages
1,449
Location
Socal
Monday afternoon I got a phone call from a buddy of mine. I had just finished up at the gym, he asked if I was busy. He threw a track on a job he was on and needed help putting it back on. Hes a good friend we ve done this about3 times its not too bad. The job wasnt too far from my house. Loaded up a few long pry bars head out. Hes mulching this property. Was suppose to be a quick 2-3 hr job but his track came completely off. You cant really tell but the first picture he went down that in his machine. I could barely walk up it. He sorta just rides his mulcher down the hill. Thats pretty sketchy to do in a skid steer.
His machine was 2/3s on a road. The right side of his machine is pretty close to the edge of a drainage. The track is completely off. It weights about 3k. Theres a large ram on the front that puts tension on the track. To release the pressure you have to get all the grease out. It gets a little messy and about a full tube ish of grease comes out. We chalk the back with wooden blocks. Use the mulcher to left the tracks off the ground. Then with ratchet straps and pry bars we get the tracks on. Start on the front, get the track over the idler then the back. Once those are on the bottom sorta slides into place. You can move the tracks it helps to get it to slide on as well. Not too bad we finished in about 15ish.
 

Attachments

  • IMG_8433.jpg
    IMG_8433.jpg
    898.6 KB · Views: 18
  • IMG_8434.jpg
    IMG_8434.jpg
    950.7 KB · Views: 18
  • IMG_8435.jpg
    IMG_8435.jpg
    1.2 MB · Views: 18
  • IMG_8436.jpg
    IMG_8436.jpg
    887.1 KB · Views: 16
To avoid these ads, REGISTER NOW!
Top Bottom