Corvette Mark
Active member
- Joined
- Dec 24, 2022
- Messages
- 36
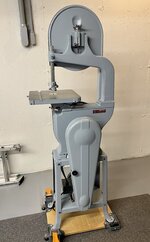
Last year I purchased this 1940s Delta bandsaw (solid upper arm, hex blade guide) and have spent the last several months doing a full restoration.
Disassembly/ clean up
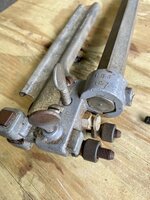
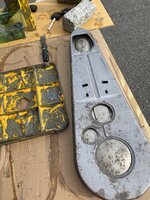
I started by disassembling the entire saw. Aside from light rust, it was in great shape. All parts were stripped with citrus paint stripper followed by a bath in Evaporust. Metal parts were all brushed on a wire wheel. Every single part was disassembled and cleaned.
Paint
The original Delta paint color was grey/ blue. The paint was oxidized, but inside the bottom casting the original color was still in good shape, so I used that to match it. I ended up using 3x coats of Rustoleum metal primer followed by 3x coats of Rustoleum “gloss winter grey”. It is more blue than grey, which was a closer match to the original than the color “smoke grey” which is another variant I see used often. For a rattle can paint job, it came out pretty well. Has some flaws, but short of putting it in a spray booth and using a real spray gun, it came out as well as it could.
Interestingly, the wheels appeared to be coated in some sort of rubberized paint… I didn’t realize this until I threw them in Evaporust and it started to react with a surfer smell, so I used a wire wheel instead to remove it.
New parts
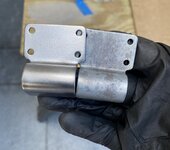
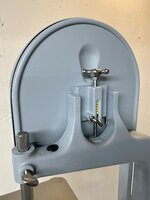
My goal was to keep the saw as original as possible, however, there are certain “consumable” parts which should be replaced after nearly 80 years. I replaced both top/ bottom wheel bearings, guide bearings, belt, guide blocks, tires, sweeper brush, and tension spring. I also replaced the two rubber grommets in the arm casting and table insert.
Movable base
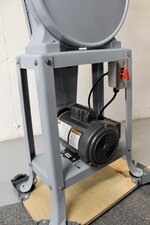
I opted to mount the saw on a mobile base. The kit is made by Bora and is supported with a 3/4” piece of Baltic birch plywood. I finished the plywood with several coats of wipe on poly to give some protection. The feet of the stand sit on the metal corners of the base which I did for rigidity. There are 3” diameter rubber washers under each foot to keep them from sliding around, and then each foot is pinned through the metal corners/ plywood with stainless steel hardware.
Motor/ electrical
The saw came with a Dayton 1/2hp motor which ran fine, but was underpowered and needed to be rewired. I purchased a new 1hp Dayton TEFC motor and wired it for 120v. You can see I fabricated a mount for an electrical box with toggle switch. The original saws did not have a switch (it was directly on the motor), however, I wanted a switch which would be more convienient to access. The electrical box mounts to existing holes in the saw stand. I fabricated two slotted pieces of bar stock so the box can be moved on the x and y axis to dial in the fit. A short run of wire connects the electrical box to the motor. I also used nylon glands for strain relief on both the motor and electrical box which worked really well. Just a few wire nuts and everything came together (note the motor has to be run CCW).
Reassembly
The fun part. Not many surprises here, I made sure to use Blue Loctite on certain parts which may have a tendency to vibrate loose in time, though most nuts/ bolts had lock washers. I also used anti seize on some surfaces as well… keep the restoration for the next guy in 80 years easier. For the table, I used Johnson paste wax. I used a couple drops of 3 in 1 oil for the trunions.
Overall the saw runs great. It cuts through wood like butter. It has a little over 6” of resaw capacity and can cut 1/16” vaneer all day.
Dust collection
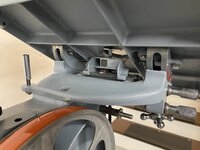
I still need to figure out dust collection, so if you have examples/ suggestions let me know. I’ve seen people make a small magnetic enclosure on the underside of the table which have a port for a shop vac attachment. This seems like the most logical place for a dust collection system as it is directly under the blade, but there isn’t a lot of room to play with.




Disassembly/ clean up
I started by disassembling the entire saw. Aside from light rust, it was in great shape. All parts were stripped with citrus paint stripper followed by a bath in Evaporust. Metal parts were all brushed on a wire wheel. Every single part was disassembled and cleaned.
Paint
The original Delta paint color was grey/ blue. The paint was oxidized, but inside the bottom casting the original color was still in good shape, so I used that to match it. I ended up using 3x coats of Rustoleum metal primer followed by 3x coats of Rustoleum “gloss winter grey”. It is more blue than grey, which was a closer match to the original than the color “smoke grey” which is another variant I see used often. For a rattle can paint job, it came out pretty well. Has some flaws, but short of putting it in a spray booth and using a real spray gun, it came out as well as it could.
Interestingly, the wheels appeared to be coated in some sort of rubberized paint… I didn’t realize this until I threw them in Evaporust and it started to react with a surfer smell, so I used a wire wheel instead to remove it.
New parts
My goal was to keep the saw as original as possible, however, there are certain “consumable” parts which should be replaced after nearly 80 years. I replaced both top/ bottom wheel bearings, guide bearings, belt, guide blocks, tires, sweeper brush, and tension spring. I also replaced the two rubber grommets in the arm casting and table insert.
Movable base
I opted to mount the saw on a mobile base. The kit is made by Bora and is supported with a 3/4” piece of Baltic birch plywood. I finished the plywood with several coats of wipe on poly to give some protection. The feet of the stand sit on the metal corners of the base which I did for rigidity. There are 3” diameter rubber washers under each foot to keep them from sliding around, and then each foot is pinned through the metal corners/ plywood with stainless steel hardware.
Motor/ electrical
The saw came with a Dayton 1/2hp motor which ran fine, but was underpowered and needed to be rewired. I purchased a new 1hp Dayton TEFC motor and wired it for 120v. You can see I fabricated a mount for an electrical box with toggle switch. The original saws did not have a switch (it was directly on the motor), however, I wanted a switch which would be more convienient to access. The electrical box mounts to existing holes in the saw stand. I fabricated two slotted pieces of bar stock so the box can be moved on the x and y axis to dial in the fit. A short run of wire connects the electrical box to the motor. I also used nylon glands for strain relief on both the motor and electrical box which worked really well. Just a few wire nuts and everything came together (note the motor has to be run CCW).
Reassembly
The fun part. Not many surprises here, I made sure to use Blue Loctite on certain parts which may have a tendency to vibrate loose in time, though most nuts/ bolts had lock washers. I also used anti seize on some surfaces as well… keep the restoration for the next guy in 80 years easier. For the table, I used Johnson paste wax. I used a couple drops of 3 in 1 oil for the trunions.
Overall the saw runs great. It cuts through wood like butter. It has a little over 6” of resaw capacity and can cut 1/16” vaneer all day.
Dust collection
I still need to figure out dust collection, so if you have examples/ suggestions let me know. I’ve seen people make a small magnetic enclosure on the underside of the table which have a port for a shop vac attachment. This seems like the most logical place for a dust collection system as it is directly under the blade, but there isn’t a lot of room to play with.