To avoid these ads, REGISTER NOW!

Delta Drill Press!

Cleave

Well-known member
Joined
Jul 11, 2018
Messages
353
Location
Back Porch
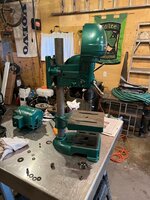
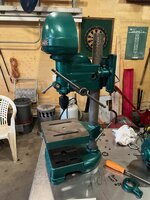
I've been using an old Delta Homecraft 11" drill press for several years, and LOVE it - very stout and accurate. But my stand was rather bulky, and not a great use of limited shop space. (Yes I could have put a cabinet under it but hadn't). I just bought a very similar Delta Rockwell floor model drill press (14" swing) for a great deal at an estate sale. You don't want to know what I paid - some previous owner tapped the table and secured the vise to it. Yes, its a Wilton 2" baby bullet.
The DP needs a new belt, but otherwise its basically good to go. Maybe I'll make a slow speed attachment? I still need to put the dial indicator and square on there to see how it compares to my other one. This one can tuck in by the end of the lathe to really get it out of the way.

DSCN8025.JPG
 
To avoid these ads, REGISTER NOW!

Roberts210

Well-known member
Joined
Dec 21, 2015
Messages
3,177
Location
Missouri
That is the most expensive drill press vise I've ever seen.
Awwwwww... come on. Make us drool by telling us what you paid.
 

crguy

Well-known member
Joined
Jan 24, 2016
Messages
2,654
Location
SW Washington
I hope you're going to remove the vise and either sell it, or use it somewhere else. That's not a good drill press vise by any stretch of the imagination.
 
OP
C

Cleave

Well-known member
Joined
Jul 11, 2018
Messages
353
Location
Back Porch
Yes folks, I have more appropriate vises for the drill press and the toe clamps to properly hold them down.
This vise will go to somebody that really wants it pretty badly.
Now back to the thread at hand - The DP is in pretty good shape, I did a simple clean and reoil of the spindle area, that's all fine. The motor and switch work but could use some improvement. Also I think there's a tension adjustment lever for this one but its missing so I'll need to track down that part and figure out how to put it in there. I may also make a slow speed attachment, we'll see when I can find the time.
 
OP
C

Cleave

Well-known member
Joined
Jul 11, 2018
Messages
353
Location
Back Porch
Here's my DP vises, and homemade toe clamps (step clamps?) to position the vises, or the work directly. Also I have a homemade woodworking table like the ones Woodpeckers and Rockler offer.

DSCN8055.JPG

Now - the lever in the middle of this picture, I imagine is to move the motor in and out to adjust belt tension and facilitate changing speeds. The inner part is missing and somebody replaced it with a 1/2" carriage bolt that doesn't do anything. Anybody have a link to a manual or know what that part is called?

DSCN8054.JPG


Here's the serial number. The badge on the front wasn't painted over, its just gone.

DSCN8053.JPG
 

Packard V8

Well-known member
Joined
Mar 16, 2009
Messages
7,380
Location
Spokane, WA
Now - the lever in the middle of this picture, I imagine is to move the motor in and out to adjust belt tension and facilitate changing speeds. The inner part is missing and somebody replaced it with a 1/2" carriage bolt that doesn't do anything. Anybody have a link to a manual or know what that part is called?
IIRC, that lever is part of the clamp to lock the head onto the column. On mine, there were two round wedges with bolt holes through them. When tightened, they pinched the column.

Also, IIRC, there is no belt tightening help. The two bolts at the bottom are loosened, belt moved to different pulley grooves and I use a bar to push some tension on the belt and then tighten the two bolts.

jack vines
 
OP
C

Cleave

Well-known member
Joined
Jul 11, 2018
Messages
353
Location
Back Porch
Jack, I found the manual and stared at the drawings for a minute and came to the same conclusion. The head is held on the column by these collars that that bolt tightens up. The manual I found there's no lever there, just a hex bolt and nut.
 
To avoid these ads, REGISTER NOW!
OP
C

Cleave

Well-known member
Joined
Jul 11, 2018
Messages
353
Location
Back Porch
Now the non-stock Westinghouse motor (3/4 HP) that came with it, takes a second or two to get up to speed. What do I check for to make the motor run properly, unless I can find a good deal on a better one?
 
OP
C

Cleave

Well-known member
Joined
Jul 11, 2018
Messages
353
Location
Back Porch
Or, I could always take the motor off my benchtop drill press and put it on this one, then get a second motor when I find the right one.
 

lafester

Well-known member
Joined
Mar 1, 2017
Messages
2,191
Location
Northern CO
I'm sure the westinghouse is fine. Just clean it up, new bearings etc. A crappy cord can effect start up or a weak capacitor.
 
OP
C

Cleave

Well-known member
Joined
Jul 11, 2018
Messages
353
Location
Back Porch
Here's a bit of progress on the slow speed attachment. A few years ago I made a slow speed attachment for the 11" Delta Homecraft DP, then removed it and ran the machine with just two pulleys. So I had a head start, already having the link arm bored for bearings, with a pulley - I just needed to make a pivot fitting to go into this column. A piece of 2" Sch 40 steel pipe fits in the column with just a little slop, so I turned a couple aluminum washers with a step, so the OD just slips into the column and the step slips into the ID of the pipe spacer. DSCN8056.JPG

DSCN8058.JPG

The pulley is a little higher than the others - two things can be done to address this.
First, the bearings in there now have a shaft collar extension. I've ordered a bearing for the top without that to gain 1/2" or so.
If that isn't low enough, I'll need to mill a step in the aluminum link arm. Not sure if I'd turn that on the lathe or try the table saw or skil saw and rasp/file. Will cross that bridge when we get to it.

DSCN8061.JPG

Here's the lathe, a WF Barnes #6, patent date on the casting is 1886. Still works well enough for simple lathe jobs.

DSCN8062.JPG
 
OP
C

Cleave

Well-known member
Joined
Jul 11, 2018
Messages
353
Location
Back Porch
I swapped to the motor from the little drill press for now. Time to get the middle pulley in line with the others. Here it is before starting, needs to come down a full belt width about. We'll gain some from the new bearing (no integrated shaft collar) and some from machining the link arm.

DSCN8066.JPG


DSCN8068.JPG

DSCN8071.JPG

Now that the pulleys are inline, its time to go to HF and get the linked adjustable v belt.

DSCN8072.JPG

Here's the woodworking table for it, I had to move the angle brackets on the bottom wider to fit - they hold to the DP using set screws to the side for quick changing from wood to metal table. You can also see the on/off switch there that I picked up, gotta mount that somewhere nice.
 

Firebrick43

Well-known member
Joined
May 12, 2015
Messages
14,032
Location
West central Indiana
Jack, I found the manual and stared at the drawings for a minute and came to the same conclusion. The head is held on the column by these collars that that bolt tightens up. The manual I found there's no lever there, just a hex bolt and nut.
These style of clamps are called "cotters"

That lever is correct. Same/similar to mine.

delta1.jpg
Remember these drill presses were made for a lot of years and through one acquisition.

Now the non-stock Westinghouse motor (3/4 HP) that came with it, takes a second or two to get up to speed. What do I check for to make the motor run properly, unless I can find a good deal on a better one?
There were no true "stock" motors. You could buy these with or without a


I know that catalogs up to 1953 which was near the end for this model of drill press, they did not sell a the press with the motor. You had to either buy one of several motors/switches separately or provide your own. There was no "standard motor" A lot of smaller machinery was sold this way up until the 50's.
 
Last edited:

JZiggy

Well-known member
Joined
Dec 1, 2014
Messages
990
Location
Atlanta
Very nice work on your multi speed pulley!! I love how you bored the pocked out for the bearing to get the pulleys the line up.
 

Packard V8

Well-known member
Joined
Mar 16, 2009
Messages
7,380
Location
Spokane, WA
Now that the pulleys are inline, its time to go to HF and get the linked adjustable v belt.

Here's where we part company. I'd never use that belt on my DP. The type belt you have on it, just two shorter ones.

jack vines
 
OP
C

Cleave

Well-known member
Joined
Jul 11, 2018
Messages
353
Location
Back Porch
Here it is finished, works as advertised. I'll need to get out the Starrett tachometer (revolution counter?) with the kids for a fun homeschool lesson.

DSCN8075.JPG

The aluminum block I bought and bored out using a homemade tool on the drill press a few years ago to make a slow speed attachment for the other drill press, I posted about that here, but the pictures don't work for me?
https://www.garagejournal.com/forum...ess-slow-speed-pulley-mount-machining.401616/

To get the hole roughed in, I made a pivot hole, and using a shoulder bolt for a pivot, was able to drill then pivot mill carefully deeper. Then made a custom boring head, with a sharpened end of a broken drill bit for a cutter, was able to take shallow passes until a press fit was achieved. Note that this sort of behavior is usually frowned upon with drill presses, but I have the Delta spindle that can be swapped for the spindle with a chuck, this spindle has a 1/2" hole with set screws. So the end mill work and the boring head work was done with this spindle. This job would have been much easier on a lathe!

DSCN2661.JPG

DSCN2682.JPG
 
Last edited:
OP
C

Cleave

Well-known member
Joined
Jul 11, 2018
Messages
353
Location
Back Porch
Maybe someday I'll round the corners on my middle pulley link arm but that'll be pretty low on the priority list!
 

Borculo Bum

New member
Joined
Mar 18, 2017
Messages
2
I bought this a few years ago because I wanted a drill press. It ran but man I knew nothing about what I should be looking for in an old drill. Needless to say, she was a total pig. I'm happy with the restoration I have done on it, the motor is kicking my **** though. anyone have some tips on how to identify an old motor? I don't think this one was original from the drill. When I flip the switch on the contactor plate isn't disengaging. I didn't burn it up (I don't think), but I don't know how to research the problem without knowing the motor type.
 

Attachments

  • IMG_0240.jpg
    IMG_0240.jpg
    295.3 KB · Views: 17
  • IMG_0241.jpg
    IMG_0241.jpg
    205.4 KB · Views: 18
  • IMG_9023.jpg
    IMG_9023.jpg
    175.2 KB · Views: 17
  • IMG_9024.jpg
    IMG_9024.jpg
    131.4 KB · Views: 17
  • IMG_9025.jpg
    IMG_9025.jpg
    149.9 KB · Views: 16
  • IMG_9026.jpg
    IMG_9026.jpg
    162.2 KB · Views: 17
  • IMG_0239.jpg
    IMG_0239.jpg
    229.1 KB · Views: 18
To avoid these ads, REGISTER NOW!
Top Bottom