To avoid these ads, REGISTER NOW!

Delta Jointer Restoration Thread

c_mccann

Well-known member
Joined
Mar 30, 2010
Messages
919
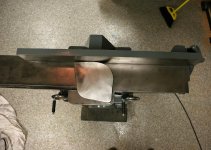
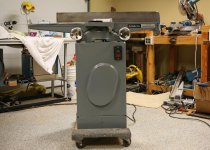
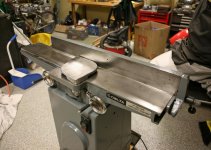
Picked up a used Delta jointer (early 80's) recently for a song. I have been looking for a good used Delta Jointer for over 2 years, either they are the wrong one, or the seller wants too much. But, I want a Delta DJ-30 as it has the best chip chute, 3 cutter spindle and the enclosed base makes it so quiet. So I waited unitl I found this one on ebay and for a song. But, she was a neglected girl, appeared to have been a survivor in a building fire and then painted black to cover the damage. No problems though- all the pieces were there, and operable (old owner has a love affair with WD-40 apparantly). I just needed to resto it and give it new life.

Basically it needed full dissambly, clean, naval jelly treatment, new bearings, new belt, new cord, paint and sharpen the cutter knives.

For those that are not familiar with the Delta jointers, they are the standard of the industry- no frills, good casting, easy to use and setup and good steel in the knives. The disassembly went easy, the cleanup was just a matter of me, mineral spirits, wire brushes, naval jelly and an afternoon.

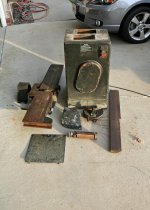
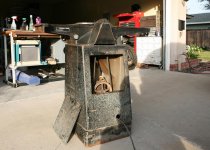
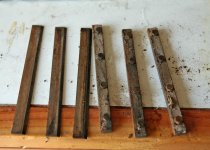
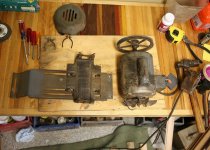
Here are the before photos..
 

Attachments

  • jointer before assembled.jpg
    jointer before assembled.jpg
    145.7 KB · Views: 341
  • Jointer before pieces.jpg
    Jointer before pieces.jpg
    146.7 KB · Views: 289
  • Jointer before rear.jpg
    Jointer before rear.jpg
    147.4 KB · Views: 272
  • Base before paint.jpg
    Base before paint.jpg
    150.2 KB · Views: 263
To avoid these ads, REGISTER NOW!
OP
C

c_mccann

Well-known member
Joined
Mar 30, 2010
Messages
919
Ok, it's disassembled. It's cleaned. Couple of good news items upon further inspection:

The motors Delta (And Rockwell) used on these machines are 3/4 hp Marathon motors. But, some were 110v only models, and some were dual voltage ones. My jointer has the dual voltage one, whoohoo! And, I opened up the inspection plate on the motor revealed a clean, shiny motor inside. The unit was obviously douced when the building was put out by the fire fighters and the closed base of the jointer protected the motor. Re-wired for 220v, and prepped for paint and new 20 ft 12/3 cord.

Not so much for the cutter bearings and cutter assembly- they revealed stock knives that had been caked in years of dust, Wd-40, gook from the fire ash and water. If you ever have wondered what to do with your ignition wrenches you used as a kid, Delta has an answer for that- cutter removal... LOL!


So, cutterhead disassembled and cleaned, bearings and bearing cases pressed out. Delta wants $42 per bearing, no thanks. 2 minutes on Google helped me get new ones at a local bearing shop for $12 for the set. Pressed in and greased, all ready for action. Gotta love the pics of the old bearings, they sounded like a 747 was landing on your forehead..

All ready for paint
 

Attachments

  • Motor inspection.jpg
    Motor inspection.jpg
    140.6 KB · Views: 191
  • Cutters before.jpg
    Cutters before.jpg
    141.4 KB · Views: 180
  • cutterhead bearings before.jpg
    cutterhead bearings before.jpg
    137.9 KB · Views: 184
  • cutter and handles before.jpg
    cutter and handles before.jpg
    140.8 KB · Views: 179
  • cutter and handles after.jpg
    cutter and handles after.jpg
    145.5 KB · Views: 177
  • motor before.jpg
    motor before.jpg
    147.2 KB · Views: 189
OP
C

c_mccann

Well-known member
Joined
Mar 30, 2010
Messages
919
Yes, it has the fence. Not too much drama there, so it's in the shop corner waiting paint.
 

collmorgen

Well-known member
Joined
Jul 5, 2009
Messages
139
Location
Deep East Texas
Have you ever visited the Old Woodworking Machines forum. OWWM.com
It has loads of information and some great examples of restorations.
 

kb2tha

Well-known member
Joined
Oct 4, 2010
Messages
495
Location
Delaware County, NYS
What is a DJ30? I have a DJ15, their 6 inch machine. DJ20 is an 8 inch model. Was there a 12 inch DJ30? If so, I have never seen one.

That will make a nice jointer for you. I have had many Delta/Rockwell jointers over the years, and I agree, they are one of the best.
Ken
 
OP
C

c_mccann

Well-known member
Joined
Mar 30, 2010
Messages
919
My bad. I was typing this post and talking on the phone at the office. It is a 37-220 model, the same model number series as the Rockwell, there was a couple of years they shared the Rockwell model numbers when Delta absorbed Rockwell. Funny thing is the plate on the machine only says 'Deluxe Jointer'. The owner who sold to me bought it off the original owner where it was in the building fire. It was charred, so the owner painted the outside of the machine rattle can black and sold it. I had to strip the motor to get the black paint off the 220v wire diagram. The guy I bought it off of basically douced it with WD-40 and used it as-is for a few years before listing it on ebay.

It is amazing that someone could abuse expensive machinery like that, but maybe the other school of thought is that they bought good stuff to be able to run it hard.

At any rate, it is getting pampered for now and put back to use.

DJ-30- I'd love a 12" jointer, but I'm afraid my furniture has to improve to sell that concept to the admiral, so it is a 6" for now..! I had a Makita Planer/Jointer combo for years- great machine but a large footprint for a home shop- I miss that unit, but I love the Delta unit- so quiet compared to the Makita.
 

woody 73

Well-known member
Joined
Apr 14, 2009
Messages
11,540
Location
The Great State Up North
I have heard stories of old timers pouring lead in which to make the babbit bearings,that little fact has made me somewhat leery of the very old machines. It sounds like your machine has the modern type bearings.

It sounds like you will have a great machine when you are done,Good Job!
 
OP
C

c_mccann

Well-known member
Joined
Mar 30, 2010
Messages
919
Update- All painted. Couple of things learned:

California never ceases to impress me with their horrible paint as time goes on. I will never paint anything Steel again with 1 part paint, Latex is not for steel. The cure times on this stuff is like 40 days. Tack free in 4 hours, durable in a month..! The extra $100 for 2-part auto paint is well worth the money, but I'm too far into this guy to go back now, I've got nice coverage, just have to be patient on the curing.

I have 2 coats of rattle can automotive primer and 3 coats of top coat on the whole unit. Rolled the first coat of finish, faired in between, sprayed the final 2 coats. Got the paint thinned out enough where it laid down nicely.

Delta Grey varies from decade to decade, but Google was my friend, a quick search and I was able to get the Sherwin Williams codes for early 80's Delta Grey- a perfect match to my Unisaw, whoohoo!

The rain in California has made my spraying challenging, but with all the moisture, I was able to spray outside with no dust and no mess.

Second thing I learned again- I think peeling off masking tape after an item is painted is a legal addiction- too much fun to see your final product come out and reveal the tape lines, too much fun!

Motor is re-wired for 220, painted and re-assembled. Bench tested and perfect.

Bearings are pressed, parts are painted, now time for re-assembly. Enjoy the pics!
 

Attachments

  • jointer painted before assembly.jpg
    jointer painted before assembly.jpg
    143.2 KB · Views: 162
  • jointer tape off.jpg
    jointer tape off.jpg
    141.1 KB · Views: 158
  • motor after paint.jpg
    motor after paint.jpg
    153.7 KB · Views: 159
  • jointer base painted.jpg
    jointer base painted.jpg
    131.1 KB · Views: 149

A_Pmech

Well-known member
Joined
May 8, 2007
Messages
8,002
Location
IL
Looking good!

I have a newer version of the same machine. It's a good little jointer.

:thumbup:
 

Greatbear

Well-known member
Joined
Jan 17, 2008
Messages
1,702
Location
Columbia/Fulton, MD
You'll love that little jointer. I have an early 70s Rockwell/Delta version with the open stand I picked up for a song about 15 years ago. A little TLC and it was back in order. My only issue was the original owner apparently ran the unit with the upper pulley setscrew missing, and the resulting rolling of the pulley on the shaft dug it up pretty severely. I put a different pulley with a deeper bore in an effort to span the undamaged shaft area which helped. By rights I should replace the shaft entirely.

When I got the jointer, it was missing the leaf guard. Trying to find a replacement was futile in my area, so I took a chance buying one from Jet that fit their current 6" model, which is based almost entirely on this unit. The new part fit perfectly in every way, but looks out of place in red and silver with a caution label. The important thing is that it serves it's purpose.
 
To avoid these ads, REGISTER NOW!

ddawg16

Well-known member
Joined
Jul 11, 2008
Messages
21,005
Location
S. California
Love seeing an old piece of equipment restored to new life.....especially when it's going to get some use.

What part of CA?
 

srmofo

Well-known member
Joined
Oct 15, 2009
Messages
6,161
Location
SW ohio
I love that grey, it reminds me when I was little running around my grandpas shop
 
OP
C

c_mccann

Well-known member
Joined
Mar 30, 2010
Messages
919
I'm in Costa Mesa, where are you?

Greatbear- good story, kinda funny how the tool world just re-badges the old designs??

Update- trying to get a handle on this paint, this is where I get picky.. Wasn't satisfied with the base's paint job- 2 coats of primer and two coats of topcoat should feel better than what I accomplished.. So.. sanded it with 220, dusted and tack clothed, and shot another coat, this time I thinned it more than 10% as suggested. Guess what- laid down much better. I think the combination of colder air, an air sprayer and water base paint makes it thicker in the sprayer, thus orange peel. Base is good now, 3 coats of top coat and nice and smooth.. Got the fence arbor cleaned, primed with 2x coats and waiting for the final coat- should be able to do when the rain clears tomorrow. I think I can get on 2 good coats tomorrow and be able to assemble the unit Wednesday- I am being easy as I know the paint needs 2 weeks at least to cure in this cold weather- (I know, 50 degree winters aren't squat as compared, don't hate, lol) but the paint is acts like latex until it cures, tearing is my future if I push it.
 

MoonRise

Well-known member
Joined
Nov 5, 2010
Messages
4,027
Location
NJ
Looking pretty good.

Couple of notes.

Personally, I would have sanded/ground/buffed the infeed and outfeed table surfaces at least a little bit before painting things. I like them smooooth and clean.

Next item, watch out for low temps with paints. Different paints and 'formulas' have different "minimum film forming temperatures". Too low and the paint will NEVER properly cure or form that nice paint film. That's in addition to or on top of the actual paint film durability and the spray application tech details and so on. If the info is not on the label or the tech info package (website or from the distributor), you can usually call/email the manufacturer and get the info. They usually want the product to come out right for you.
 
OP
C

c_mccann

Well-known member
Joined
Mar 30, 2010
Messages
919
Thanks for the tips. The infeed/outfeed tables and the fence are going to be sanded as the last step- I want the paint and assembly finished before the final on the metal resurfacing. They will be finished up with a sanding block and 280 grit. Now they are degreased, de-stained and pretty ugly, but clean and straight.

I cured the paint in a 65 degree room, but spraying was in a 55 degree temp area. The paint called for 50-90 degree temps I believe. I was surprised how the aire sprayer made it colder- makes sense though- wind chill..!

Thanks for the tips!
 

MoonRise

Well-known member
Joined
Nov 5, 2010
Messages
4,027
Location
NJ
pssst, it really wasn't "wind chill".

It was a combination of evaporative cooling from the solvent (yes, the water in latex/acrylic paint is 'solvent', just not a VOC-type solvent) and expansion cooling from the pressurized air in the sprayer (unless you were using a turbine-powered HVLP sprayer, which usually slightly warms the air stream) expanding from the pressurized level down to atmospheric perssure. Those cooling effects produce a REAL cooling effect, as opposed to "wind chill" which just makes it -feel- cooler to living things from the increased heat loss due to the air flow (but not an actual colder temperature.)

:beer:
 

christopizza

Well-known member
Joined
Dec 3, 2010
Messages
129
Location
NC
very nice! I bought several delta tools at auction many years ago and cleaned them up. Trouble was they were all 3 phase and I had 220v at the shop only.

An old timer told me to hook up an extra 3phase motor to 2 phases and wrapped a rope around the shaft and pulled on it. This motor created the 3rd leg I needed to run the other equipment. I worked that way for 2 and a half years until I sold the shop for money to finish college - still hating that I sold all that stuff....

Chris
 
OP
C

c_mccann

Well-known member
Joined
Mar 30, 2010
Messages
919
Unit is complete and running!

Got it assembled, the sharpened knives in and adjusted, the fences trued, the tables trued and the pulleys adjusted.

Took a bit of ingenuity to get the pulleys to align, but a level and plumbob were my saviors- it is amazing how off it originally was- no surprise though considering the old owner's love for WD-40..

Tester piece went in, a minor outseed table adjustment and the next pass was clean- no waves and the edges came out knife sharp on a 2x6 piece of Hickory..

Here are the final pictures
 
OP
C

c_mccann

Well-known member
Joined
Mar 30, 2010
Messages
919
Here are the pics..

Total for the project:

Used Jointer $125
New Bearings $12
Matched Paint and supplies $35
New electrical cord and plug $22
Sharpened cutter knives $18
Misc. fastners $2

Total $214

I had sold a teardown bench I refurbished for $175, (bought for $60) that was my new jointer budget, and I got close to that budget with my jointer..
Fun project, using it for my new wood projects will be more fun..
 

Attachments

  • top of unit completed.jpg
    top of unit completed.jpg
    146.5 KB · Views: 110
  • rear of unit completed.jpg
    rear of unit completed.jpg
    143.4 KB · Views: 115
  • front of unit completed.jpg
    front of unit completed.jpg
    147 KB · Views: 124
  • complete unit all fixed up.jpg
    complete unit all fixed up.jpg
    141.4 KB · Views: 154

A_Pmech

Well-known member
Joined
May 8, 2007
Messages
8,002
Location
IL
Nicely done! Looks like you're all set now.

Can't beat the price. :)
 
To avoid these ads, REGISTER NOW!
Top Bottom