To avoid these ads, REGISTER NOW!

Delta Unisaw Type 2 with biesemeyer fence

rszimm

Member
Joined
Sep 25, 2019
Messages
11
Location
tucson
So I just picked one of these up (5HP version) at auction. Part number on the saw cabinet says 36-L500 Type 2. Is that the same as the 36-L552 model?

So all seems to be good. Top is very rusted, but that'll clean up nice. On the fence the lamination peeled off, but I think I can either stick that back on or perhaps buy some formica or something and put a new one on. The extension table also has some peeling laminate.

The tough thing here is that it doesn't seem that anyone has any parts for the thing. The only parts I need are the table insert (which seems to be 'sort of' available, albeit it's expensive) and the big red STOP button cover is missing. Generally not a big deal as the button itself is still there, but I'd like to have the big red plastic cover just to make it easy to pop off with my knee or whatever. Of course they don't sell the red plastic button separately, just the whole freakin cover (A24898), but you can't even find that anywhere. What's going on?

Just FYI: Here's what my switch looks like (notice the missing red cover on stop): https://i.imgur.com/hOidmqm.jpg
And here's what it SHOULD look like:
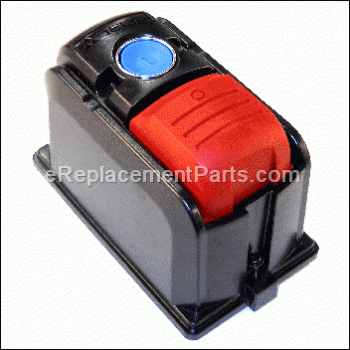
part_p_373813_3764415827.gif
 
Last edited:
To avoid these ads, REGISTER NOW!

rlitman

Well-known member
Joined
Oct 18, 2010
Messages
24,655
Location
Long Island
Nice saw. My Biesemeyer had the lamination failure too. I replaced the sides with corian and it's SO much better.
 

manwithtools

ALLIANCE MEMBER
Joined
Aug 24, 2015
Messages
14,078
Location
Lebanon, TN
That's a simple manual motor starter in an enclosure. If you can find one rated for your saw's voltage and HP it could be made to work easily. Alternatively, why not make your own swinging cover for the stop button portion?

Also agree, replace the fence sides with something other than the original material, it will slide much easier.
 
Last edited:

driftpin

Well-known member
Joined
Dec 22, 2016
Messages
11,304
Location
Miami-Dade/Broward Co. Florida
I'm no-expert on these, but be sure that if you decide to buy a switch, it's rated for your phase/amps/voltage, and that it's a magnetic switch. You don't want to pop a circuit breaker, and without a magnetic switch, re-set the circuit breaker, and have the saw start-up again, because you forgot to shut-off the 'on' switch.
 
OP
R

rszimm

Member
Joined
Sep 25, 2019
Messages
11
Location
tucson
So if you replace the sides with corian do you strip the plywood (that the laminate used to attach to) and put the corian directly to the inside part (I'm assuming it's steel in there?), or do you attach the corian to the plywood?

I'll have to search around for pieces of corian! Anyone tried UHMW?
 

manwithtools

ALLIANCE MEMBER
Joined
Aug 24, 2015
Messages
14,078
Location
Lebanon, TN
UHMW will work, trick is getting it fastened to the steel without inducing warpage. Many small fasteners work better than a few large ones in this instance. Could also use HDPE.

If using any of the alternative materails, just get rid of the OEM plywood.
 

rlitman

Well-known member
Joined
Oct 18, 2010
Messages
24,655
Location
Long Island
I'm no-expert on these, but be sure that if you decide to buy a switch, it's rated for your phase/amps/voltage, and that it's a magnetic switch. You don't want to pop a circuit breaker, and without a magnetic switch, re-set the circuit breaker, and have the saw start-up again, because you forgot to shut-off the 'on' switch.

I don't have a magnetic switch, but yes, that would be a nice upgrade. Still, I don't foresee tripping the dedicated breaker on my saw. But if I did, I am WELL aware of the switch issue. Of course, not all saw users are.

So if you replace the sides with corian do you strip the plywood (that the laminate used to attach to) and put the corian directly to the inside part (I'm assuming it's steel in there?), or do you attach the corian to the plywood?

I'll have to search around for pieces of corian! Anyone tried UHMW?

Underneath the laminate you'll find that the plywood has been attached to the steel frame by using countersunk self tapping screws. You can lift the formica with a heat gun and a scraper/chisel. At that point, you should be able to clean off the glue and contact cement on more formica, but in my case, the plywood was already beyond repair (I bought the saw cheap and well abused).

My first attempt at attaching corian was with epoxy. That eventually failed. The plastic expands and contracts at a different rate than the steel, and in the winter it popped off on one end making a sort of scary tuning fork.

I've since switched to using Clear Gorilla Glue (NOT Super Glue). That's held up very well for a few years now.

I've seen many fences done with UHMW, but I'm not sure how you'd attach it to a steel Biesemeyer. UHMW doesn't glue, and I don't want exposed screw heads (even countersunk) on the fence face, or ANYTHING that can catch. The good UHMW fences I've seen screw to the plastic from the back-side, but they were built around aluminum extrusions and bolted construction. They also use many fasteners, as UHMW will get wavy where clamped (corian is too rigid to do this).

If you really like the slipperiness of UHMW, there's always UHMW tape. I actually used that on my Biesemeyer to replace the trashed center pad that the fence glides over the table with. My father's been using UHMW in tape form on his Biesemeyer faces for years.

I like the corian for several reasons over both the formica and UHMW options.

1) By making it myself, I was able to extend the fence face height about 1-1/4" above the height of the steel fence body. The taller fence rises above the blade's maximum height, giving me a convenient storage till (for marking gauges, pencils, etc.), as well as yet another excuse to always use a push stick (because the fence just doesn't leave room for your hand).

2) The corian is HARD, which means it takes a sharp edge. This helps at the bottom, because even the thinnest of pieces don't stand a chance at slipping under the fence. In my case, my fence rides 0.005" above the table, set there by the thickness of the UHMW tape I applied after I glued the corian on sitting directly in contact with the table (I clamped everything flat and down, with just a sheet of waxed paper on the table to help release).

3) The corian is strong. Strong enough and straight enough, and now tall enough that I can make auxiliary tools that slide on top of it. In my case, I made a two sided accessory. Facing one way, I have a vertical support that I can clamp things to to use as a tenoning jig. Turned 180 degrees (so the tenoning support faces away from the blade), I have a 45 degree support, so I can cut in splines.
 
To avoid these ads, REGISTER NOW!

Downwindtracker 2

Well-known member
Joined
Jun 13, 2019
Messages
1,715
Location
BC
For a table insert , you can use a piece of 3/8" phonlic (sp) board. The stuff can be tapped for the four tabs. Using set screws, you adjust your height. You want to make a few, for dado and angle. The POS factory one is removed so you get a "zero" blade clearance.
 

rlitman

Well-known member
Joined
Oct 18, 2010
Messages
24,655
Location
Long Island
For a table insert , you can use a piece of 3/8" phonlic (sp) board. The stuff can be tapped for the four tabs. Using set screws, you adjust your height. You want to make a few, for dado and angle. The POS factory one is removed so you get a "zero" blade clearance.

I'm a HUGE fan of zero clearance inserts.

Phenolic is the gold standard. It's smooth, tough, and strong enough to work well even though the insert is otherwise pretty thin. I'm just too cheap to buy phenolic blanks.

For my own saw, I kept a decent quantity of 3/4" plywood with hard lacquer finish on it from a piece of furniture I demolished that I use for my inserts. The problem with using 3/4" stock for the insert though is that the tabs and arbor flange/washers both come up to about 1/4" from the surface. But 1/4" plywood is (like UHMW) just too springy to be used as an insert.

My solution was to make a router template. I cut out the rough rectangle, scroll saw out the round ends, and drop the blank in the template. From there, I route out all the places that need to be thinned. Next, I remove my riving knife and raise the running blade through the plate. Some TINY wood screws go in at each tab location for final leveling. I finish by using the scroll saw to extend the slot back through where my riving knife goes.

I guess I need to include all this in my pictures...
 

Voi

Well-known member
Joined
Oct 10, 2010
Messages
5,151
Location
Western South Dakota
I'm a HUGE fan of zero clearance inserts.

I made one of my ZCI's from an extra regular steel insert that I picked up super cheap.

I flipped it upside down on some waxed paper and applied a thick layer of fiber filled body filler. Once that was cured I did a skim coat of regular body filler on the top side and sanded it flush. After that just raise the blade through the insert with a board clamped over the top like and other ZCI.

This was my favorite ZCI because it still had the leveling screws and was completely repairable and could be modified. Like if I needed to convert it to an angled insert of if I needed to fill the ends because I had the blade raised up really high for the previous project. Just trowel in some body filler and give it a quick sanding and start over.

I'm not sure if the fiber reinforced body filler was necessary but I had it so I used it.

I did keep an old narrow kerf blade around for the initial cut through the cured body filler. I wasn't sure what effect the fibers would have on a new expensive blade so I only did the final cut with my good blade.
 

gungatim

Well-known member
Joined
Jan 8, 2013
Messages
8,101
Location
west mich
I just use particle board or whatever scrap MDF for my ZCI's. I just rough it out with the bandsaw, stick double face tape to another one and flush cut on the router table.

drop it, slide the fence over it, and slowly raise the blade.

then just shim with some tape to get it level. don't need to be perfect or smooth, your wood rides on the steel table not the insert.
 

rlitman

Well-known member
Joined
Oct 18, 2010
Messages
24,655
Location
Long Island
...then just shim with some tape to get it level. don't need to be perfect or smooth, your wood rides on the steel table not the insert.

If the wood doesn't ride on the insert, then there's no point in making it zero-clearance.

As for level, you want the leading edge of the insert to be beneath table height by a few thousandths of an inch, and the trailing edge to be proud by the same amount. This avoids the possibility of the work catching on anything.
 

PNWguy

Well-known member
Joined
Jan 3, 2018
Messages
494
Location
Near Grants Pass, OR
I'd also consider Delrin for the sides of the fence and the insert. I haven't tried it yes, but my next insert will be Delrin. Very smooth, slick and durable.
 
To avoid these ads, REGISTER NOW!
Top Bottom