To avoid these ads, REGISTER NOW!

Between 485 & 705 SQ/FT Denver MCM garage expansion

Workspaces between 485 and 705 squarefeet.

dwlachowicz

Well-known member
Joined
Jan 21, 2019
Messages
50
Location
Mount Prospect, IL
The T-shirts were a test run of the logo - single ink color (white) on dark shirts. I modified the logo, most obviously by adding two more colors to reflect better the theme of the garage. The printer has reasonable pricing on multicolor screening (around $24 depending on quantity) so I'm planning on another run using the 3 color image on light blue shirts. If anyone is seriously interested, let me know.
attachment.php

I'd be totally interested in a shirt, Size Small. Let me know how to send you funds! :thumbup::beer:
 
To avoid these ads, REGISTER NOW!
OP
K

kwyjibo

Well-known member
Joined
Apr 8, 2008
Messages
743
I was in the middle of replying earlier when I got a text from HD that my order was ready for pick up. So I dropped everything and ran out the door. I'll post an update on that later today
Enjoyed reading through your thread today. My buddy worked at Centerline in Lafayette for 4 years and he had quite the steering wheel collection too. I think anything below 30 is sane...
We're lucky to have such a local resource. I've never owned an Alfa, but I would like to. Every few years I research new projects and, until I found the targa, I was thinking about the Giulietta Sprint. It could still happen....
Interesting concept on the clamping bench, I had not seen that one before.
Since you've built a lot of cabinets at this point... can I ask, do you use any accessories for the track saw for repeatability? Like rail square or parallel guides? I'm working on making a track saw cutting station right now but for me that's the major downside when used alone -- it's difficult to get repeatable or truly square cuts.
Can't wait to see more progress on the credenza. :D
I don't use any of those guides. I'm sure they'd speed up my process and save me lots of trouble, but I'm not a pro so time isn't money. money is money, and I'm a cheapskate. I just carefully measure and re-measure before cutting. I measure and mark points as far apart as possible to get close to parallel. Then I use a carpenter's square to check the track (see the photo) on both edges. If the square agrees with the track then I'm reasonably confident of the cut. I use the same process for setting up the track for dadoes.One other thing that I did was make sure that all my measuring tools were consistent. When I was building the fences I found that one of my tape measures was way off, which was a problem when I had one on site and another at the saw. I saw a big difference after I replaced any tape measures and rulers that weren't consistent with the others and made an effort to use the same tape measure for everything.
attachment.php

Yeah thanks for the garage shots! Can’t wait to see more updates. And please share some targa content as well!
I'm hoping that the updates will be more frequent now that the hardware has arrived. You guys will know when the targa comes home! I don't think that I'll be able to contain myself when I'm finally able to work on it in the garage.
I'd be totally interested in a shirt, Size Small. Let me know how to send you funds! :thumbup::beer:
I didn't order any small or medium shirts based on what people wanted in the test order. I'll check where the current order is in the queue and if I can still add to it. I do have a medium in the white on maroon, but that is neither small nor Gulf colors. Send me a PM with your info and I'll contact you about the Gulf shirts
 

Attachments

  • DSCN5936.jpg
    DSCN5936.jpg
    101.6 KB · Views: 1,164
OP
K

kwyjibo

Well-known member
Joined
Apr 8, 2008
Messages
743
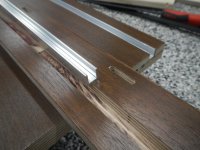
OK, I now have all the hardware for the credenza so I'm now the rate-limiting factor. First thing on the list was to fit aluminum channels into the top and bottom of the carcass to act as tracks for the door. They fit nice and tight but I'll use contact adhesive to make sure they don't come loose.
attachment.php

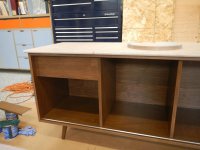
Once the channels were in place I could start glueing up the parts. The bottom, back and center partitions are glued. I got impatient and test fit the sides and turntable tray so that I could get a look at it. There will be a drawer in the right most section to match the fixed turntable shelf.
attachment.php
 

Attachments

  • DSCN5948.jpg
    DSCN5948.jpg
    146.2 KB · Views: 1,138
  • DSCN5939.jpg
    DSCN5939.jpg
    147.8 KB · Views: 1,126
OP
K

kwyjibo

Well-known member
Joined
Apr 8, 2008
Messages
743
quick Saturday update
The credenza looks the same as in the last photo, but now the sides are actually glued on. I only have one pair of F-clamps and 2 pairs of parallel clamps. And none are large enough to cover the cabinet width. So I needed to combine them to clamp the carcass sides. I don't really know if the hole at the end of the bar is there for anything other than hanging, but they're great for bolting together two clamps to make one longer clamp. Here's what it looks like at the junction
attachment.php


Small thing, but I'm excited: My first set of decals came in today's mail
attachment.php
 

Attachments

  • DSCN5949.jpg
    DSCN5949.jpg
    101.9 KB · Views: 1,089
  • DSCN5953.jpg
    DSCN5953.jpg
    95.8 KB · Views: 1,078

Jo3l

Well-known member
Joined
Jul 25, 2018
Messages
187
Location
Phoenix
The credenza is looking great!
I have an old console that I had hollowed out to house all of our entertainment style electronics.

09.jpg


But I've always dreamed of building one from the ground up as you are. Very nice work, I'll be looking forward to more updates on it :thumbup:
 
OP
K

kwyjibo

Well-known member
Joined
Apr 8, 2008
Messages
743
Thanks for the photo Joel! I just happened to be starting my evening project of finding pictures of credenzas so that I could decide on leg placement.

I spent the day working on edge banding. The carcass is done! ok, I'm still working on the finish. Here it is laying on it's back so that I can apply the banding on the front edges. At this point I've also applied the stain.
attachment.php

Here's a look at the stereo side. Those are the shelves and drawer front drying in the background
attachment.php

All the joints are rabbets or dadoes with dominos. My wife likes the look of mitered joints best, so I cut the edge banding at 45degree angles. So unless you look underneath, you don't see rabbets.
attachment.php
 

Attachments

  • DSCN5959.jpg
    DSCN5959.jpg
    123.1 KB · Views: 981
  • DSCN5958.jpg
    DSCN5958.jpg
    154.8 KB · Views: 989
  • DSCN5957.jpg
    DSCN5957.jpg
    111.3 KB · Views: 987

Arclitgold

Well-known member
Joined
Dec 20, 2017
Messages
317
Holy moly that cabinet looks incredible. Are you sure you weren’t a carpenter in a past life?


Sent from my iPhone using Tapatalk
 
OP
K

kwyjibo

Well-known member
Joined
Apr 8, 2008
Messages
743
Thanks guys! Unfortunately I didn't have much real experience at the start which would have kept me from making some basic errors. I've stopped noticing some of the mistakes when I look around the garage, but there are a few that still piss me off when I see them

The first coat of gel topcoat was dry enough by late afternoon to flip it over and give it a quick look. First up was leg placement. Luckily the carcass can balance on the legs so I can look at the legs in different positions. The photo was taken when the left legs were centered on the opening and the right set was inset the same distance that they are tall. I'm leaning towards the more outbound look. The second test was how much the top should overhang. That's why there's an old foam sheet on top.
attachment.php
 

Attachments

  • DSCN5974.jpg
    DSCN5974.jpg
    148.4 KB · Views: 934

Bakafish

Well-known member
Joined
Feb 7, 2017
Messages
477
Location
Tokyo
Agree with moving those legs more outboard, closer to the vertical side panels. Point loading that plywood in the middle of its least supported span just doesn't seem advisable (without reinforcement anyway.) I assume there will be some heavy audio gear and over time I can imagine there will be some flex in those spans which could pinch your sliding doors, and possibly cause visible bowing to those sections. Maybe that aluminum track is stronger than I think, I'm always over engineering things, but that's what jumps out at me.

Love the look of that walnut finish and the edging looks great!
 

BoilermakerFan

Well-known member
Joined
Apr 17, 2006
Messages
2,188
Location
Indianapolis, Indiana
Thanks guys! Unfortunately I didn't have much real experience at the start which would have kept me from making some basic errors. I've stopped noticing some of the mistakes when I look around the garage, but there are a few that still piss me off when I see them

The first coat of gel topcoat was dry enough by late afternoon to flip it over and give it a quick look. First up was leg placement. Luckily the carcass can balance on the legs so I can look at the legs in different positions. The photo was taken when the left legs were centered on the opening and the right set was inset the same distance that they are tall. I'm leaning towards the more outbound look. The second test was how much the top should overhang. That's why there's an old foam sheet on top.
attachment.php

it looks like the two outer "boxes" are the same width. So i would try the legs in 1/3 of the width of the outer box. then move them in the same distance from the front edge.
 

gearhead1960

ALLIANCE MEMBER
Joined
Mar 21, 2019
Messages
1,862
Location
Manassas, VA, a small blot in history
Thanks guys! Unfortunately I didn't have much real experience at the start which would have kept me from making some basic errors. I've stopped noticing some of the mistakes when I look around the garage, but there are a few that still piss me off when I see them

The first coat of gel topcoat was dry enough by late afternoon to flip it over and give it a quick look. First up was leg placement. Luckily the carcass can balance on the legs so I can look at the legs in different positions. The photo was taken when the left legs were centered on the opening and the right set was inset the same distance that they are tall. I'm leaning towards the more outbound look. The second test was how much the top should overhang. That's why there's an old foam sheet on top.
attachment.php

Here's a Paul McCobb Dresser that was for sale on Ebay that shares similar size and leg style. Perhaps your positioning should mirror this.....
 

Bakafish

Well-known member
Joined
Feb 7, 2017
Messages
477
Location
Tokyo
Yeah, they are quite inset, but it also looks like the legs are on plate or stretcher that reinforces the attachment area. The visual balance of the proposed placement looks good, my concerns about strength are still there though.
 
OP
K

kwyjibo

Well-known member
Joined
Apr 8, 2008
Messages
743
Thanks for all the comments and photos
The legs are of a similar design to those in gearhead1960's photos. I picked them up online from a company located in VT, a few towns north of where we lived in NH. I'll post a photo later
We arbitrarily settled on a location based on what "looks right". Coincidently (?) it is roughly between BoilermakerFan's 1/3 suggestion and my inset=height would put it.
 
OP
K

kwyjibo

Well-known member
Joined
Apr 8, 2008
Messages
743
I'm just working on the finish, so I don't have any photos of progress today
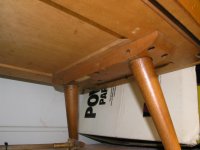
Before I forget, here is the photo of the legs
attachment.php

And here is the rabbet disguised as a mitered joint
attachment.php


Completely off topic....
I was browsing around the interwebs and came across a story that Jeff Grosso (a pro skateboarder) died recently. I didn't know him well but we skated the same ramps in Northern Calif during the mid-80s. That started me down a rabbit hole, which got me searching some old skating buddies. And that got me pulling old photos to jog some names out of old memories. I scanned a few to send to friends. I need to work on the scans but here are a couple
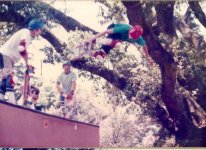
Corey O skating, Greg and Fab waiting. Atherton Ramp circa '84. I always liked the look on Fab's face in this shot
attachment.php

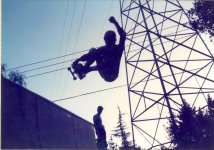
Frontside air by me, I can't remember the guy's name waiting. Jason's Ramp circa '85. One of the few photos of me because it seemed like I usually the one taking them. I set my friend up on the transition, pointed towards the sun to get the silhouette
attachment.php

I used to also ride freestyle BMX. But this is the King of the Skateparks, Eddie Fiola, sometime around '83. I rode my BMX bike about 40 miles roundtrip because I heard that he might be around. Totally worth it to see him ride
attachment.php
 

Attachments

  • frntsd.jpg
    frntsd.jpg
    154 KB · Views: 748
  • corey.jpg
    corey.jpg
    155.8 KB · Views: 745
  • fiola.jpg
    fiola.jpg
    101 KB · Views: 737
  • DSCN5992.jpg
    DSCN5992.jpg
    116.1 KB · Views: 1,284
  • DSCN5990.jpg
    DSCN5990.jpg
    113.2 KB · Views: 744

Bakafish

Well-known member
Joined
Feb 7, 2017
Messages
477
Location
Tokyo
I didn't realize those legs were mounted on a plate. I retract my concerns, should be good to go!
 

Jo3l

Well-known member
Joined
Jul 25, 2018
Messages
187
Location
Phoenix
Those are some nice leg mounts! Too bad they will be totally hidden, but at least you'll know they are there :)
 
To avoid these ads, REGISTER NOW!
OP
K

kwyjibo

Well-known member
Joined
Apr 8, 2008
Messages
743
The legs are now mounted and the top is being finished. Here it is after I crosscut the top to make the turntable lid
attachment.php

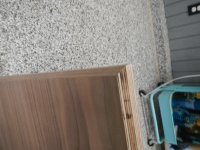
a view of the bevel along the bottom edge with one side edge banded. It's a 45 degree cut ending about 1/2 the depth. The 7/8" edge band just covers the total surface.
attachment.php

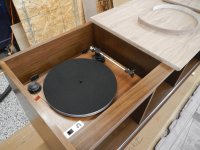
I couldn't resist putting the turntable in for a test fit. I'm planning on making a cover to fit the space between the turntable and the walls. But I won't be surprised if I end up making a new plinth that fits the space better (and hopefully matches better)
attachment.php
 

Attachments

  • DSCN6006.jpg
    DSCN6006.jpg
    138.6 KB · Views: 1,131
  • DSCN6004.jpg
    DSCN6004.jpg
    133.6 KB · Views: 1,129
  • DSCN5995.jpg
    DSCN5995.jpg
    130.7 KB · Views: 1,141
OP
K

kwyjibo

Well-known member
Joined
Apr 8, 2008
Messages
743
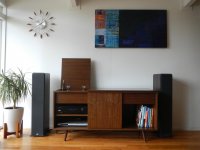
The audio equipment is nothing special: U-turn turntable, Cambridge Audio SR20 receiver and Polk S50 speakers. The system works fine for me. Until a couple years ago I was using my '80s Bose 301s with Sony $99 receiver and $200 5-disc CD player which are now in the garage. I will want to pick up a new CD player at some point for in-house use because right now I'm using a $30 DVD player. The biggest problem is that all this work still doesn't solve my vinyl record storage problem. I left a couple apple crates of 12" records at my parents house 25 years ago that I've been meaning to retrieve but I don't really have a place to keep them. still.

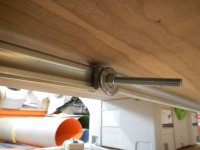
I made the sliding door using a piece that I selected earlier based on the grain pattern. I figured that the top and door would be the most visible parts, so I picked and set them aside early. The door rolls on a Hafele wheel/guide insert in the inlaid tracks. Other than the finish, I need to make the drawer for the right box and mount the turntable lid. Almost there.
attachment.php
 

Attachments

  • DSCN6018.jpg
    DSCN6018.jpg
    144.5 KB · Views: 1,015
Last edited:

BoilermakerFan

Well-known member
Joined
Apr 17, 2006
Messages
2,188
Location
Indianapolis, Indiana
The audio equipment is nothing special: U-turn turntable, Cambridge Audio SR20 receiver and Polk S50 speakers. The system works fine for me. Until a couple years ago I was using my '80s Bose 301s with Sony $99 receiver and $200 5-disc CD player which are now in the garage. I will want to pick up a new CD player at some point for in-house use because right now I'm using a $30 DVD player. The biggest problem is that all this work still doesn't solve my vinyl record storage problem. I left a couple apple crates of 12" records at my parents house 25 years ago that I've been meaning to retrieve but I don't really have a place to keep them. still.

I made the sliding door using a piece that I selected earlier based on the grain pattern. I figured that the top and door would be the most visible parts, so I picked and set them aside early. The door rolls on a Hafele wheel/guide insert in the inlaid tracks. Other than the finish, I need to make the drawer for the right box and mount the turntable lid. Almost there.
attachment.php

Nothing wrong with Polk speakers. I still have my '92 or '93 vintage Polk S4 bookshelf speakers. And the old Monitor 10 speakers were pretty great too.

Look at Pro-Ject TTs for a budget friendly upgrade and Grado cartridges. I prefer the Grado sound signature over Ortofon cartridges.

My favorite sounding CD players at a reasonable price point are Denon units.
 
OP
K

kwyjibo

Well-known member
Joined
Apr 8, 2008
Messages
743
Thanks! I appreciate you guys taking the time to read and comment. Thanks also for the component suggestion. I wish that I could sit and compare how all these different components actually sound.
The door is stained and I couldn't resist getting a preview before applying the topcoat.
attachment.php

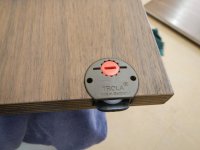
Also, this is the roller insert I used
attachment.php
 

Attachments

  • DSCN6021.jpg
    DSCN6021.jpg
    149.6 KB · Views: 954
  • DSCN6023.jpg
    DSCN6023.jpg
    103.1 KB · Views: 957

iced98lx

ALLIANCE MEMBER
Joined
Oct 28, 2013
Messages
1,068
Location
South Eastern SD
Gosh that is a dang good representation of what I would expect a MCM stereo cabinet to be, except high quality craftsmanship and not chipboard ;)
 

Brian_P

Well-known member
Joined
Jan 27, 2017
Messages
47
Location
Georgia
Funny. I've been following this thread for a while (along with 10 or so others) and I've noticed that while most GJ threads result in my wife glancing at my screen, becoming rapidly bored, and looking away, or perhaps noticing some expensive tool and getting a worried look in her eyes, this thread has resulted in multiple requests. I now have a pergola on the to-do list, she keeps looking at midcentury homes on zillow (to be fair, our last home was a midcentury ranch and we have always loved the style), and if I show her this console I think my free time will be booked for the year! It's beautiful work, and almost certainly better than the originals. Thanks for posting it.
 
OP
K

kwyjibo

Well-known member
Joined
Apr 8, 2008
Messages
743
Thanks iced98Lx and Brian_P (I'm sorry if anything I've done resulted in more work for you)!

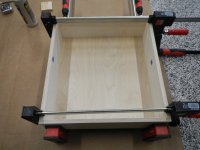
More of the same - I'm mostly working on the finish. The only thing worth photographing is the drawer build. It took all my clamps to hold it together for the glue up
attachment.php

I'm happy with how it turned out. It's probably my best yet -the joints are tight and the whole structure is square. Finally! this is my thirteenth drawer so it's about time I got it right
attachment.php
 

Attachments

  • DSCN6027.jpg
    DSCN6027.jpg
    147.7 KB · Views: 870
  • DSCN6025.jpg
    DSCN6025.jpg
    124.8 KB · Views: 871

topcok88

Well-known member
Joined
Jun 3, 2013
Messages
660
Appears to be Sipo dominos with the through tenon appearance? Have been seeing that approach recently on the WW forums.


Sent from my iPhone using Garage Journal
 

Jo3l

Well-known member
Joined
Jul 25, 2018
Messages
187
Location
Phoenix
Looks fantastic! Besides the condition would have never guessed it was brand new
 

Brian_P

Well-known member
Joined
Jan 27, 2017
Messages
47
Location
Georgia
Ha! No, no extra work. I'd be doing a project anyways, so inspiration is always good. And, love the joinery.
 
OP
K

kwyjibo

Well-known member
Joined
Apr 8, 2008
Messages
743
Thanks guys!
topcok88 - those are the standard beech dominos. I think the darkness is just the end grain absorption. I made all the drawers in the garage using through tenons, but this time added a rabbet into the mix.

The drawer is now installed so this is the first time for me to get an actual look at all the parts together. Otherwise, just working on more coats of finish
attachment.php
 

Attachments

  • DSCN6028.jpg
    DSCN6028.jpg
    150 KB · Views: 780
Last edited:

wendle

Active member
Joined
Jul 19, 2018
Messages
27
Location
NSW,AU
Also, this is the roller insert I used

Don't lay the cabinet on it's back with the door installed. The weight of the door levers the rollers out of the board and quite often rips a chunk of the material out with them :wtf:

There is a copy made by another supplier with two "ears" sticking up from the roller with screw holes in them to stop this from happening...
 
OP
K

kwyjibo

Well-known member
Joined
Apr 8, 2008
Messages
743
Thanks for the comments
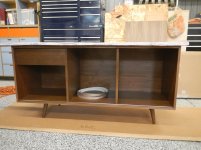
The last coat of finish went onto the credenza yesterday so we moved it into the house. We need to make a few adjustments but here it is in it's finished state.
attachment.php
 

Attachments

  • DSCN6048.jpg
    DSCN6048.jpg
    100.5 KB · Views: 1,849
To avoid these ads, REGISTER NOW!
Top Bottom