To avoid these ads, REGISTER NOW!

Detached 14x22 service bay build

yetibiker

Member
Joined
Nov 12, 2013
Messages
24
c1f99959c8c60bd336a16224c6c0d1da.jpg
I’m coming up on a year of owning this house with a very unique garage and workshop layout and I’ve figured out how to make it work for me.

This build doesn’t feature a workshop. That is in my basement. No lawn and garden or bikes; there is a shed for that. I don’t need to come and go from this garage because that is what the attached garage is for. This build is all about my “back garage”

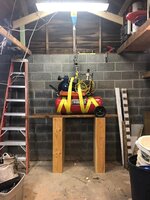
This garage will have the primary purpose of being a service bay for automotive repairs and maintenance, complete with a two post lift. I have a Suburban 2500, and like to fix and flip cars. Someday I will have something exiting to wrench on.

There are some limitations.
-The floorspace is 14’ wide and 22’ deep. Walls are 8’ tall.
-It is made of cinder block and brick and positioned tight into the corner of my lot. It cannot get any bigger.
-The foundation has some issues caused by neglected drainage by previous owners. This has caused structural damage to the walls and floor. I don’t know if this can be repaired, but the structure is still sound and I am working on a landscaping solution to the drainage problem to prevent further settling and damage.
-It has to accommodate a beast of a Suburban.

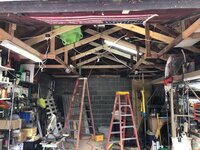
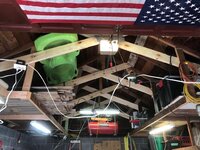
So far, I’ve built scissors trusses around my rafters to allow the rafter ties to be removed for the headroom. Part of the truss design includes support for a 3’ deep shelf on each side at the height of the old rafter ties. They will be like overhead compartments on an airliner, up and out of the way, while partially reclaiming the lost attic space.

Insulation and paint are two more goals for the near term, maybe even plywood over the insulation. Lots of work to do. More photos will follow. My goal for this week is to continue building my trusses down to accommodate the side shelves.

Buckle up, because this isn’t one of those well-funded builds and I’m doing the whole thing myself as time permits. I’m really counting on a whole lot of white paint to be able to make all of my repurposed cobbling look decent.


Sent from my iPhone using Tapatalk
 

Attachments

  • c1f99959c8c60bd336a16224c6c0d1da.jpg
    c1f99959c8c60bd336a16224c6c0d1da.jpg
    127.4 KB · Views: 2
To avoid these ads, REGISTER NOW!

Jking24

Well-known member
Joined
Feb 27, 2018
Messages
258
Should work well length is gonna be a little tight but doable. I have a 16x24 outside dimension with two coarse of block and 8'stem walls with stick built roof with no bottom coard. Lift fits just inside of the roof sheathing. Mine has a 4ft mezzanine in the very front used for compressor and storage. I also made swinging barn style doors to avoid complications with the lift and lighting. Crew cab long bed trucks cant be lifted without
the doors open but this is only because of the mezzanine. 3ft would have worked out better their. It's insulated with r13 and sealed up pretty tight. I heat it with two 1500 watt electric heaters and can maintain a very comfortable working temperature as long as the outside temp isn't in the single digits then i have to fire up the torpedo. I have a window unit through the wall aswell as two ceiling fans with one pulling and one pushing. I found this does a nice job of equalizing the temp. I built this about 11 years ago and theirs not much i would do differently for my needs. Walls also sheathed in osb makes hanging things a breeze Hope this helps
 
OP
Y

yetibiker

Member
Joined
Nov 12, 2013
Messages
24
Should work well length is gonna be a little tight but doable. I have a 16x24 outside dimension with two coarse of block and 8'stem walls with stick built roof with no bottom coard. Lift fits just inside of the roof sheathing. Mine has a 4ft mezzanine in the very front used for compressor and storage. I also made swinging barn style doors to avoid complications with the lift and lighting. Crew cab long bed trucks cant be lifted without
the doors open but this is only because of the mezzanine. 3ft would have worked out better their. It's insulated with r13 and sealed up pretty tight. I heat it with two 1500 watt electric heaters and can maintain a very comfortable working temperature as long as the outside temp isn't in the single digits then i have to fire up the torpedo. I have a window unit through the wall aswell as two ceiling fans with one pulling and one pushing. I found this does a nice job of equalizing the temp. I built this about 11 years ago and theirs not much i would do differently for my needs. Walls also sheathed in osb makes hanging things a breeze Hope this helps


That is encouraging. I got all of my scissors trusses up and am plugging away at my perimeter shelf and modifications to my garage door track. I like the idea of stuffing my air compressor up into the dead space over my (now angled) garage door as long as I have a way to get it down again if I need to work on it. I can’t do barn doors because my garage is lower than the street and my driveway is short and steep. My Suburban backs in, so does my daughter’s Honda Civic, but the wife’s Toyota Sienna lacks the departure angle to get over the scupper bump.

Since I work all the time, I don’t see the garage being heated very often. I don’t even want to vent the roof, just 24” wide Kraft-backed rolls between the rafters. I have a good-sized kerosine torpedo heated for now, and hate the idea of electric heat, but for the little while I’m out there, I might opt for a 5kw garage heater. I dig the idea of AC, too, and ceiling fans.

I hadn’t considered sheeting the walls. That sounds kind of appealing. I’ve been hammer drilling 1/4-20 caulk-ins where ever I need to hang something and it is a PITA.

I think that the most important thing will be to minimize what is on the floor, and make sure it is on wheels. I want to get everything dialed in on a shoestring budget before I get the lift. I think it will be a couple years.

Well, I have to go figure out what is binding on my garage door. Once I have that sorted, I’ll drop some more pictures. ecbb05a54309613e073daf2e2de13cde.jpg


Sent from my iPad using Tapatalk
 

Attachments

  • ecbb05a54309613e073daf2e2de13cde.jpg
    ecbb05a54309613e073daf2e2de13cde.jpg
    124.4 KB · Views: 2
To avoid these ads, REGISTER NOW!
OP
Y

yetibiker

Member
Joined
Nov 12, 2013
Messages
24
Well, the problem is that it is an awful mess in there. I’ve been spending plenty of time in there since creating the topic, but just an hour here and there. Here goes. Please excuse the mess.efe40fac066c5ef916d8ef252bf3e77d.jpg

My circular saw was pretty old when I bought it for $25 at a rummage sale 18 years ago. Last week I paid another $10 for a rip fence accessory for it. My smiling 2x6 rafter ties became 2x4 supports for my shelves.

They will become integrated into the scissors trusses when I come up with a spike plate-pressing accessory for my ball joint press. I have a friend on the lookout for some scrap drops of hefty bar or plate.
8d026d0ebc6c9ad90bb1068bbfd4b833.jpg
Here is a picture of the reinforcement I added to hoist my 26 gallon Quincy air compressor. It will just fit into the back gable space. The weight will bear on the block wall once it is in place. It is a tight fit. The tank supports will barely fit into the channel of 1-5/8” unistrut, but that configuration will allow me to use every inch of space between the top of the block and the bottom of the truss. The fronts of the struts will be supported by a trapeze, chained back to the gable wall at as tall an angle as possible. I want to be able to pull two pins, open up two links and easily lower the compressor for service.

be475a4b2871a61580fd7fa6ac7e2e3d.jpg
I did a test pick last night to find the center of gravity and locate my support brackets. I used what I had. Redneck engineering at its finest. To do the actual pick, I will bolt it to the brackets and fit permanent lifting slings from front to back on each side. The sling wrapped around the truss will be replaced by a bracket that I make from a scrap of 2x2 angle iron. The two 1/2” bolts at the “pivot” of the scissors truss will go through this bracket, and I’ll drill a hole in it to lift from. The ****** block of the winch will hook up there. Winch hook and load hook will grab the slings on the support brackets.


Sent from my iPhone using Tapatalk
 

Attachments

  • be475a4b2871a61580fd7fa6ac7e2e3d.jpg
    be475a4b2871a61580fd7fa6ac7e2e3d.jpg
    133.1 KB · Views: 1
  • 8d026d0ebc6c9ad90bb1068bbfd4b833.jpg
    8d026d0ebc6c9ad90bb1068bbfd4b833.jpg
    67.7 KB · Views: 1
  • efe40fac066c5ef916d8ef252bf3e77d.jpg
    efe40fac066c5ef916d8ef252bf3e77d.jpg
    161.1 KB · Views: 2
OP
Y

yetibiker

Member
Joined
Nov 12, 2013
Messages
24
After what has been the craziest week yet at my favorite mega-dairy, I was able to get a few hours in the garage today. The air compressor continued to beat me at every turn, even after spending $64 at my local Ace Hardware for remarkably little chain. I got it as high as it would go, and of course the belt guard hit that diagonal brace that I added. I was within inches of a done deal. After lowering it onto a rolling wire shelf, I left it alone for a few nights.

I keep getting a “we have a problem” message from Tapatalk every time I try to upload a photo, so a thousand words will have to stand in for a picture.

Today I bought a $50 2 ton handchain hoist from Menards and more chain. Once it was back on the floor, I used about a foot of chain to add the best lifting point I could to the compressor, and I reconfigured the unistrut to keep it farther away from the diagonal brace. I really wanted to keep it as tight to the back wall as possible, because I cannot have it in my Suburban’s airspace. My new attitude is that I’ll cross that bridge when I come to it. I can replace that angle brace with some jigsawed laminated plywood contraption if need be, and gain about 6” of airspace back when the time comes

Anyway, the new hoist is a keeper. It did a great job. My compressor is up off the floor and out of my way. I’m happy with how it turned out. I still have to use washers to shim the tank level so that the condensate drain works properly, and mount my hose reel. Soon, more money will be spent to reconfigure the air piping. Last year, I replaced my dry-rotted high-flow air hose that had actual 3/8” fittings with a Flexzilla hose that doesn’t flow as well, but is way easier to deal with. I want to keep that hose on the reel as a regulated, oiled hose for my smaller air tools, but I’ll also have a valved stack of tees. One of those tees will be set up with a 1/2” union to feed a serious impact wrench for those rare cases that my Milwaukee FUEL 1/2” HTIW doesn’t have the grunt to do the job. I’ll probably set up another for painting. It’s just a 26 gallon two stage.

Other than that, I found that I had to crank my garage door spring a little harder to compensate for the 16° pitch of the door track. I also have some ideas for shelves suspended from chain down the block walls. I’m very excited to get all of the sawdust out of the garage, as well as the things that make and become sawdust. The constant stream of ideas means that more sawdust needs to happen first.


Sent from my iPad using Tapatalk
 
Last edited:
OP
Y

yetibiker

Member
Joined
Nov 12, 2013
Messages
24
0fc172c685c75479ede3deb41cbe15b7.jpg
Some more pictures. I didn’t have enough shadows, so I built some more shelves. It is getting down to small boxes of random assorted ****. Pretty soon the wire shelves will be empty and gone. Maybe there is a rolling workbench in my future?

1f578e9f0be34e25eacba2d875618236.jpg
A detail of the suspended shelf. The back of it is a piece of slotted angle channel toggle bolted into the block. This shelf is 78” to the lowest point and 24” deep x 8’ long. I used wood that I already had for most of this.

13546cfe3a9b3ce5f8633591032eb020.jpg
Here is my mutt of a compressor, although not as tight to the gable wall as I wanted, it is finally hanging. Vibration isn’t a problem at the foot of the tank because of how I mounted the compressor on isolators. It runs nice and quiet.

7c3a8d0e796db54e56bc34c66e7689e4.jpg
Here is a look at how it is coming along. I just left the wiring hang for now after dropping the rafter ties. I don’t want to wire it up until I know exactly where I want everything.

The next step is more cleaning and purging, or maybe some shallow shelves on the walls. I am very eager to paint everything white. The exception will be the shelf over the garage door. I will paint that gloss yellow as a subtle nod to Marty and Moog at Mighty Car Mods.

There is a story about why my big toolbox looks like it was in a rollover crash.


Sent from my iPad using Tapatalk
 

Attachments

  • 0fc172c685c75479ede3deb41cbe15b7.jpg
    0fc172c685c75479ede3deb41cbe15b7.jpg
    125.8 KB · Views: 4
  • 13546cfe3a9b3ce5f8633591032eb020.jpg
    13546cfe3a9b3ce5f8633591032eb020.jpg
    99.3 KB · Views: 4
  • 7c3a8d0e796db54e56bc34c66e7689e4.jpg
    7c3a8d0e796db54e56bc34c66e7689e4.jpg
    137.4 KB · Views: 3
  • 1f578e9f0be34e25eacba2d875618236.jpg
    1f578e9f0be34e25eacba2d875618236.jpg
    67.6 KB · Views: 2
To avoid these ads, REGISTER NOW!
Top Bottom