To avoid these ads, REGISTER NOW!

Detached shed exterior surface mount subpanel questions

baneonrt

Well-known member
Joined
Dec 2, 2008
Messages
76
Location
Sacramento, CA
I'm getting caught up in analysis paralysis trying to finish off a permitted subpanel installation for a detached 10x12 shed I had installed a while back and was hoping for some suggestions.

Details:
Square D exterior surface mount panel. 50A is what I'm running to it, I'm confident I have the feeder circuit stuff sorted.
#6 THHN copper feeder wire running through 1" conduit from house main panel with a short underground run that's already been inspected and passed.
Plan is 3 outlet circuits and a lighting circuit.

What I'm getting caught on is how to run the circuits from the panel and into the shed. As in what fittings and any sealing methods should be used/followed.
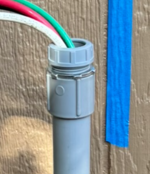
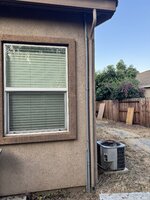
Here is the rear of the shed. Expecting to attach the panel to the stud running along where the blue tape is. Will be installing cross boards inside to line up with more mounting points just so I don't have to rely on the siding.
shed_outside.jpg

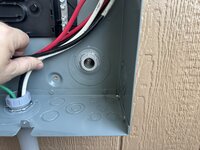
Panel interior. Depending on what the proper method for passing circuits from the panel to the shed interior is I was planning on the feed passing through either #1 or #2. My preference I think would be to go straight back through #3 but I'm having a hard time determining if that's to code and if so, what specific fittings would be appropriate. An elbow fitting at #4 is my least favorite option, but if fed through #1 an elbow at #1 would be ok. Am I anywhere near the right track on this?
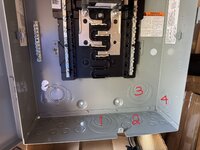
subpanel.jpg

Thanks!

Steve
 
To avoid these ads, REGISTER NOW!

mike93lx

ALLIANCE MEMBER
Joined
Dec 9, 2013
Messages
38,398
Location
Richmond, VA
I do not want to maintain clearance in this small shed. Exterior is a project requirement.

And yep, ground rods already in the ground.

Steve
Great reason.

I'd mount the panel with one knock out removed, drill a hole and silicone it before mounting. If the hole is slightly smaller than the knock out, there really won't be an abrasion risk
 
OP
B

baneonrt

Well-known member
Joined
Dec 2, 2008
Messages
76
Location
Sacramento, CA
Great reason.

I'd mount the panel with one knock out removed, drill a hole and silicone it before mounting. If the hole is slightly smaller than the knock out, there really won't be an abrasion risk
That was my initial plan until I started trying to confirm if that would be code compliant or not. Then started looking for bushing/grommet solutions. Then questioning how many circuits I can run through one hole, and then and then lol

What I'm hoping to confirm is that I can run through knockout #3 for the 4 romex wires I'll be running and securing them within 8 or 12" of the box and be ok. Alternatively, I could knockout both those rear holes and split the wires between them. Two each.

Steve
 

mike93lx

ALLIANCE MEMBER
Joined
Dec 9, 2013
Messages
38,398
Location
Richmond, VA
#3 is friggin huge and this is a small shed. It's fine

You doing gfci breakers or receptacles?

Secure wires within 12".
 
OP
B

baneonrt

Well-known member
Joined
Dec 2, 2008
Messages
76
Location
Sacramento, CA
#3 is friggin huge and this is a small shed. It's fine

You doing gfci breakers or receptacles?

Secure wires within 12".
Would you use the entirety of #3? I suppose I could knock it all out but then drill a smaller hole.

I was under the impression I needed to do breakers but would love to get confirmation a receptacle is sufficient. Without that I was going to error on the breaker side.

Steve
 

mike93lx

ALLIANCE MEMBER
Joined
Dec 9, 2013
Messages
38,398
Location
Richmond, VA
Would you use the entirety of #3? I suppose I could knock it all out but then drill a smaller hole.

I was under the impression I needed to do breakers but would love to get confirmation a receptacle is sufficient. Without that I was going to error on the breaker side.

Steve
You need gfci protection, not a specific methodology. A receptacle accomplishes that and keeps the reset indoors.

I am not a sparky, to be completely clear. I'd probably knock out to the first ring. Can always drill another hole through the box and wall later if need be, but you can only stuff so much stuff in a little shed.

If you get lucky, @wyliesdiesels @sparky 1971 or one of the other sparkies will chime in.
 
OP
B

baneonrt

Well-known member
Joined
Dec 2, 2008
Messages
76
Location
Sacramento, CA
You need gfci protection, not a specific methodology. A receptacle accomplishes that and keeps the reset indoors.

I am not a sparky, to be completely clear. I'd probably knock out to the first ring. Can always drill another hole through the box and wall later if need be, but you can only stuff so much stuff in a little shed.

If you get lucky, @wyliesdiesels @sparky 1971 or one of the other sparkies will chime in.

Hehe, thanks, my unwritten thought was waiting for additional feedback and try to confirm before execution anyway :)

I've been around here quite a while, just sporadically active. Pretty sure Wylie has chimed in on previous questions.

Steve
 

sparky 1971

Well-known member
Joined
Oct 9, 2018
Messages
8,112
Location
Central Iowa
Without knowing what is on the other side of the wall, my first though would be to run a 3/4" conduit, PVC, EMT, or even a pre made Rigid ****** through hole #3 to a box on the inside. Take all of the circuits through there and splice them. It would probably require a 2-1/8" deep 4X4 and either a mud ring if flush mount or a raised cover if surface mounted.


Actually, what I would do if permits and inspections weren't involved would be to punch #3 hole out to 1" and put a 1" PVC male adapter in it, then shove all four romex's through it.
 
OP
B

baneonrt

Well-known member
Joined
Dec 2, 2008
Messages
76
Location
Sacramento, CA
I'm surprised expansion joints aren't required.

I'd also go straight through the back at #3.
On the conduit going into the panel? I'm running an expansion joint on the 10' length going up the side of the house but didn't think if it would be required for the short length below the panel.
 
OP
B

baneonrt

Well-known member
Joined
Dec 2, 2008
Messages
76
Location
Sacramento, CA
Without knowing what is on the other side of the wall, my first though would be to run a 3/4" conduit, PVC, EMT, or even a pre made Rigid ****** through hole #3 to a box on the inside. Take all of the circuits through there and splice them. It would probably require a 2-1/8" deep 4X4 and either a mud ring if flush mount or a raised cover if surface mounted.


Actually, what I would do if permits and inspections weren't involved would be to punch #3 hole out to 1" and put a 1" PVC male adapter in it, then shove all four romex's through it.
Shed is 2x4 construction, 16" OC studs. Unfinished currently but I plan to insulate and panel the inside. I have full access inside right now.

Any rigid ******* I've seen at the home store don't seem long enough to go through the panel, air gap and 3/8" siding and still have any threads to secure the other side. Unless I'm not thinking of the same component.

Steve
 

sparky 1971

Well-known member
Joined
Oct 9, 2018
Messages
8,112
Location
Central Iowa
Shed is 2x4 construction, 16" OC studs. Unfinished currently but I plan to insulate and panel the inside. I have full access inside right now.

Any rigid ******* I've seen at the home store don't seem long enough to go through the panel, air gap and 3/8" siding and still have any threads to secure the other side. Unless I'm not thinking of the same component.

Steve
You're probably thinking of the right thing, but the odds of having one the exact length you need is pretty slim. The easiest route would be PVC. Go straight through the back of the panel, and when it doesn't wind up in the right place, just throw a scab of 2X4 in to mount the box. Then you can take all the circuits in there with THWN and splice the Romex.
 
OP
B

baneonrt

Well-known member
Joined
Dec 2, 2008
Messages
76
Location
Sacramento, CA
You're probably thinking of the right thing, but the odds of having one the exact length you need is pretty slim. The easiest route would be PVC. Go straight through the back of the panel, and when it doesn't wind up in the right place, just throw a scab of 2X4 in to mount the box. Then you can take all the circuits in there with THWN and splice the Romex.
That helps immensely. Do I need a wire clamp for the THWN entering the 4x4 box? I assume all exiting circuits will need them, but that's easy.

Ok, THWN isn't turning up much results at the home store. I've bought most of my stuff from the local electrical supply shop, but they're closed now. Are they likely to know what I'm asking for?

Edit: nevermind, I see the THHN label also has a THWN-2 rating on it for the product I found.

Steve
 
Last edited:
OP
B

baneonrt

Well-known member
Joined
Dec 2, 2008
Messages
76
Location
Sacramento, CA
OP
B

baneonrt

Well-known member
Joined
Dec 2, 2008
Messages
76
Location
Sacramento, CA
use a short ****** out the back into the back of a 4x4 then go from there.
Yep looks like if I mount a 4x4 box with 1/2" of stickout for future drywall, then a 3" ****** would have 1/4" of threads on either side to secure it. Or mount it flush for now and use a mud ring later.

Feeling much better about the direction I'm going now. Thanks everyone.
 

sparky 1971

Well-known member
Joined
Oct 9, 2018
Messages
8,112
Location
Central Iowa
That helps immensely. Do I need a wire clamp for the THWN entering the 4x4 box? I assume all exiting circuits will need them, but that's easy.
Not for the TWHN.
Ok, THWN isn't turning up much results at the home store. I've bought most of my stuff from the local electrical supply shop, but they're closed now. Are they likely to know what I'm asking for?

Edit: nevermind, I see the THHN label also has a THWN-2 rating on it for the product I found.
It's almost all dual rated these days.


To avoid these ads, REGISTER NOW!

sparky 1971

Well-known member
Joined
Oct 9, 2018
Messages
8,112
Location
Central Iowa
Yep looks like if I mount a 4x4 box with 1/2" of stickout for future drywall, then a 3" ****** would have 1/4" of threads on either side to secure it. Or mount it flush for now and use a mud ring later.

Feeling much better about the direction I'm going now. Thanks everyone.
Put the 4X4 flush with the face of the stud. The mud ring is what will bring it out to the face of the sheathing. You can get them in single or two gang, and if you are going to use 1/2" thick wall board, use a 5/8 deep ring. Don't screw up and use a two gang handy box, make sure it's a real 4X4X2-1/8.
 
OP
B

baneonrt

Well-known member
Joined
Dec 2, 2008
Messages
76
Location
Sacramento, CA
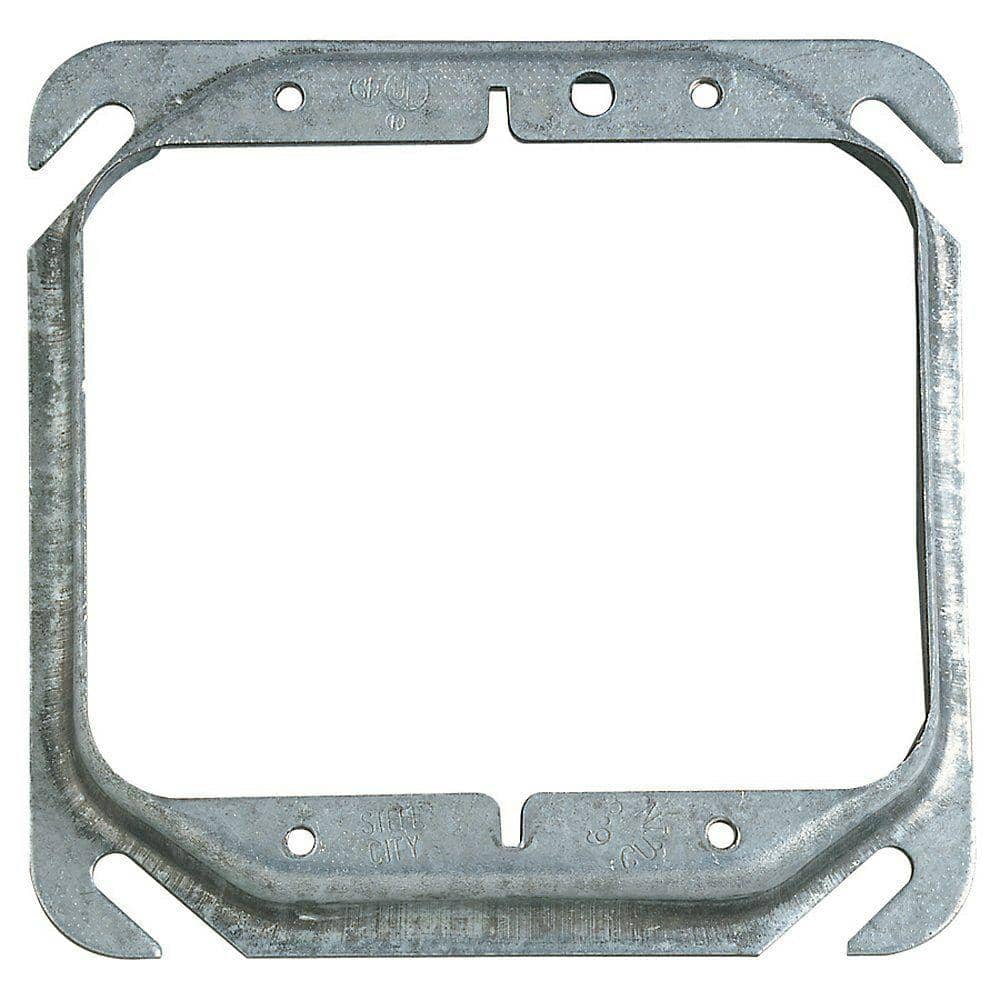
Put the 4X4 flush with the face of the stud. The mud ring is what will bring it out to the face of the sheathing. You can get them in single or two gang, and if you are going to use 1/2" thick wall board, use a 5/8 deep ring. Don't screw up and use a two gang handy box, make sure it's a real 4X4X2-1/8.
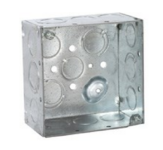
Thanks for the additional info. The correct box I imagine is the one with the hard square corners, not rounded.
1748314122183.png
A bit more difficult to find with a 1" knockout in the rear but we'll see what my electrical supply shop has tomorrow. Step bit? :)

Steve
 

sparky 1971

Well-known member
Joined
Oct 9, 2018
Messages
8,112
Location
Central Iowa
Thanks for the additional info. The correct box I imagine is the one with the hard square corners, not rounded.
1748314122183.png
A bit more difficult to find with a 1" knockout in the rear but we'll see what my electrical supply shop has tomorrow. Step bit? :)

Steve
That's the box. You won't find one with 1" knockouts in the back, 3/4 will be fine. My 1" reference above was for a PVC connector into the back of the panel with no conduit and the romex pushed through that directly into the panel but that would be a violation due to no clamp.
 
OP
B

baneonrt

Well-known member
Joined
Dec 2, 2008
Messages
76
Location
Sacramento, CA
That's the box. You won't find one with 1" knockouts in the back, 3/4 will be fine. My 1" reference above was for a PVC connector into the back of the panel with no conduit and the romex pushed through that directly into the panel but that would be a violation due to no clamp.
The minimum size of the knockout in the back of the panel is 1". I still need some sort of conduit (pvc ******) going between the panel and the junction box right? Use a reducer bushing?
 
OP
B

baneonrt

Well-known member
Joined
Dec 2, 2008
Messages
76
Location
Sacramento, CA
If that's the case, you can get a pair of reducing washers. If it's a 3/4 knockout it will measure 1-1/8 across. A 1" will be 1-3/8".
perfect.

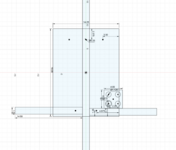
Made a quick drawing to help me visualize where things'll need to go. Looks like it'll line up reasonably well. 2x4 stud and cross blocks for mounting.
1748315941273.png
Mount panel first then drill through for the rest of the important locations.

Steve
 

sparky 1971

Well-known member
Joined
Oct 9, 2018
Messages
8,112
Location
Central Iowa
perfect.

Made a quick drawing to help me visualize where things'll need to go. Looks like it'll line up reasonably well. 2x4 stud and cross blocks for mounting.
1748315941273.png
Mount panel first then drill through for the rest of the important locations.

Steve
The hole through the wall will be larger than the knockout hole so mount the panel with a couple of screws, run a 1/4" pilot bit through the center of the knockout, then take the panel down and drill the hole through the wall. Or, mount the panel and drill the same pilot hole, then go in the shed and run the holesaw through from the inside out, but stop when you get to the panel
 
OP
B

baneonrt

Well-known member
Joined
Dec 2, 2008
Messages
76
Location
Sacramento, CA
The hole through the wall will be larger than the knockout hole so mount the panel with a couple of screws, run a 1/4" pilot bit through the center of the knockout, then take the panel down and drill the hole through the wall. Or, mount the panel and drill the same pilot hole, then go in the shed and run the holesaw through from the inside out, but stop when you get to the panel
Yep, this is all conceptual. Will reference everything from the actual panel mounting location when I actually do it. Just handy to make sure I'll hit enough panel mounting points and a general sanity check. Also looks like I should look for a 3" ******, 2.5 would probably be just a tad too tight. If they have both I'll try both.
1748316860007.png
 

sparky 1971

Well-known member
Joined
Oct 9, 2018
Messages
8,112
Location
Central Iowa
Yep, this is all conceptual. Will reference everything from the actual panel mounting location when I actually do it. Just handy to make sure I'll hit enough panel mounting points
Throw some blocks in on the inside of the shed against the back side of the sheathing, then use screws long enough to reach through the siding and into them.
and a general sanity check. Also looks like I should look for a 3" ******, 2.5 would probably be just a tad too tight. If they have both I'll try both.
1748316860007.png
If you use a rigid ******, make sure you have lock nuts on both sides of the panel and the box. I'd probably put a 4" long piece of PVC through then cut it to length inside.
 
OP
B

baneonrt

Well-known member
Joined
Dec 2, 2008
Messages
76
Location
Sacramento, CA
If you use a rigid ******, make sure you have lock nuts on both sides of the panel and the box. I'd probably put a 4" long piece of PVC through then cut it to length inside.
I did think about and assumed I would need support on the backs of the panel and box. Not sure I'm visualizing what a non-threaded ****** solution looks like though. I assume it's not just floating there and needs some fittings glued to it?

Steve
 

sparky 1971

Well-known member
Joined
Oct 9, 2018
Messages
8,112
Location
Central Iowa
I did think about and assumed I would need support on the backs of the panel and box. Not sure I'm visualizing what a non-threaded ****** solution looks like though. I assume it's not just floating there and needs some fittings glued to it?

Steve
A rigid ****** will be all metal and threaded on both ends, it won't need a connector, just lock nuts on both sides, that's the first (second) thing I think of when the term ****** is used.. EMT or PVC will require a connector to mount it to the box and panel. The PVC route will probably be the easiest way in this case.
 
OP
B

baneonrt

Well-known member
Joined
Dec 2, 2008
Messages
76
Location
Sacramento, CA
A rigid ****** will be all metal and threaded on both ends, it won't need a connector, just lock nuts on both sides, that's the first (second) thing I think of when the term ****** is used.. EMT or PVC will require a connector to mount it to the box and panel. The PVC route will probably be the easiest way in this case.
I think what I was thinking of is called a PVC riser and searching for it now seems more sprinkler system related. Two of the 3/4" version of what I'm using for the entry wiring is probably what I'm looking for joined by a short piece of PVC?

1748318414350.png
 
OP
B

baneonrt

Well-known member
Joined
Dec 2, 2008
Messages
76
Location
Sacramento, CA
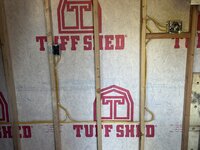
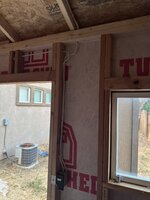
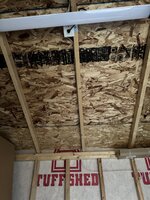
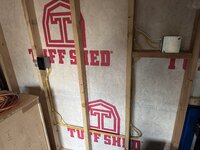
Inspection day should be tomorrow. See anything that might get flagged?
 

Attachments

  • IMG_1928.jpeg
    IMG_1928.jpeg
    703.8 KB · Views: 22
  • IMG_1927.jpeg
    IMG_1927.jpeg
    928.7 KB · Views: 22
  • IMG_1926.jpeg
    IMG_1926.jpeg
    700.8 KB · Views: 22
  • IMG_1925.jpeg
    IMG_1925.jpeg
    1.1 MB · Views: 23
  • IMG_1924.jpeg
    IMG_1924.jpeg
    1.2 MB · Views: 22
  • IMG_1923.jpeg
    IMG_1923.jpeg
    1.2 MB · Views: 23
  • IMG_1916.jpeg
    IMG_1916.jpeg
    985.4 KB · Views: 22

sparky 1971

Well-known member
Joined
Oct 9, 2018
Messages
8,112
Location
Central Iowa
If you're covering the walls you don't want to have the devices in until after that and you will need a mud ring on the 4X4 box.


If the walls aren't getting covered, you will be fine as long as the inspector is ok with exposed romex. It has to be protected from damage, but there is no definition of that, leaving it up to interpretation.
 
OP
B

baneonrt

Well-known member
Joined
Dec 2, 2008
Messages
76
Location
Sacramento, CA
If you're covering the walls you don't want to have the devices in until after that and you will need a mud ring on the 4X4 box.


If the walls aren't getting covered, you will be fine as long as the inspector is ok with exposed romex. It has to be protected from damage, but there is no definition of that, leaving it up to interpretation.
Thanks. Glad to hear nothing looks significantly wrong :) I am planning on insulating and finishing the walls, but on a home diy'er timeline. I guess I'll find out what the inspector's thoughts on that are.
 
OP
B

baneonrt

Well-known member
Joined
Dec 2, 2008
Messages
76
Location
Sacramento, CA
Rough-in passed with nothing needing any comments. As suggested, final will have to wait until I protect the romex. Gives me a 180 day timeframe to get it done, might be enough :)
 
Last edited:
To avoid these ads, REGISTER NOW!
Top Bottom