To avoid these ads, REGISTER NOW!

Detla Milwaukee Production table assembly broke

jransom

Well-known member
Joined
Mar 4, 2015
Messages
135
Hey guys, I want to get some opinions. Last night I started disassembling my old Delta Milwaukee DP220 and discovered a crack which quickly turned into a break. I might have helped it a little by pulling on it in the visa a little bit. Anyways, I was thinking of just grinding the old weld off, cleaning up the area in general and using my new mig welder to weld it back together. Any reason I shouldn't? At same point I'm going to do a full restore on it!

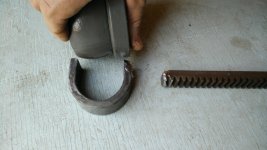
Also, as you can see from the attached image, the C shaped piece doesn't exactly fit over the locking collar and bearing ring like I see in some pictures around the internet. Maybe the piece is bent?? When I got the drill press this piece just sat on top of the bearing ring. When I'd crank the table up the mechanism worked fine but to let it down I had to loosen the two large nuts on the back of the table column collar to let it slide back down.
 

Attachments

  • uploadfromtaptalk1429198001710.jpg
    uploadfromtaptalk1429198001710.jpg
    148.6 KB · Views: 29
  • uploadfromtaptalk1429198025639.jpg
    uploadfromtaptalk1429198025639.jpg
    140.2 KB · Views: 30
To avoid these ads, REGISTER NOW!
OP
J

jransom

Well-known member
Joined
Mar 4, 2015
Messages
135
Here's a picture of the drill press.
 

Attachments

  • uploadfromtaptalk1429198722089.jpg
    uploadfromtaptalk1429198722089.jpg
    128 KB · Views: 40

zkling

Well-known member
Joined
Jan 23, 2007
Messages
16,939
Yes, the horseshoe, for lack of better terms is bent, it needs to be opened up a bit to fit over the bottom clamp and bearing. As you found out the bottom needs to hook over the clamp when bringing the table down. The gear rack end is a common broken item on those machines. Luckily they are steel and can be welded back together easily. Make sure to clean out the thrust bearing balls before reassembly. Caution when taking it apart to not let any of the ball bearings get away.
 
OP
J

jransom

Well-known member
Joined
Mar 4, 2015
Messages
135
Thanks for the info. I'll be sure to do so.

Since my first post I've started disassembling. No better time than the present to start a complete restore job I say! I've got a little brass wire wheel that fits in my cordless drill and it seems to be doing an amazing job at cleaning up and striping the paint & gunk/dried up grease off all the bolts and steel parts I've removed this far. The previous owner thought it would be good to just blanket the whole thing, all hardware included in new paint so I'm doing that first. Pretty bad paint job. Thankfully the pullys, belt, column and badges aren't painted but pretty much everything else is.

Does anyone know how to remove the spring and handle assembly? I got the actual handle off but can't figure out the spring and piece that goes through the head.

Also can't figure out how to get the little pointer part that goes into the little metal fitting that appears to be pressed into the side of the head for marking quill travel. Looks like there is a little spring inside of the pace thats pressed into the head.
 
Last edited:
OP
J

jransom

Well-known member
Joined
Mar 4, 2015
Messages
135
So I did figure out how to remove the shooting **** didn't yet as it seems it may be a bear to get back together. Anyone know if it is? Thanks!
 
To avoid these ads, REGISTER NOW!

zkling

Well-known member
Joined
Jan 23, 2007
Messages
16,939
Shooting ****? The depth scale pointer is in a spring loaded (brass) housing that is pressed into the main casting. If you pull the pointer out you will need a pick or something to get it back in place.

IIRC for the spring you have to loosen the jam nuts, get a firm grip on the housing and pull it out slightly while under control loosen the tension in the coil spring. There are notches in the back of the spring housing that allow it to index at different tension settings. Then you can slide the spring in the housing off the pinion shaft (careful as the quill will want to drop). Once you remove the spring you can pull the pinion out the handle side, again making sure you have the quill locked or a hand on the bottom of it. Once you pull the pinion shaft free the quill will drop free of the head. The actual spindle on those has a quick change feature that is kept in place by a collar and set screw on the top half of the quill. If you lower the quill about half way you can see it in the upper half of the depth scale window.

It has been a while since I've worked on a DP220. :headscrat:
 
Last edited:
OP
J

jransom

Well-known member
Joined
Mar 4, 2015
Messages
135
Ha ha, shooting but… what ever was my auto correct thinking! Yeah, not what I meant.

Good info. I'll give it s shot but it so far seems really difficult to get the depth scale pointer back in.

Spring and housing is what I meant. Seems like all I have to do is grab the silver dollar sized housing and rotate it a little and pull, it will then come right off. I'm just worried I wont be able to reassemble it. That spring is under a lot of tension. I'll look at it again tomorrow. Thanks for all the info, I appreciate it.
 

Dennis Leigh Henry

Well-known member
Joined
Apr 8, 2013
Messages
6,302
Location
South Central, IN USA
How's the reweld of the OP going? I hope you're able to get that fixed up good. if not, you may try calling Plaza Machinery, Joe is a little difficult to get ahold of but he's a Delta guy and probably has (or knows where to find) a replacement.
 
OP
J

jransom

Well-known member
Joined
Mar 4, 2015
Messages
135
Hi Dennis, I haven't actually gotten to the welding part. I happened to have a welder on order and just received it yesterday. I still need to get it all hooked up and then I'll fix it. I'll update here once I've done it.

Thanks for his info. I didn't know of him but am glad to now!
 
To avoid these ads, REGISTER NOW!
Top Bottom