To avoid these ads, REGISTER NOW!

DFW 3 car attached addition

specialed

Member
Joined
Jul 10, 2017
Messages
6
I have been meaning to post this for a while but it took a bit to collect all the photos and just sit down and do it. Having to convert iPhone Heic photos to png did not help matters.

Project Summary
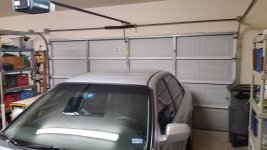
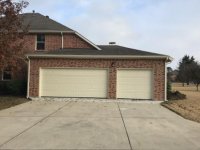
I have a three car attached garage but it is very shallow, only 18 feet deep. Even with my relatively small car I was always having to walk around it. There was no way to even put anything in the trunk if the garage door was closed.
My first thought to make it deeper was to go in from the front of the garage. This would have taken about 5 feet from the family room. The more I looked at this the less compelling it became for a number of reasons. Load bearing wall, moving a fireplace, laundry now in the garage, only lengthen two bays, less sq ft living area. That left going out into the driveway. From the plat I had about 10 feet of setback to work with. There were three main challenges going this direction.

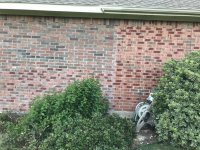
1. Matching the brick
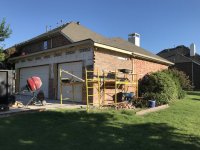
2. Blending the roof line
3. Removing the existing garage door load bearing wall.

Concerning the brick, that style had been discontinued (of course). I was told by the contractor there is a staining process that can be used. After some research and contacting the sub who would be doing it my skepticism was somewhat reduced.

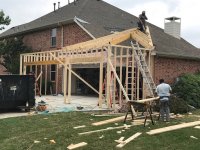
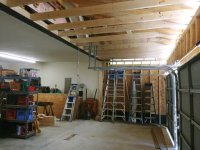
Concerning the roof line, after staring at it endlessly and discussing with contractors nothing was looking that compelling. Finally the contractor who actually got the job said, just envision “pulling” the corner out. After he drew it out I went aha. I see it. Very simple.

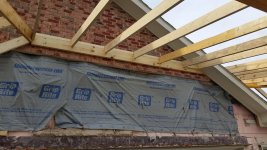
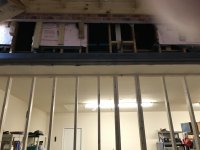
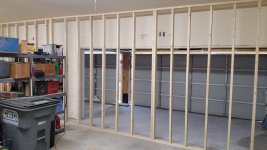
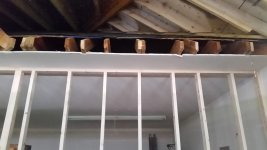
What to do with the existing load bearing wall where the garage doors were originally? First thought is just leave them there. Problem is that limits usable space and makes it look like an add-on. Also what about the door openers once they are moved? Would the wall interfere? On these they go back around 10 feet. When I mentioned the wall I got a black stare from some of the contractors. They were out. The contractor I went with did not want to put a pole in and originally envisioned it flush across the ceiling. The area above is attic. More on that later.

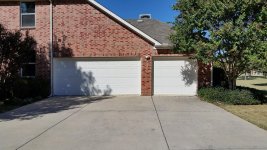
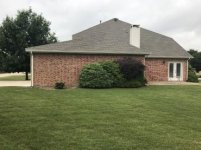
Here is what we are starting with. Garage is flush with side of the house. This is a corner lot.
 

Attachments

  • 20171026_144245.jpg
    20171026_144245.jpg
    119.8 KB · Views: 69
  • 20171026_144414  Before const front.jpg
    20171026_144414 Before const front.jpg
    154 KB · Views: 75
  • 20180104_084959 before const side.jpg
    20180104_084959 before const side.jpg
    150.8 KB · Views: 72
To avoid these ads, REGISTER NOW!
OP
S

specialed

Member
Joined
Jul 10, 2017
Messages
6
After brick demo and drive poured. Framing. Attaching to existing brick. Note they just go over the existing roof. This is the easy part.
 

Attachments

  • 2018-04-11 After demo drive poured.jpg
    2018-04-11 After demo drive poured.jpg
    150.9 KB · Views: 91
  • 2018-05-02 Framing.jpg
    2018-05-02 Framing.jpg
    89.3 KB · Views: 103
  • 20180502_181513 attaching to existing brick.jpg
    20180502_181513 attaching to existing brick.jpg
    154.1 KB · Views: 91
  • 20180505_183902 framing.jpg
    20180505_183902 framing.jpg
    152.5 KB · Views: 94
Last edited:
OP
S

specialed

Member
Joined
Jul 10, 2017
Messages
6
OK here is where things got a bit sticky. The problematic existing, now inside, wall. As I mentioned the contractor wanted it flush across the ceiling. I didn't really care. Not sure what his motivation was. The first try at this was two 6 in L steel beams bolted together. They were installed and the temporary wall removed. Nothing fell down. I did notice the brick above had tilted away from the upstairs window. It turned out that was another issue but it got me to measure the deflection of the beam. It was 1 1/2 to 2 in. Doing some research 1:360 is considered standard. That would be 1 in on this 30 foot span. Also going up in the attic space it was a bit "bouncy". I also ran some programs that calculate what size beam you need to a given span. Got into tributary weight, etc. Interesting stuff. In any event after a bit of back and forth the contractor put in a 12 in I beam underneath the L beams. Took a lot of effort to fit in in after the they were in place. Much more solid now. I don't think it would be enough for a live load but will suffice here.
 

Attachments

  • IMG_0126 Boxing I beam.jpg
    IMG_0126 Boxing I beam.jpg
    150.2 KB · Views: 93
  • IMG_0116 I beam.jpg
    IMG_0116 I beam.jpg
    151.7 KB · Views: 82
  • IMG_0113 I Beam.jpg
    IMG_0113 I Beam.jpg
    147.1 KB · Views: 85
  • IMG_0085 L steel.jpg
    IMG_0085 L steel.jpg
    107.8 KB · Views: 83
  • 20180604_181135 temporary wall.jpg
    20180604_181135 temporary wall.jpg
    131.5 KB · Views: 86
  • 20180605_181146.jpg
    20180605_181146.jpg
    87.8 KB · Views: 59
  • 2018-06-09.jpg
    2018-06-09.jpg
    63 KB · Views: 74
Last edited:

protegeV

Well-known member
Joined
Apr 18, 2018
Messages
13,363
Location
DFW
Interesting concept. You see a lot of these shallow attached garages around here. My car attached is 22' which is nice but I still dont have to park cars in it thanks to the 40x60 shop :D
 
OP
S

specialed

Member
Joined
Jul 10, 2017
Messages
6
The final challenge. Matching the brick. Picture shows how it looked prior to the staining. It turns out they couldn't, or didn't want to, reclaim the brick from the existing front wall. They said the mortar was too sticky. In any event there wouldn't have been enough anyway. Their first try at staining just the brick it still did not match very close. It turns out if the mortar is not matched it will not look good. There were able to stain it also. Yes you can still see the difference but from the street with a casual glance you would not notice.

The roof line came out better than expected. From the side it is not symmetric but again it does not look bad. To move that ridge would have been much more involved. The more you tear up....

So here is final product. Neighbors are happy with it. It is almost the way the home should have been built to begin with. Much more room to maneuver inside also. The beam looks fine to me.
 

Attachments

  • IMG_0244 completed inside.jpg
    IMG_0244 completed inside.jpg
    19.5 KB · Views: 42
  • IMG_0141 completed inside.jpg
    IMG_0141 completed inside.jpg
    126.8 KB · Views: 91
  • IMG_0171 completed front.jpg
    IMG_0171 completed front.jpg
    19.2 KB · Views: 52
  • IMG_0213 completed side.jpg
    IMG_0213 completed side.jpg
    19.5 KB · Views: 45
  • IMG_0135 brick before stain.jpg
    IMG_0135 brick before stain.jpg
    156.5 KB · Views: 88
OP
S

specialed

Member
Joined
Jul 10, 2017
Messages
6
I wanted to go into the planning and contractor selection process while I am still thinking about it. The most difficult thing was just getting started. This is not something I have done before. Do you talk to contractors first, or get plans first? Who do you get plans from? My first thought was to ask the person who maintains my garage doors. They for sure would have a recommendation. Nope, they suggested BBB. Not helpful. I had some success with HomeAdvisor both for designers and contractors. The problem is this is sort of an "in between" project. Bigger than the average back patio but not an entire home. One resource that was really helpful was a book called "What Your Contractor Can't Tell You". A little dated an maybe some overkill for a project this size. The big takeaways are spend as much time planning as doing and contractor selection process is critical. The contractors I did get through HomeAdvisor fell into a few categories. First, everyone if they bother to come out says they can do it "no problem".

Custom Home builders - Generally are not interested in something this size. Not much enthusiasm.

Hungry - Really want the job but not much demonstrated experience with something like this.

Too Busy - Won't call back or they are backed up months

Too Expensive - One established contractor bid twice what I ended up paying.

It came down to two. One had a lot experience and specifically did garages. But he was a little shall we say "free form" in approach. The other a lot less experience despite his company having a very established sounding name (good idea). He was the methodical by the book type.

So I went with the experienced but "free form" guy. Really no regrets. He was always very communicative and answered any questions had. He has subs I think he has used for a long time. I just had to stay on top of things. But that is another thing that the book recommended. Makes sense.

The planning negotiating phase took probably around 4-5 months starting Nov 2017. Actual construction started end of Mar 2018 completed July 2018 Final punch list items completed Oct.

I'm sure everyone wants to know this. Cost was mid $30's.

Also he did my roof as it had previous hail damage.
 
To avoid these ads, REGISTER NOW!

protegeV

Well-known member
Joined
Apr 18, 2018
Messages
13,363
Location
DFW
The cost with the roof included seems totally reasonable!

I know what you mean about "free-form"

We did a pretty sizeable reno about 5 years back to a previous house and the GC was kind of vague on a lot of stuff. Kind of do it as he goes. He came highly recommended though so I went for it and he ended up right on budget and the work was top notch.
 

CombatNinja

Well-known member
Joined
Aug 24, 2013
Messages
1,456
The cost with the roof included seems totally reasonable!

I don't think the roof is included in that number he gave. Most likely the roof would be a homeowner's insurance thing since he mentioned hail damage.

So, special, what is the total size of that addition? Looks like about a 10' x 20' bump out? If so, that is one seriously expensive garage addition in terms of price per square foot. $150/sq ft is a real buzzkill for anyone with a fantasy of making their attached garage bigger for a reasonable amount of money.
 
Last edited:

RSr

Well-known member
Joined
Jul 20, 2010
Messages
155
Location
Pittsburgh, PA
That's a nice way to turn unusable depth to quality space and a 10' x 30' bump out for $30k is a good deal even though expensive... economies of scale. Did they reinforce the brick veneer where the roof framing connects?
 

el monte slim

Well-known member
Joined
Apr 4, 2018
Messages
243
Location
Midwest USA
This 10' x 30' bump-out looks and functions like it's original to the construction of the home. In my opinion, the new angles and lines actually enhance the overall appearance and curb appeal. I think this was $30k well-spent. Enjoy all that new garage space!
 
OP
S

specialed

Member
Joined
Jul 10, 2017
Messages
6
Yes, roof was paid by the homeowners insurance. That was a strange deal. Based on the time involved and what was paid out I think the GC made a lot more on the roof than the garage. Seeing how often roofs get changed around here something is going on with that.

Yes it was a 10 X 30 addition. I really did not need that much space but I figured it would cost about the same to go out two feet as ten. Before the project I had done a rather involved rearrangement of the layout but it still wasn't working. Also the garage actually seems wider now than before though its not.

One of the design goals was to make it not look like a add on. There were some sleepless nights during this project but absolutely no regrets on the outcome. I doubt I will get the money out of it but I figure it will make the home a lot easier to sell when that time comes. That said, my observation on this is adding on is much more difficult than new or free standing construction. In this case I wasn't looking to build a shop I just needed more room for cars and stuff. I had room behind for a free standing shop but it would have been difficult to blend with the sloping roof line of the house. Also I didn't want to blow up the back yard if someone later wanted to put in a pool or something.

Concerning the brick reinforcement I'm not sure. I attached a few more pictures but not sure if they will answer the question. On the original construction it was a little disconcerting that between the framing and brick there was nothing more that this cardboard like sheathing.
 

Attachments

  • IMG_0095.jpg
    IMG_0095.jpg
    146.3 KB · Views: 31
  • IMG_0096.jpg
    IMG_0096.jpg
    146.3 KB · Views: 34
To avoid these ads, REGISTER NOW!
Top Bottom