To avoid these ads, REGISTER NOW!

Diesel Air Heater for a trailer

Lucid Moments

Well-known member
Joined
Aug 9, 2015
Messages
1,775
Location
Gainesville, Ga
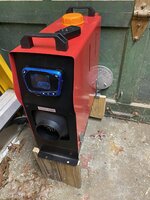
I am considering something like this to install in my enclosed car trailer so I can sleep in it while at the racetrack. The trailer has 1" blueboard in the walls in ceiling. I live in the Southeast of the US so it isn't like I have to deal with serious cold. Getting electric at the tracks I go to is a real crapshoot so I can't count on it, but 12v for this heater would be easy to arrange.

Has anyone used this or something like it?
 
To avoid these ads, REGISTER NOW!

rlitman

Well-known member
Joined
Oct 18, 2010
Messages
24,649
Location
Long Island
I actually just bought one like that for detached garage heating. I can't say I have enough hours on it to make a useful comment though, except that these heaters can be finicky and require very specific setups.
 

cannuck

Well-known member
Joined
Nov 30, 2021
Messages
4,656
Location
Rural SK
There is NO WAY I would ever trust a hundred dollar, chinese aluminum heat exchanger to keep me alive. There are superb quality heaters from Eberspacher (ESPAR) and Webasto. You can get them in forced air or circulating coolant versions. I have an ESPAR in my F450 that will heat the engine from -40 to an easy start temp in just an hour. Use it through the cab heater core with seperate power supply from aux battery to run the heater and the truck's heater fan without risking starting batteries. Works like a damn, but not China pricing (but both german brands supported worldwide).
 

AldeanFan

Well-known member
Joined
Sep 9, 2014
Messages
2,588
Location
Niagara on the Lake
I’ve got a thread going about putting one of these heaters in my Airstream.
If it works I’ll put one in my car trailer also.
Like you I sleep in the trailer at the track and would like some heat that doesn’t require electricity. Currently I use a space heater and generator but generators have to be shut off at night when it is coldest.
 

rlitman

Well-known member
Joined
Oct 18, 2010
Messages
24,649
Location
Long Island
So I've got about 10 run hours on my all-in-one Chinese diesel heater now, and it's working out pretty well for me (running on 1K undyed pump kerosene). I've found TONS of information online about these, so I won't rehash their well known issues (critical pump mounting angles, exhaust drainage, yes, I have a CO detector AND meter, etc.), but here's what I added specifically to mine:

1) Kill switch - the internal control board to these units will continue to run forever until it receives a stop command from the control panel, and these electronic control panels are anything but reliable, and you must not simply pull the power from the heater, because they require a running fan for safe shutdown. So, should my control panel fail while in use, there's no easy way to safely shut the unit down. So, I mounted a toggle switch on the rear of the unit, in series with the fuel pump's power. Turn it off, and fuel delivery stops. My unit will throw an error 04 (fuel pump failure), and shut itself down safely, easy as pie. I wouldn't consider using ANY of these heaters, whether it be Espar, Webasto, Chinese no-name, etc. without either a simple switch to stop the fuel pump or at least a fuel cutoff valve, and I don't understand why all of them leave this so simple feature out.

2) Tilt switch - every modern kerosene heater I've used has one of these (even my Monitor heater, which isn't exactly something you can easily knock over), but the Espar and Webasto heaters are engineered to be bolted down (and the Chinese heater modules themselves are exact clones), so they don't need one, yet these Chinese all-in-one heaters are, well "Chinese engineered", so they're lacking this essential safety consideration once you ******** a tank and chassis and make the machine portable. I bolted the switch inside to the rear, and also wired it in series with my fuel pump. Which means it will also go into a safety shutdown (with the associated fan assisted cool-down). The bonus here is that if the heater is quickly re-righted after being tipped, the error 04 will lock out re-lighting until you manually intervene. A simple alternative to a tilt switch could be a momentary switch placed so that it is pressed only when the unit is firmly on a flat surface. I've got an electric space heater that uses one of these, but it means that you can't use it elevated on blocks.

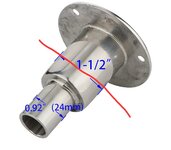
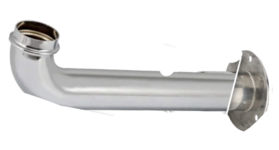
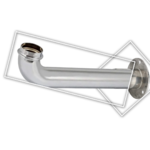
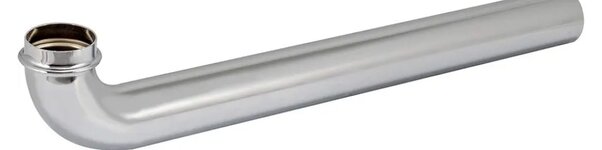
3) Co-axial exhaust. Ok, here I go way overboard, but hey, why not. My 20kBTU Monitor heater already uses one of these, and it just makes sense to heat your combustion inlet air with your exhaust waste heat. Besides, a cooler exhaust is safer. I used a 15" brass "wall bend tube" from a 1-1/2" drain, but I had to shorten it, so a 12" tube would be fine.

41PLeNrJpNL._AC_SL600_.jpg
I drilled this for the exhaust to run inside, and sealed it up with JB Weld (plain silicone seals the intake). The JB Weld burned up quite a bit, smelling pretty bad in the process, and I'm going to be replacing it with a better high temperature epoxy, but otherwise it works great (the exhaust tube is contiguous, so I know for certain that all exhaust is piped out, and if the inlet leaks a little, that's ok). A few screws near the far end of the brass tube keep the stainless flexible exhaust tube centered nicely, and with the brass trimmed to match the length of the stainless, the muffler shoved into the stainless provides just enough separation between inlet and exhaust. The thin stainless corrugated exhaust tube makes an ideal heat transfer surface. I really couldn't have picked something better. The far end of the brass is always cold, 2" behind the heater where it passes the door is cool enough to touch, and by the time I get to the rear foot, it's quite warm.

I mentioned this co-axial exhaust elsewhere, and someone commented that the warm intake air would throw off the mixture. Well, one thing I've noticed is that this unit has an automatic altitude compensation, and while I am at sea level, it showed an altitude near 0m when I bench tested it with just direct exhaust, but now shows that I am near 100m with the coaxial exhaust, so whatever these do to automatically compensate for "altitude" must be optimizing combustion pretty intelligently. I wonder if they're using an oxygen sensor in the combustion chamber...

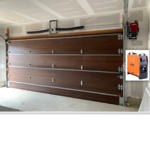
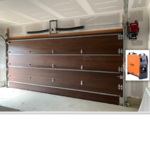
The last picture shows it venting through an exhaust port in my garage door. The 6" opening makes it easy for me to pass the exhaust tube with the muffler installed right through it, and a bracket on the door mates with a part I attached to the foot on the rear of the heater to keep it stably in place.

Is this anywhere near as nice as my Monitor heater? No. It's quite a bit louder, though also much smaller and the output is similar. The biggest issue is that the Monitor will gracefully shutdown if it loses power unattended, whereas this will likely melt it's internal electronics if it loses power and I don't supply air to cool the combustion chamber quickly.
 

Attachments

  • 7B851328-0CD7-43A3-B3E4-3822992D796A.jpeg
    7B851328-0CD7-43A3-B3E4-3822992D796A.jpeg
    697.1 KB · Views: 90
  • 71B63ED1-428E-4E35-8152-59F4DB86EE83.jpeg
    71B63ED1-428E-4E35-8152-59F4DB86EE83.jpeg
    800.3 KB · Views: 88
Last edited:
To avoid these ads, REGISTER NOW!

Bmw4life

Well-known member
Joined
Apr 17, 2020
Messages
207
Location
Canada
Interesting idea! First time I see something like this and I watched a ton of YouTube videos on these heaters.
I wish there were a few more pictures. So you're using this tube for air intake


And you're using this for exhaust


You basically drilled the air intake tube, that's 1.25 inch in diameter, and passed the exhaust line inside of it, which is 1 inch in diameter.

Both intake and exhaust are then the same length, which is one foot? They then both go over this exhaust pipe?


You said the air intake tube was 15 inches long, but you shortened it to 12. Could you explain why you needed 12 inches instead of 15?

You said you used some screws at the end of the exhaust to keep it centered inside the air intake. Could you explain or provide a picture, as I'm curious how you did it and have no idea.

I assume it's not a problem that the exhaust is not centered throughout the entire run, and only need to be centered at the end?

From your picture it's hard to tell, but the diesel heater is inside the garage?

I'm not clear what happened with the exhaust muffler?
You said you passed it through The 6" opening, I'm not sure I understand. Like a cut out in your wall that's 6 inches in diameter? A picture would be great!

My plan was to drill a hole in my garage door, to be able to connect and disconnect the exhaust flexible pipe. (I cannot drill through the walls).
I was going to use the air inside my garage for air intake, instead of getting the air from outside.
I'm not entirely sure what's the point of bringing new fresh air in and having to heat it more, when the air inside the garage is already warm.

Sorry for all the noob questions! Just trying to understand the parts I need to order and how to make it work right.
 

rlitman

Well-known member
Joined
Oct 18, 2010
Messages
24,649
Location
Long Island
...So you're using this tube for air intake...And you're using this for exhaust...
You said the air intake tube was 15 inches long, but you shortened it to 12. Could you explain why you needed 12 inches instead of 15?

You said you used some screws at the end of the exhaust to keep it centered inside the air intake. Could you explain or provide a picture, as I'm curious how you did it and have no idea.

I assume it's not a problem that the exhaust is not centered throughout the entire run, and only need to be centered at the end?

From your picture it's hard to tell, but the diesel heater is inside the garage?

I'm not clear what happened with the exhaust muffler?
You said you passed it through The 6" opening, I'm not sure I understand. Like a cut out in your wall that's 6 inches in diameter? A picture would be great!

My plan was to drill a hole in my garage door, to be able to connect and disconnect the exhaust flexible pipe. (I cannot drill through the walls).
I was going to use the air inside my garage for air intake, instead of getting the air from outside.
I'm not entirely sure what's the point of bringing new fresh air in and having to heat it more, when the air inside the garage is already warm.

Sorry for all the noob questions! Just trying to understand the parts I need to order and how to make it work right.
That is the exact model brass wall bend I used. It is 1.5" nominally, but the ID is a bit bigger than that IIRC. The exhaust I'm using is the very short one that came with the unit, and that's why I ended up needing to cut the wall bend. I forgot about that. You shouldn't modify the exhaust length, because the smooth end needs to remain for the connection to your muffler, and you need clearance for the exhaust to stay away from the intake. I guess I need to come back with some measurements...

About centering. The exhaust is cemented in the middle of the hole on one end, and the tips of three sheet metal screws stuck in around the far end of the brass tube keep it centered there. The brass tube is only a foot long, so the middle of the stainless isn't moving, because the stainless is kinda stiff. I'll come back with a picture of this when I can.

Unrelated and long before this heater project, I installed a 6" aluminum exhaust port in my wood garage door so I could vent mufflers and such (or even pull a vacuum cleaner hose through it when I want the door to stay shut). That's the opening I'm using. I made a bracket out of scrap parts (wood and steel cutoffs from a shelf system) that keeps the heater aligned with the opening, poke the exhaust through, and then walk outside and stick the muffler onto the steel tube to get better separation between exhaust and intake. The 6" hole gives a lot more air around everything than needed for this setup, so this winter I need to come up with a way to seal around the tube.

What is your door made of. A wood door may have enough solid area at the bottom to drill, but other door materials present their own challenges.

Lots of people run the exhaust outside and allow the unit to pull combustion air from inside. It may be "safe", but it's a terrible idea. I'll give the top two reasons why:
1) Balance. The combustion blower pulls fresh air in and forces exhaust out. When there is a pressure difference between the two, air will flow in ways not intended by the blower. Like how a dryer or range exhaust can cause a chimney flow to reverse. This even happens when the wind blows by one pipe outside and not the other. By having the air inlet on the same exterior wall as the exhaust, both will always be at the same static pressure, so the blower will work as intended.
2) Air has to come from somewhere. If you leave the inlet open to room air and vent the exhaust outside, outside air MUST re-enter the building from somewhere to equalize the pressure. Either you force outside air to enter via every crack and opening, and waste room temperature air through the combustion chamber, or you source the combustion air outside. You will do nearly as much for boosting combustion efficiency by connecting your intake outside, as you can by recapturing heat lost in the exhaust.
 

Bmw4life

Well-known member
Joined
Apr 17, 2020
Messages
207
Location
Canada
Thanks for the explanation. I think if you could add a bunch of pictures, that would be terrific!
My garage door is some kind of plastic, and ideally the smaller the diameter the better. I think this is how I connect?
1000070235.jpg


I'll cut off the smaller diameter piece and screw it to the garage door with 3 screws.

This fitting will be 1.5 inches in diameter, the same as the air intake pipe.
This will be a slight problem, since I won't be able to connect them together.

1000070246.png


So I need to think of some mechanism how to connect the exhaust on the garage door to the brass pipe, so quick and easy disconnect.
Also I'd like to place the heater to the side of the garage by the wall, and my garage door is not there. So I don't think this pipe will work, since the heater won't be directly in front of the door.

I have to think of something else.
I have at least a foot of space on each side of the garage door, and I want to mount the heater on the side wall.
Something like this but on the wall to the right, not on the front wall.
1000070250.png
 

Attachments

  • 1000070250.png
    1000070250.png
    877.4 KB · Views: 20
  • 1000070242.png
    1000070242.png
    306.4 KB · Views: 26

Bmw4life

Well-known member
Joined
Apr 17, 2020
Messages
207
Location
Canada
I dont really like this rigid brass tube....
1000070239.jpg


I'm thinking, why not use something flexible like this instead?

1000070252.jpg

Feed the 1 inch exhaust tube through the 1.5 inch walker tube, using the walker tube for air intake. Gives you greater flexibility if your like is not straight.
 

Bmw4life

Well-known member
Joined
Apr 17, 2020
Messages
207
Location
Canada
Here's what I think I will do.

I'll use this 2.5 inch blastgate. It's the smallest diameter I could find.
1000070256.jpg


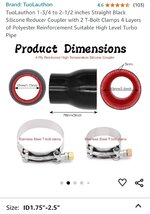
OD is 2.5, this reducer will go over the blast gate inside the garage.
1000070259.jpg

The 1.75 diameter is a little too big to go over the Walker air intake hose of 1-5/8" OD, but not a huge difference.
I'll simply glue the 1.75 inch end of the reducer to the Walker pipe, but will keep it going inside, and past the blast gate.
That's it!
When I'm done, I'll just pull of the reducer off the blast gate and close the blast gate.
All in all this set up comes up to just under $300 CAD.
 
To avoid these ads, REGISTER NOW!
Top Bottom