
cthulu
Well-known member
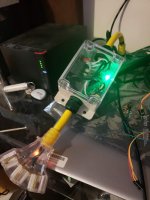
Hey guys, I recently finished a project to send power to my parts washer on Saturdays without me having to get up and turn it on. This same basic principal can be used with basically anything that pulls under 30 amps, you could also use a larger amperage contactor and run this for larger appliances as well.
Goal was to be able to use my computer to set a timer/schedule for things in the shop, End of the post lists all the parts used and what I paid with links. Total cost per unit is about 30$
After you've assembled the box and soldered your breakaway pins in the sonoff device (3v3, grd, tx,rx) , directions below. You are ready to start programming the new device.
http://blog.kilomon.com/2018/01/hacking-sonoff-wifi-switch.html
You'll need to download arduino and install it on your computer.
https://www.arduino.cc/en/Main/Software
You can then use this software and the programmer listed in the parts section to connect to the sonoff device and reprogram it with the below code.
The second part of the directions helped a lot but the code didn't get me there 100% so I used the below code instead.
http://blog.kilomon.com/2018/02/hacking-sonoff-wifi-switch-part-2.html
// Load Wi-Fi library
#include <ESP8266WiFi.h>
// Replace with your network credentials
const char* ssid = "YourWifiSSID";
const char* password = "YourWIFIpassword";
// Set web server port number to 80
WiFiServer server(80);
// Variable to store the HTTP request
String header;
// Auxiliar variables to store the current output state
String output5State = "off";
String output4State = "off";
// Assign output variables to GPIO pins
const int output5 = 13;
const int output4 = 12;
void setup() {
Serial.begin(115200);
// Initialize the output variables as outputs
pinMode(output5, OUTPUT);
pinMode(output4, OUTPUT);
// Set outputs to LOW
digitalWrite(output5, LOW);
digitalWrite(output4, LOW);
// Connect to Wi-Fi network with SSID and password
Serial.print("Connecting to ");
Serial.println(ssid);
WiFi.begin(ssid, password);
while (WiFi.status() != WL_CONNECTED) {
delay(500);
Serial.print(".");
}
// Print local IP address and start web server
Serial.println("");
Serial.println("WiFi connected.");
Serial.println("IP address: ");
Serial.println(WiFi.localIP());
server.begin();
}
void loop(){
WiFiClient client = server.available(); // Listen for incoming clients
if (client) { // If a new client connects,
Serial.println("New Client."); // print a message out in the serial port
String currentLine = ""; // make a String to hold incoming data from the client
while (client.connected()) { // loop while the client's connected
if (client.available()) { // if there's bytes to read from the client,
char c = client.read(); // read a byte, then
Serial.write(c); // print it out the serial monitor
header += c;
if (c == '\n') { // if the byte is a newline character
// if the current line is blank, you got two newline characters in a row.
// that's the end of the client HTTP request, so send a response:
if (currentLine.length() == 0) {
// HTTP headers always start with a response code (e.g. HTTP/1.1 200 OK)
// and a content-type so the client knows what's coming, then a blank line:
client.println("HTTP/1.1 200 OK");
client.println("Content-type:text/html");
client.println("Connection: close");
client.println();
// turns the GPIOs on and off
if (header.indexOf("GET /5/on") >= 0) {
Serial.println("GPIO 5 on");
output5State = "on";
digitalWrite(output5, HIGH);
} else if (header.indexOf("GET /5/off") >= 0) {
Serial.println("GPIO 5 off");
output5State = "off";
digitalWrite(output5, LOW);
} else if (header.indexOf("GET /4/on") >= 0) {
Serial.println("GPIO 4 on");
output4State = "on";
digitalWrite(output4, HIGH);
} else if (header.indexOf("GET /4/off") >= 0) {
Serial.println("GPIO 4 off");
output4State = "off";
digitalWrite(output4, LOW);
}
// Display the HTML web page
client.println("<!DOCTYPE html><html>");
client.println("<head><meta name="viewport" content="width=device-width, initial-scale=1">");
client.println("<link rel="icon" href="data:,">");
// CSS to style the on/off buttons
// Feel free to change the background-color and font-size attributes to fit your preferences
client.println("<style>html { font-family: Helvetica; display: inline-block; margin: 0px auto; text-align: center;}");
client.println(".button { background-color: #195B6A; border: none; color: white; padding: 16px 40px;");
client.println("text-decoration: none; font-size: 30px; margin: 2px; cursor: pointer;}");
client.println(".button2 {background-color: #77878A;}</style></head>");
// Web Page Heading
client.println("<body><h1>ESP8266 Web Server</h1>");
// Display current state, and ON/OFF buttons for GPIO 5
client.println("<p>GPIO 5 - State " + output5State + "</p>");
// If the output5State is off, it displays the ON button
if (output5State=="off") {
client.println("<p><a href="/5/on"><button class="button">ON</button></a></p>");
} else {
client.println("<p><a href="/5/off"><button class="button button2">OFF</button></a></p>");
}
// Display current state, and ON/OFF buttons for GPIO 4
client.println("<p>GPIO 4 - State " + output4State + "</p>");
// If the output4State is off, it displays the ON button
if (output4State=="off") {
client.println("<p><a href="/4/on"><button class="button">ON</button></a></p>");
} else {
client.println("<p><a href="/4/off"><button class="button button2">OFF</button></a></p>");
}
client.println("</body></html>");
// The HTTP response ends with another blank line
client.println();
// Break out of the while loop
break;
} else { // if you got a newline, then clear currentLine
currentLine = "";
}
} else if (c != '\r') { // if you got anything else but a carriage return character,
currentLine += c; // add it to the end of the currentLine
}
}
}
// Clear the header variable
header = "";
// Close the connection
client.stop();
Serial.println("Client disconnected.");
Serial.println("");
}
}
Finally you now need a way to activate the switch to test it, I couldn't get the web browser working correctly so I used a windows programming language called PowerShell to do it. Replace the IP of your sonoff device in the below script and this will turn the led on and the relay on. (Yes, I know the on/off is backwards, but I didn't notice till I had put the box back together you could change the above code and reflash if it bugs you)
Copy the below into notepad and save as TurnOn.PS1 and select all files in notepad. Then you can right click the script and run it with powershell to turn on your device for further automation you can use windows task scheduler to execute the scripts on a set time frame.
#turns led and relay on
Invoke-WebRequest -UseBasicParsing -Uri http://192.168.1.149/5/off
Invoke-WebRequest -UseBasicParsing -Uri http://192.168.1.149/4/on
Below is the code for turning the relay and led off.
#turns led and relay off
Invoke-WebRequest -UseBasicParsing -Uri http://192.168.1.149/5/on
Invoke-WebRequest -UseBasicParsing -Uri http://192.168.1.149/4/off
Programmer, 12.49$
Reusable on future projects, there are cheaper ones that don't work as well as this one (ask me how I know)
https://www.amazon.com/gp/product/B075N82CDL/?tag=atomicindus08-20
Breakaway pins, 10.99$
You could just solder everything together permanently.
https://www.amazon.com/gp/product/B01MFBPH9N/?tag=atomicindus08-20
Power cord, 1-3, 9.12$
You could easily use any old powercord though.
https://www.amazon.com/gp/product/B000BQU576/?tag=atomicindus08-20
Contactors/Relay 12.99$
https://www.amazon.com/gp/product/B07587NZTC/?tag=atomicindus08-20
Cable Glands, 10.99$
https://www.amazon.com/gp/product/B01GJ03AUQ/?tag=atomicindus08-20
Project box, clear. 8.99$
https://www.amazon.com/gp/product/B072FS4118/?tag=atomicindus08-20
Jumper wires, 6.98$
https://www.amazon.com/gp/product/B01EV70C78/?tag=atomicindus08-20
Sonoff WiFi Swtich Pack of 2, 13.52
https://www.amazon.com/gp/product/B07BDFDHX9/?tag=atomicindus08-20

")