To avoid these ads, REGISTER NOW!

DIY install of non-Mrcool units

racecougar

Well-known member
Joined
Jan 26, 2021
Messages
5,385
Location
Missouri
I picked up a valve core remover/installer for $16 and a eccentric flaring tool with clutch for $30 off Amazon.
 
To avoid these ads, REGISTER NOW!

bluedog225

Well-known member
Joined
Jan 31, 2012
Messages
3,378
Location
Texas
OP-I wouldn’t skimp on any aspect. If you get all the right tools, and are meticulous, it may go well.

Always a carp shoot about the quality of the factory copper joints.

I recall somewhere that all copper connections should be brazed, not soldered. Not sure if this is accurate but wanted to mention it.
 

housewolf

Well-known member
Joined
Feb 3, 2021
Messages
1,144
Location
East Texas
OP-I wouldn’t skimp on any aspect. If you get all the right tools, and are meticulous, it may go well.

Always a carp shoot about the quality of the factory copper joints.

I recall somewhere that all copper connections should be brazed, not soldered. Not sure if this is accurate but wanted to mention it.
This is true but most likely won’t need to do any brazing. Regular (soft) solder requires flux that would contaminate the system. Brazing done while being purged with nitrogen will leave the inside of the pipe shiny clean.

Hopefully I’ll be picking up my unit today, or early next week. I’m waiting on the call from the dealer. I wasn’t “planning“ on using any nitrogen. Just hook up the (short) lineset, get a good vacuum then open the valve. The unit is shipped with enough refrigerant for 20’ I believe. I’m gonna make some calls before I mess something up though
 

bluedog225

Well-known member
Joined
Jan 31, 2012
Messages
3,378
Location
Texas
Roughly you need this , but sky is the limit.....

Nitrogen tank >$100
Nitrogen regulator, high pressure >$30
Flaring tool $30-40
Torque wrench >$100
Gauges/hoses $>100
Micron gauge >$80
Valve core remover/installer $>80
Bubble test $.05 for dish detergent
optional...
608 certification, $150
leak tester >$100
if you have multiple splits....
refrigerant recovery machine used >$400
recovery tank >$80

Spend all this or save more than this on your first install or possibly your first service call.
Good list
 

kdeboy

Member
Joined
Aug 28, 2022
Messages
23
I just installed an LG (non-DIY) mini split system, these are the parts and tools I needed for the install:

1. Line set (copper lines to connect indoor and outdoor units). Make sure you get the correct type of copper line.
2. Tube cutter and flaring tool (I used a Yellow Jacket 60295 flaring tool)
3. Gauge set (I used JB Industries 2 valve manifold gauge set)
4. Mini split adapter for gauge set (Mini splits use a 5/16 fitting to connect the gauge(s), but most hose sets have a 1/4 fitting for "standard" HVAC systems. I used a Yellow Jacket 19173)
5. Bottle of nitrogen to leak check the system after installing the lines. I borrowed this from a friend.
6. Vacuum pump and micron gauge to evacuate the lines/outdoor unit after leak checking. I also borrowed these from a friend, vacuum pump was a JB Platinum 5cfm pump, gauge was a BluVac+ digital micron gauge)
The outdoor unit comes precharged with refrigerant, but the charge is based on using a line set in a pre-determined length range. If your lines are shorter or longer than that, you'll either remove some of the factory precharge or add more. The "correct" (and legal) way to remove part of the charge will require an evacuation unit and recovery bottle. If you need to add charge, you'll need and EPA card or know someone who has one, as most HVAC suppliers won't sell refrigerant to you if you don't have the EPA card.
 

pcmeiners

Well-known member
Joined
Aug 13, 2009
Messages
8,055
Location
In the only town in Pennsylvania, Bloomsburg.
"I recall somewhere that all copper connections should be brazed, not soldered. Not sure if this is accurate but wanted to mention it."

There is nothing wrong with flares unless you have crappy tools , want to cut corners, any you are too damn lazy to do a flare correctly (using a torque wrench). Brazing copper is not going to stop crappy installs and leaking systems; laziness permeates anything you do. As to brazing, done correctly it is less prone to leakage, but it also weakens copper pipe considerably.
 
Last edited:
OP
J

JackOfDiamonds

Well-known member
Joined
Jul 31, 2020
Messages
714
Location
Idaho (USA)
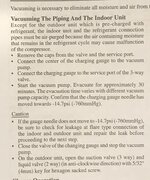
After over-thinking it and reading a Pioneer install guide, I don't know what you need a micron guage for.

If the idea is you will pump it down and watch the micron guage to see if it holds vacuum, really, right? But full vacuum is only about -15psig.

If you are going to do a high pressure n2 test, that is usually like 300psi. Wouldn't that be much better than the vacuum check anyway?
 

N_Jay

Well-known member
Joined
Nov 1, 2016
Messages
1,209
So just how bad are the Mr. Cool units.
Asking because Costco has them, so it might be a better deal than most.
 

pcmeiners

Well-known member
Joined
Aug 13, 2009
Messages
8,055
Location
In the only town in Pennsylvania, Bloomsburg.
"After over-thinking it and reading a Pioneer install guide, I don't know what you need a micron gauge for."

If you pump down below 500 micron and turn off vacuum pump....

microns rise slow to very fast, and eventual double digit thousands of microns, you have a leak (s) or your hose connections are not good, valves, gauges, vacuum pump have leaks.

Switched to PSI scale, rise continuously, then level off above 0 psi you have trapped refrigerant gases.

Switched to PSI scale, rising continuously until you get to 0 psi, you have moisture remaining. This is why you triple purge.

micron rise but level off below 500 microns, and remain at the same level for an extended time, taking temperature change or system acclamation into account, your good to go. The rise could be trapped gas in devices or hoses materials, or oil.

"If the idea is you will pump it down and watch the micron gauge to see if it holds vacuum, really, right? But full vacuum is only about -15psig."

Generally micron gauges start to register at 25,000 microns, is your mechanical gauge and eye sight good enough to show 25000 increments from 0 to 29.92" mercury ?

"If you are going to do a high pressure n2 test, that is usually like 300psi. Wouldn't that be much better than the vacuum check anyway?"

Do you have a super accurate pressure gauge, accurate at 300-600psi which increments in the 1000th of a pound ? Secondly, a micron gauges main functions are to monitor moisture and trapped gases, and then leaks, positive pressure gauges are limited. You can you do without a micron gauge if you want to gamble with your system, consider it relatively cheap insurance/assurance.


.
 
Last edited:

housewolf

Well-known member
Joined
Feb 3, 2021
Messages
1,144
Location
East Texas
Well I still have some issues to take care of and I’m going to take my time with it but I’m about to get this show on the road
9BC0E222-C2AE-4BEF-B389-D420F744F084.jpeg
 

housewolf

Well-known member
Joined
Feb 3, 2021
Messages
1,144
Location
East Texas
Where did you get thr Daikin?
How much was it?
I’m retired from Plg/HVAC business. I bought it directly from Goodman, they’re somewhat local to me. It probably wouldn’t be ethical to say what I paid but it was significantly less than I could have gotten a Mr Cool DIY unit.
 

housewolf

Well-known member
Joined
Feb 3, 2021
Messages
1,144
Location
East Texas
After over-thinking it and reading a Pioneer install guide, I don't know what you need a micron guage for.

If the idea is you will pump it down and watch the micron guage to see if it holds vacuum, really, right? But full vacuum is only about -15psig.

If you are going to do a high pressure n2 test, that is usually like 300psi. Wouldn't that be much better than the vacuum check anyway?
Same with the Daiken manual
3529643C-828C-48B4-9C31-A8DF0F5D5E2A.jpeg

I’m going to check with one of the techs at work and see what they say. I’ve got some other irons in the fire but I believe I can work on this a little each day. I got the inside unit hung today.
E4D3EBC4-676F-41E5-8B03-03EE23801870.jpeg
I’m definitely going to need some help fishing the lineset through and will probably wait until my son can help. Hopefully have this wrapped up my the end of next week.
 

wyliesdiesels

Well-known member
Joined
Aug 14, 2012
Messages
20,194
Location
Modesto, CA
It's totally feasible. You need 4 tools to do the job properly: Manifold gauge set, vacuum pump, core removal tool, micron gauge. You can pick all of that up for about $250 or so.

Licensing is another story, and varies by state and county.

No soldering or brazing necessary with most minisplits.
cant buy the gas without an EPA cert card...
 
Last edited:

wyliesdiesels

Well-known member
Joined
Aug 14, 2012
Messages
20,194
Location
Modesto, CA
Easiest install ever. No wonder all the HVAC companies push these so hard, a monkey could install them. No special tools, no gauges, no vaccuum pumps needed. Units come precharged, all connections are sealed with valves so no risk of refrig loss or contamination of the lines. Connect the lines, open the valves and sit back in the cool breeze from your new A/C
do you have a recommendation?
 
To avoid these ads, REGISTER NOW!

haveissues

Well-known member
Joined
Feb 9, 2011
Messages
379
Location
Hudson Valley NY
I also just finished installing a 3 head lg unit diy. I would recommend skipping brazing lines and just flare them. I bought a $25 orbital flare tool on amazon that was recommended on here and my flares looked better than the factory flares on the lines. I had an argon tank so I used that to pressure test
 

wyliesdiesels

Well-known member
Joined
Aug 14, 2012
Messages
20,194
Location
Modesto, CA
Get a license. Probably no big deal. I did just buy a 25 lber without license through FB marketplace.
sure ill jump right on that. requires a ton of study time and material ($$$$$) and a $200 test.... easier said than done....


428PI

Well-known member
Joined
Jul 14, 2018
Messages
1,976
Location
Peabody, KS
requires a ton of study time and material ($$$$$) and a $200 test.... easier said than done....
It's 25 bucks and open book exam. Someone's trying to scam you and yea, most units come precharged. Mine did too (3 unit design) but I'm I believe a little low so hence I bought some gas but like I said it was 10 bucks a pound on the open market. You can buy an extra 2 lb from Pioneer whom I purchased the unit from if the lines were longer than 75ft total between all of them.
 

danski0224

Well-known member
Joined
Jan 29, 2005
Messages
13,746
Location
Near Naperville, IL
After over-thinking it and reading a Pioneer install guide, I don't know what you need a micron guage for.

If the idea is you will pump it down and watch the micron guage to see if it holds vacuum, really, right? But full vacuum is only about -15psig.

If you are going to do a high pressure n2 test, that is usually like 300psi. Wouldn't that be much better than the vacuum check anyway?
The pressure test determines lineset integrity. Some require a pressure test at 500 PSIG, and that test pressure is supposed to hold for 24 hours. Details are in the factory supplied kneepads- AKA instructions.

That pressure test is actually a lot harder than it sounds, especially if there is a temperature change. Some digital gauges will do a pressure check with temperature compensation.

Moreover, if you think you can eyeball a small difference on an analog gauge, good luck.

The micron gauge determines the quality of the vacuum (moisture content). The micron gauge will also find problems in your equipment, like crappy hoses or a crappy manifold set.

There are 24,000 microns in the last inch of mercury when pulling a vacuum, a digital gauge will read -29.5" of mercury when in a vacuum.

A good vacuum for HVAC purposes is usually defined as under 500 microns.

The gauge can read -29.5" Hg and the microns can be over 50,000. It can take HOURS to pull a proper vacuum, using a micron gauge and pulling the vacuum through those tiny 1/4" ID HVAC hoses and the manifold. There is a bunch of stuff on the TruTech Tools website about pulling a vacuum.

The triple evac is using dry nitrogen at a low PSI between evacuations to draw out additional moisture (the microns). Yes, it makes a huge time difference to purge with nitrogen.

There is a conversion from microns to grains of moisture to drops of moisture. The factory filter/driers are rated for a certain number of drops of moisture. In the end, it's all about getting a sealed and dry system.

There really is no way to "top off" a mini split. When the performance drops off or if it stops working, the only option is to recover refrigerant and weigh in new.

The shortcuts you take now show up later.
 

danski0224

Well-known member
Joined
Jan 29, 2005
Messages
13,746
Location
Near Naperville, IL
Easiest install ever. No wonder all the HVAC companies push these so hard, a monkey could install them. No special tools, no gauges, no vaccuum pumps needed. Units come precharged, all connections are sealed with valves so no risk of refrig loss or contamination of the lines. Connect the lines, open the valves and sit back in the cool breeze from your new A/C

Not really true with respect to the lineset. That still has to be fit to the job, pressure tested, evacuated and charged with refrigerant if the installation is over X feet specified in the manual.

The no special tools part is BS too.

Of course, it comes down to what kind of install you are doing. And yes, some companies are going to **** it in, too.
 

wyliesdiesels

Well-known member
Joined
Aug 14, 2012
Messages
20,194
Location
Modesto, CA
It's 25 bucks and open book exam. Someone's trying to scam you and yea, most units come precharged. Mine did too (3 unit design) but I'm I believe a little low so hence I bought some gas but like I said it was 10 bucks a pound on the open market. You can buy an extra 2 lb from Pioneer whom I purchased the unit from if the lines were longer than 75ft total between all of them.
who offers it for $25?
 

pcmeiners

Well-known member
Joined
Aug 13, 2009
Messages
8,055
Location
In the only town in Pennsylvania, Bloomsburg.
Sorry folks your not legally working on a minisplit for $25, and your open book test does not count on your other type II, III tests, you have to take it over, closed book, no reference material. An EPA type 1 certificate only allows work on small low pressure appliances, such as a window AC unit, refrigerator, water coolers, dehumidifiers.

Nor does it allow someone to charge or recover refrigerant from a minisplit, that requires a type II or universal.

A type 1 does not permit you to legally buy gas for a minisplit

"Refrigerant can only be sold to technicians certified under the Section 608 or Section 609 technician certification programs, where individuals may only purchase refrigerant consistent with the appliances covered by their certification."

"sure ill jump right on that. requires a ton of study time and material ($$$$$) and a $200 test.... easier said than done"

A ton of study time ? Guess you have not taken the test. I passed the universal, bet it could be passed with 2 days of study, if you understand the material. Cost $ 160

The good news, the core test is the hardest, if you can pass practice tests without an open book. with a decent grade, you should be able to pass the rest of the tests (if you understand the material). Type III cert was the easiest part.
 
Last edited:

428PI

Well-known member
Joined
Jul 14, 2018
Messages
1,976
Location
Peabody, KS
where individuals may only purchase refrigerant consistent with the appliances covered by their certification."
Don't they have R410a gas in smaller appliances? And probably no one here that has installed a minisplit has the means to recover the gas.
 

428PI

Well-known member
Joined
Jul 14, 2018
Messages
1,976
Location
Peabody, KS
A type 1 does not permit you to legally buy gas for a minisplit
Technically you don't need a permit to buy gas for a minisplit although some warehouse may require it though as the OP was really wondering about how to install one. Technically you probably only need the permit to service it? I really think too that people buying the tools to do flares may be setting themselves up for potential failure. I ordered the length of linesets I needed and used that. Factory flares looked fine (why wouldn't they?). People tend to overcomplicate things. I've got the cert. for vehicle AC work but nobody has ever asked me for it (except at work we all recertified since I couldn't find my original one from years ago). You can buy all kinds of refrigerants at all kinds of outlets.
 

N_Jay

Well-known member
Joined
Nov 1, 2016
Messages
1,209
Now that we have drifted way off topic, what brand do most recommend, and why?
Looking to keep the cost down, without taking too big a hit on quality, and not over complicating the installation.
 

pcmeiners

Well-known member
Joined
Aug 13, 2009
Messages
8,055
Location
In the only town in Pennsylvania, Bloomsburg.
"Technically you don't need a permit to buy gas for a minisplit although some warehouse may"

Yes it drifted off, .....technically you are required to be certified to purchase 410a, unless it is for resale, if you want to buy it off Ebay, it your gamble.... are you getting retail gas , recovered, or contaminated refrigerant. Please educate yourself before making anymore twisted statements or questions.

N_jay, in general the more you pay the better the minisplit. There are to many variable to tell you what is the best unit for you. The higher the efficiency, the more you pay, the more serviceable, the more you pay. Mitsubishi is likely the most serviceable ( most dealer/service men), with high efficency, low temperature ability,low noise. Fujitsu has the highest efficiency (Tested/documented), low temperature ability, low noise but is has less dealers/servicemen. Easiest are any minisplit with pre-charged linesets, such as Mr Cool. Almost all minisplit warranties down right ****. Personally I went with Fujitsu.
 
Last edited:

N_Jay

Well-known member
Joined
Nov 1, 2016
Messages
1,209
Choose the one of those 3 areas that is the most important to you. The rest will follow.

That's how it is.
Engineering is the art of compromise.
All three factors are critical, putting quality slightly above cost, while maintaining a relatively easy installation for a mechanically competent novice and capping tools at $300 to $500.
 

N_Jay

Well-known member
Joined
Nov 1, 2016
Messages
1,209
If the Costco price gets Mr. Cool down towards the lower end of cost, and since it is targeting the DIY market, should also be at the lower end of complexity, just how big a hit am I taking in quality?
 

juddspaintballs

Well-known member
Joined
Sep 1, 2011
Messages
324
Location
Hedgesville, WV
I used a 12k Mr. Cool in an addition I built at my last house. It was insulated to the minimum for code, had four inexpensive windows and an exterior door in a 12x28 room. It kept the room warm when temperatures were below zero outside and it kept it cool in the humid summers of over 95 degrees. I don't know about longevity because I sold that house. Install was simple, it was inexpensive (I got a super discount on it when I bought all of the building materials at once through Lowes), and it worked just fine. What I didn't like was having a coil of extra line outside because I didn't have a good way to put the unit far enough away to avoid coiling the line.
 
To avoid these ads, REGISTER NOW!
Top Bottom