To avoid these ads, REGISTER NOW!

DIY machined finish?

Killer95Stang

Well-known member
Joined
Jan 1, 2008
Messages
341
Not exactly garage related, but the brain trust here is probably the most knowledgeable of the many boards i frequent.

Bought these valve covers raw and unfinished for an engine I'm completing. They didn't come gloss black, so I had to get them this way. I dropped them off to get powdercoated , which included sand or bead blasting. They look great, but the raised lettering is obviously the as cast finish.

Any ideas on how to mimic the machined look, like is standard on these covers when you buy them painted?

My idea is to get some fine, maybe 1000-1500 sand paper and glue it to a wood block, or my workbench and pull the valve covers across it in one direction. Am I on the right track, or do they need to be machined on a milling machine?
 

Attachments

  • pro5.jpg
    pro5.jpg
    48.5 KB · Views: 216
  • 20250116_162933.jpg
    20250116_162933.jpg
    674.7 KB · Views: 193
  • 5e0bfab0-8a27-42b9-ba46-0b03332a391f.jpg
    5e0bfab0-8a27-42b9-ba46-0b03332a391f.jpg
    809.2 KB · Views: 193
To avoid these ads, REGISTER NOW!

PCustoms

Well-known member
Joined
Jul 23, 2011
Messages
23,407
Location
VT
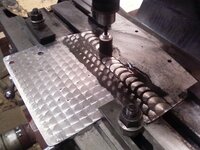
Fly cut it.

Sandpaper on a block isn't going to mimic a machined (fly cut) surface. Maybe if you could rig it up in a cross slide vise on a drill press you could somehow swing a sanding pad to mimic the arc pattern, but at that point I would just setup to skim with a fly cutter.

Note: side loading the quilt typically isn't good for a drill press
 
Last edited:

ArcReactorKC

Well-known member
Joined
Jun 1, 2019
Messages
2,237
Location
Out in the county NE of KCMO
I don't have pictures since this was done before there were cameras on our phones...

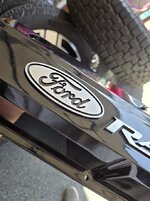
When we were building the 4.0v6 for a friend of mines 96 mustang he wanted some "machined" valve covers. I don't know where he got the stamped ones he found but they said FORD RACING similar to the blue one you posted.

I powder coated them and baked them in the yardsale oven. I then ran them face down on our ancient 12" wide belt sander with 100grit belt on it.

I think in theory it could've been done with a hand belt sander but I was lucky enough to use the farms tools.

I don't know if I would say it looked machined for sure but it looked surprisingly good.
 

CV428

Well-known member
Joined
Dec 12, 2019
Messages
156
Fly cut it.

Sandpaper on a block isn't going to minimize a machined (fly cut) surface. Maybe if you could rif it up in a cross slide vise on a drill press you could somehow swing a sanding pad to mimic the arc pattern, but at that point I would just setup to skim with a fly cutter.

Note: side loading the quilt typically isn't good for a drill press

This is the best way, honestly.

If OP doesn't have access to a mill, you can do "redneck jeweling" using a pneumatic orbital sander and scotch-brite. You'd have to strip the existing coating first though, media blast it. If you do any finishing work on aluminum (polishing or sanding) make 100% sure you have proper PPE. Gloves, goggles, and respirator. Aluminum dust is deadly.

Also be aware that cast aluminum finish is at the mercy of the quality of materials. I tried to polish some cast aluminum valve covers a few years ago and it was a nightmare due to impurities in the casting. We eventually got it looking nice but there were some weird striations here and there. A professional polishing shop could do it with ease, but hobbyists such as myself won't have those tools.
 

whateg01

Well-known member
Joined
Mar 13, 2006
Messages
11,450
Location
doo dah, kansas, usa
Describe what you mean by machined finish. I've had people ask me to replicate a machined finish on aluminum items with raised letters and what they really wanted was a brushed finish.
 

LXCam

ALLIANCE MEMBER
Joined
Apr 23, 2013
Messages
19,193
Location
AZ
Blue tape the major part of the powder coat. Then sandpaper and a good solid flat block the area. The blue tape is just incase you boo-boo leading in or coming off. Also screw ot clamp the cover down so it doesn’t move.
 
OP
K

Killer95Stang

Well-known member
Joined
Jan 1, 2008
Messages
341
Describe what you mean by machined finish. I've had people ask me to replicate a machined finish on aluminum items with raised letters and what they really wanted was a brushed finish.
Maybe brushed is what I'm capable of. I know for sure that the original is probably flycut, but I won't be able to do that ar home. I just want a non sandblast look finish, that more like the Factory ford finish.
 

Colin Len

Well-known member
Joined
Jan 30, 2013
Messages
1,233
Location
Long Beach CA
I've used your sandpaper method on many Honda valve covers over the years. Works perfectly to give a brushed finish and obviously you can pic more fine or rough sandpaper for a different look. But if you need that machined/milled looking finish I'm not sure there's really a way to replicate that without getting it fly cut.
 

nutjob

Well-known member
Joined
May 8, 2008
Messages
808
Location
NE, PA
I have done this on a lot of AL covers that I collect. Small Maple wood block with self adhesive sandpaper and just sand the raised parts and change the grit as you see needed.

Keep in mind when you are done these parts will be bare AL and will corrode / oxidize over time unless you can protect them.

Kevin
 

Mandres

Well-known member
Joined
Jun 22, 2006
Messages
1,158
Keep in mind when you are done these parts will be bare AL and will corrode / oxidize over time unless you can protect them.

Kevin

This is an important point. Right now the part is protected from damage and corrosion for the life of the engine. If you polish the lettering you're actively destroying that protection. Are good looks worth it to you?

If yes then you'll have to commit to a regular routine of cleaning and waxing the bare metal, or spray it with a high-temp catalyzed clear coat.
 

whateg01

Well-known member
Joined
Mar 13, 2006
Messages
11,450
Location
doo dah, kansas, usa
... , which included sand or bead blasting. They look great, but the raised lettering is obviously the as cast finish.

...

Keep in mind when you are done these parts will be bare AL and will corrode / oxidize over time unless you can protect them.
I'm not sure they are protected now. It looks like they probably masked off the areas that were to be left bare and powder coated the rest. So those areas are still bare metal, just rough bare metal.
 

NUTTSGT

Super Moderator
Staff member
Joined
Sep 14, 2009
Messages
51,098
Location
Northern Central Ohio
Blue tape the major part of the powder coat. Then sandpaper and a good solid flat block the area. The blue tape is just incase you boo-boo leading in or coming off. Also screw ot clamp the cover down so it doesn’t move.
Yes, yes, yes.

Masking tape is cheap.
 
OP
K

Killer95Stang

Well-known member
Joined
Jan 1, 2008
Messages
341
I'm not sure they are protected now. It looks like they probably masked off the areas that were to be left bare and powder coated the rest. So those areas are still bare metal, just rough bare metal.
They were sand/ bead blasted, cleaned and then powdercoated. After dusting with the powdercoat, they used either a brush or their finger to wipe off the powder that was on the raised letters. Last step was to put them in the oven.

I'm going to try the tape them up first, then sand with a block method. Car won't be at pebble beach, but may make it to Donut Derelicts cars and coffee one day if I ever finish it. As it stands, I only have this engine to stare at, because the car has been in fab shop jail for a 5 week job since last April.
 

Mandres

Well-known member
Joined
Jun 22, 2006
Messages
1,158
I'm not sure they are protected now. It looks like they probably masked off the areas that were to be left bare and powder coated the rest. So those areas are still bare metal, just rough bare metal.

You're absolutely right, I should have looked at the pics.

Scotch brite pads on the die grinder leave a decent looking finish. That's what I'd do 👍
 

Beerhippie

Well-known member
Joined
Oct 13, 2023
Messages
9,982
Location
Far NE Oregon
This is the best way, honestly.

If OP doesn't have access to a mill, you can do "redneck jeweling" using a pneumatic orbital sander and scotch-brite. You'd have to strip the existing coating first though, media blast it. If you do any finishing work on aluminum (polishing or sanding) make 100% sure you have proper PPE. Gloves, goggles, and respirator. Aluminum dust is deadly.

Also be aware that cast aluminum finish is at the mercy of the quality of materials. I tried to polish some cast aluminum valve covers a few years ago and it was a nightmare due to impurities in the casting. We eventually got it looking nice but there were some weird striations here and there. A professional polishing shop could do it with ease, but hobbyists such as myself won't have those tools.
Do you have a citation for this? 'Cause I don't seem to have gotten the memo. OSHA never seems to worry about it, either--as long as it isn't piled up under a grinder.
 

racecougar

Well-known member
Joined
Jan 26, 2021
Messages
5,174
Location
Missouri
If you want to go a step further, turn the lettering. You can pick up a simple kit for cheap. The real "cost" is your time, but those letters won't take long to do.

Old pics, but they illustrate the process/finish.

ATT00735.jpg
P1040960.JPG
20280306_10100194675885973_1252521922653454911_o.jpg
 
To avoid these ads, REGISTER NOW!

Beerhippie

Well-known member
Joined
Oct 13, 2023
Messages
9,982
Location
Far NE Oregon
^ Hard to do if you don't have a dual-traverse vise for the drill press. It can be done with some creative jig-making, but for a small project....

I did this 10/22 bolt on a simple drill press with a wooden jig:

8463403964_0a135b3763_b.jpg

It took me longer to make the jug than to do the tooling!
 

racecougar

Well-known member
Joined
Jan 26, 2021
Messages
5,174
Location
Missouri
^ Hard to do if you don't have a dual-traverse vise for the drill press. It can be done with some creative jig-making, but for a small project....

I did this 10/22 bolt on a simple drill press with a wooden jig:


It took me longer to make the jug than to do the tooling!
It's definitely easier with X-Y, but I've done it on the drill press with just a scale (ruler) clamped to the table as a fence. In fact, that is how I did the radiator cover shown in my post above (second photo).
 

Ultradog MN

Well-known member
Joined
Jan 20, 2024
Messages
793
Location
Twin Cities
Not exactly garage related, but the brain trust here is probably the most knowledgeable of the many boards i frequent.

Bought these valve covers raw and unfinished for an engine I'm completing. They didn't come gloss black, so I had to get them this way. I dropped them off to get powdercoated , which included sand or bead blasting. They look great, but the raised lettering is obviously the as cast finish.

Any ideas on how to mimic the machined look, like is standard on these covers when you buy them painted?

My idea is to get some fine, maybe 1000-1500 sand paper and glue it to a wood block, or my workbench and pull the valve covers across it in one direction. Am I on the right track, or do they need to be machined on a milling machine?
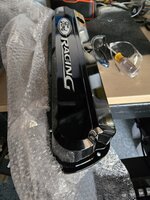
Clamping it onto a Bridgeport and flycutting would be like a 15 minute job.
However, a machined finish will leave burred/sharp edges everywhere. So you would have to take a dremel tool and deburr around each and every letter. afterwards. And THAT would be a long, tedious task to do without boogering up your pretty paint.
 
OP
K

Killer95Stang

Well-known member
Joined
Jan 1, 2008
Messages
341
Thanks for all the help....

I tried a scotch pads on a on pneumatic angled die grinder, which removed the casting marks and bumps from blasting. I then followed it up with hand polish with some Flitz. It produced a smoother semi-polished surface that I am happy with.

I'll try to post a few pictures when I finish both covers tomorrow.
 

DGersic

Well-known member
Joined
Mar 12, 2017
Messages
6,371
Location
DeKalb, IL
^ Hard to do if you don't have a dual-traverse vise for the drill press. It can be done with some creative jig-making, but for a small project....

I did this 10/22 bolt on a simple drill press with a wooden jig:

8463403964_0a135b3763_b.jpg

It took me longer to make the jug than to do the tooling!

No jig needed. Or at least not much of one. Just a board on my drill press.

IMG_5195.jpeg

Draw a T on the board, that establishes your side to side spacing. Clamp down a yardstick, there’s your row. After the row, move the yardstick.

Here’s the first project I did. Dash insert for my ‘37.

IMG_5193.jpeg

No brake, the mounting tabs were bent in a vice. Rounded corners were cut on my bandsaw and finished. The turning was done on my drill press with a Cratex stick.

Second project was a backer for the license plate.

IMG_5194.jpeg

Same drill press. Used a round brush constrained with heat shrink tubing.

Third project, a cover for the ugly plastic mount for the gas pedal.

IMG_5196.jpeg
 

rsanter

Well-known member
Joined
Dec 22, 2007
Messages
18,523
Location
visalia ca
I did a set of cobra valve covers, I painted them black wrinkle then block sanded the fins like you mentioned.
I went through several finer grits till I polished them.
Other than taking a bunch of time, it was not hard to do
 

DGersic

Well-known member
Joined
Mar 12, 2017
Messages
6,371
Location
DeKalb, IL
^ You're a better man than I, Gunga Din.

Nah. Just wanted it and worked out a way to do it. One step at a time. The hard part is that Cratex sticks are floppy, so it’s hard to get them to cut a nice circle. I found that a Cratex fits tight in a piece of brass tube from the local hardware store, making it work a lot better.
 

Beerhippie

Well-known member
Joined
Oct 13, 2023
Messages
9,982
Location
Far NE Oregon
Nah. Just wanted it and worked out a way to do it. One step at a time. The hard part is that Cratex sticks are floppy, so it’s hard to get them to cut a nice circle. I found that a Cratex fits tight in a piece of brass tube from the local hardware store, making it work a lot better.
I used some 1/4" cylinder X 1/8" shaft Cratex for that bolt. I didn't have any problems, but was keeping the pressure to a minimum to extend the life of the Cratex points. While I had the jig set up, I did a few more for myself and friends.
 
OP
K

Killer95Stang

Well-known member
Joined
Jan 1, 2008
Messages
341
Hard to see in photos, but I think I got the look I was after. I was mainly trying to get rid of the dull freshly cast finished / sand blast look that the raised letters had after I got them back from the powdercoater. I might try using a little ceramic coating over the entire valve covers to protect them a little more and to keep the letters from oxidizing too fast.

Thanks again.. Also, that metal turned finish on those parts above looks pretty awesome. If wasn't transforming this car from a 60s drag car, into an autocross / street car, I'd probably add a bunch of that detail work.

Hard to see in the photos...
 

Attachments

  • 20250202_103356.jpg
    20250202_103356.jpg
    132.5 KB · Views: 76
  • 20250202_103417.jpg
    20250202_103417.jpg
    136.5 KB · Views: 86

PCustoms

Well-known member
Joined
Jul 23, 2011
Messages
23,407
Location
VT
Hard to see in photos, but I think I got the look I was after. I was mainly trying to get rid of the dull freshly cast finished / sand blast look that the raised letters had after I got them back from the powdercoater. I might try using a little ceramic coating over the entire valve covers to protect them a little more and to keep the letters from oxidizing too fast.

Thanks again.. Also, that metal turned finish on those parts above looks pretty awesome. If wasn't transforming this car from a 60s drag car, into an autocross / street car, I'd probably add a bunch of that detail work.

Hard to see in the photos...
Looks good!

That's definitely going to oxide and get all dark/gross again, pretty quickly
 

CV428

Well-known member
Joined
Dec 12, 2019
Messages
156
Do you have a citation for this? 'Cause I don't seem to have gotten the memo. OSHA never seems to worry about it, either--as long as it isn't piled up under a grinder.

Chips generated from machining aren't really the issue for inhalation- it's when people use abrasives on aluminum where it becomes a major problem:


It doesn't mean it'll kill you if you breathe it in once (my original comment may have been a bit alarmist the way it was typed), but getting any metal dust in your lungs is never a good thing. Our liver and kidneys work to remove metals, but hepatotoxicity is a huge issue (so bad that even anti-perspirants with aluminum are being investigated). Lung and mucous membrane irritation, "metal flu/fever" effects, and cognitive impairment can occur very shortly after exposure. Look up Bubby Ebsen (Tin Man) and his experience with aluminum toxicity.

We used to make our own fireworks, and 8mic aluminum powder was a staple for some of the louder mortars. The warnings on that stuff were no joke.
 
Last edited:

rlitman

Well-known member
Joined
Oct 18, 2010
Messages
24,651
Location
Long Island
...so bad that even anti-perspirants with aluminum are being investigated...
This pseudo science keeps coming back like a zombie, and every single time someone mentions aluminum and Alzheimer's it gets rightly shot down because there is ZERO evidence in support of it. And yet people keep dredging this back up.
 

CV428

Well-known member
Joined
Dec 12, 2019
Messages
156
This pseudo science keeps coming back like a zombie, and every single time someone mentions aluminum and Alzheimer's it gets rightly shot down because there is ZERO evidence in support of it. And yet people keep dredging this back up.

Hepatotoxicity is the greater concern. It's real and there are many, many cases of it. The Alzheimer's correlation has enough info on it to be a concern, though.

There was a time where cigarettes were marketed as healthy. Same with sugar. Not trying to hijack the thread here, just saying "inhaling aluminum dust has major health implications, use proper PPE"
 

Colin Len

Well-known member
Joined
Jan 30, 2013
Messages
1,233
Location
Long Beach CA
Hard to see in photos, but I think I got the look I was after. I was mainly trying to get rid of the dull freshly cast finished / sand blast look that the raised letters had after I got them back from the powdercoater. I might try using a little ceramic coating over the entire valve covers to protect them a little more and to keep the letters from oxidizing too fast.

Thanks again.. Also, that metal turned finish on those parts above looks pretty awesome. If wasn't transforming this car from a 60s drag car, into an autocross / street car, I'd probably add a bunch of that detail work.

Hard to see in the photos...
You may also want to consider Boeshield T-9. My father turned me on to it, he was using it on his motorcycles and I've since started using it in my engine bay. It seems to have done a pretty good job keeping my bare aluminum surfaces looking good. And really, I wipe pretty much everything in the engine bay with it and it adds a nice looking sheen.
 

BurtEggley

Well-known member
Joined
Oct 8, 2024
Messages
887
next time have the shop who powder coats use a finer glass bead on the letters then mask them. There are some fine beads that leave almost a mirror finish.
 
To avoid these ads, REGISTER NOW!
Top Bottom