To avoid these ads, REGISTER NOW!

DIY Roof Rack

aka Larry

Well-known member
Joined
May 2, 2012
Messages
8,038
Location
Eastern, NC
I have friend with a Jeep Cherokee that does lots of camping. So he asked me to help him build a roof rack for it.

The first task was to get a design. He had a general idea and gave me the measurements to get started. For simplicity all the components would be 1"x 0.625" wall steel square tubing. So we could visualize the end product (and because I was bored during a recent power outage) I created this rendering using Google Sketch Up:


jeep_rack.jpg


I put a lot of pre-planning into these types of things. I also created a "cut sheet" so we would know exactly what pieces needed to be cut and to what dimension. This results in less wasted time during construction and no waste or re-cuts. The size was 52" x 65" and the calculated weight w/o the spare tire was 66 lbs.

A lot of cuts would need to be made, and some corners would be mitered. The tool for the job was a chop saw with a metal cutting blade. The resulting cuts were so clean they hardly needed any de-burring at all. Here are the pics:


Here is my friend (Chris) making the first of many cuts.

P1050199.jpg


The stack of components after cutting ready for assembly:


P1050200.jpg


Here we have tacked the first corner of the lower hoop, making sure we kept it square:


P1050202.jpg


The lower hoop all welded together:


P1050203.jpg


Since it was Chris’ project, I had him doing all the grunt work with the grinder, making all the ****-welds flush:


P1050205.jpg


Once the perimeter was done it was time to measure for the interior cross members:


P1050209.jpg


Here all the components of the lower rack and in place. Here I'm welding all the joints:


P1050210.jpg


Time to add the spacers to support the upper hoop:


P1050213.jpg


Now we've added the upper hoop and I'm welding all the joints:


P1050215.jpg


After all the welding was done, Chris used the drill and wire wheel to clean around the welds for paint:


P1050216.jpg


Chris wanted to store his full-sized spare on the roof. Here we've added a section of rectangular tubing with a nut welded in place as a base to secure the tire:


P1050218.jpg


To hold the wheel to the base, I built a holder from a 5/8" bolt welded to a 1-1/2" pipe flange. I bent a section of 1/4" rod to serve as a handle so it could be tightened by hand. Here's the final result:


P1050219.jpg


To actually mount the rack to the roof, he bought specialized brackets that clamp on the rain gutter. We bolted those brackets to the rack and sat it in place for a test fit:


P1050221.jpg


Once we were satisfied with the fit, we cleaned the whole rack and primed it with Dupli-color Self Etching primer. It was almost dark by this time and the bird-sized mosquitoes almost carried us away! :x


P1050222.jpg


After the primer we used Dupli-color engine enamel for the top coat:


P1050224.jpg


P1050223.jpg


After the paint was dry enough to handle, we placed the rack on the roof and cinched it down on the brackets:


P1050225.jpg


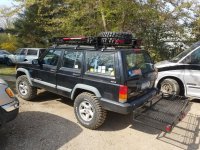
We heaved the spare up and into place and attached it with the hold-down. Now it's all done.


P1050227.jpg


P1050228.jpg


0abdf5e5.jpg
 
To avoid these ads, REGISTER NOW!

Heavy Metal Doctor

Well-known member
Joined
May 26, 2010
Messages
5,417
Location
Mason Dixon Line
Very nice work!...but no tabs for mounting lights?.... I wish I had pics of the one I built for a friend -- very much the same, but a bit bigger in all directions since he had an old fullsize Jeep Wagoneer .
 
OP
A

aka Larry

Well-known member
Joined
May 2, 2012
Messages
8,038
Location
Eastern, NC
Very nice work!...but no tabs for mounting lights?

Thanks! I suggested adding tabs/lights, but he declined. It didn't really matter since I knew he wouldn't own it too long. He hardly ever keeps a vehicle more than 12 months. He sold that Jeep just a few months after we added the rack and now has a WRX.
 
OP
A

aka Larry

Well-known member
Joined
May 2, 2012
Messages
8,038
Location
Eastern, NC
Nice looking rack Larry!! Just curious, did you get a final weight? And how long did it take you and chris? Looking to build one for my passport.. When do you wanna start:lol_hitti

Without the spare tire it was right at 70 lbs. It took about 12 hours total, which included all the painting.

C'mon on over and I'll help you build one.
 

upndown

Well-known member
Joined
Dec 5, 2010
Messages
3,107
Location
Desert Hills/Peeples Valley AZ.
Thanks for the offer Larry!! Think i'd need to pack a couple lunches for that trip:wtf: Fortunately I also have a buddy(retired boiler man) that's trying to teach my dumb *** some of his skill:headscrats fun learning tho!!
 

mscribellito

Well-known member
Joined
Apr 22, 2012
Messages
157
Location
SC
Nice Mustang, and no...I have a MIG setup using 75-25.

Thank you, sir. I couldn't see it in this thread, but I saw your MIG setup in your trailer build. You do some really nice work. I just got into welding so I'm a noob.
 

MarkG

Well-known member
Joined
May 23, 2012
Messages
1,219
Location
Elgin, IL
Looks great! What version of Sketch-up did you use? I was wondering how useful the free version is. I guess I could download it and try it out since it's free, but since you've got the experience.......

I imagine it works a lot like other CAD programs? I used to use AutoCAD as well as a Computervision CAD program at school and work, but it's been years!

Thanks.
 
OP
A

aka Larry

Well-known member
Joined
May 2, 2012
Messages
8,038
Location
Eastern, NC
Looks great! What version of Sketch-up did you use? I was wondering how useful the free version is. I guess I could download it and try it out since it's free, but since you've got the experience.......

I imagine it works a lot like other CAD programs? I used to use AutoCAD as well as a Computervision CAD program at school and work, but it's been years!

Thanks.

Thanks! I used the free version of Sketch-Up, but when you use AutoCAD like I do everyday at my job it's a steep learning curve. It took me 4 times longer to draw it in Sketch-Up!
 

DirtyWhiteBoy

Well-known member
Joined
Aug 18, 2009
Messages
141
Location
Byrdstown,TN
cool Larry, I have an XJ too - also in Gunmetal Blue....I need one too! ;) That looks great

Tell me about that chop saw/blade. Ive been looking at used cold saws, but I'd only use it a few times a month. It ***** using my little horiz band saw for every cut.

DSC_0031.jpg
 
Last edited:
OP
A

aka Larry

Well-known member
Joined
May 2, 2012
Messages
8,038
Location
Eastern, NC
Tell me about that chop saw/blade. Ive been looking at used cold saws, but I'd only use it a few times a month. It ***** using my little horiz band saw for every cut.

I'm in the same boat. The chop saw you see in the pic is the Evolution Fury 14" model which unfortunately has been discountinued. I borrowed it from a friend because like you I had been making all my cuts with my horizontal band saw, which would have taken forever on this project.

You can buy the blade on Amazon for $68 but keep in mind the RPM range on an abrasive saw is much higher so you can't just swap in this blade. This blade is rated for 1450RPM max vs. the Dewalt 14" abrasive saw which turns at 3600 RPM.

I've got a 14" HF chop saw and had the thought of using a speed control for a router to slow it down to be able to use the Evolution blade.

Anyone got an opinion if this is acceptable method to slow the blade speed on a chop saw?
 
Last edited:

DirtyWhiteBoy

Well-known member
Joined
Aug 18, 2009
Messages
141
Location
Byrdstown,TN
Thanks Larry!

I was googleing metal chop saws and found this

http://www.medfordtools.com/evolution/evo355.html

It must be the new version. $399 with a steel cutting blade rated for 800 cuts might just be worth a try for me. I can't stand the abrasive choppers. Too much noise, mess and crooked cuts make me insane....ok more insane:eyecrazy:
I gave away both of my abrasive chop saws when I moved to TN.
 
Last edited:

Griff93

Well-known member
Joined
Jul 25, 2009
Messages
1,121
Location
Huntsville, AL
If you want to turn down the speed of an AC motor you could use a variable frequency drive to accomplish this will pretty much full power. Machine tool guys use these on a regular basis. Most vary the hertz between 0.5 and 400. The wall outlet is 60 in the US. If you wanted to drop the speed in half you could run it at 30 Hz.
 

Syndicate

Banned
Joined
Aug 10, 2011
Messages
1,229
Awesome build you did. It ***** that he sold the jeep though. You should build one with tabs for the lights and market that sucker! Great work man. Thanks for sharing that.
 
To avoid these ads, REGISTER NOW!

2manytoyz

Well-known member
Joined
Sep 20, 2011
Messages
419
Location
Central FL
Excellent looking project!

I have the HF saw. While it works, it is painfully slow. Even bought an aftermarket (name brand) blade, the performance wasn't much better. Thinking this is the nature of the beast with this type of cutting method.

weld1656.jpg


A much faster method is using my Dewalt 18V grinder with a cut-off wheel:

gen6330s.jpg


Unfortunately, it's less accurate. I can follow a scribed line usually "close enough". It's a shame the big saw cuts ~ 1/10 the speed of the handheld saw.

I do have a Jet portable metal cutting bandsaw at work. It cuts quickly, but the cuts aren't as square as I would expect. Think the blade bends a little as it passes through the metal. Might have to tighten it up some.

Hope your buddy compensated you for your hard work. Heck, the only reason he was able to sell the vehicle is because of that FINE roof rack!

Jeez, I need to knock the dust off my welder...
 
OP
A

aka Larry

Well-known member
Joined
May 2, 2012
Messages
8,038
Location
Eastern, NC
Where did you get the clamps for the rain gutters?

The owner bought those so I have no idea.


What kind of metal saw/blade do you have?


See my post #15 in this thread.


Excellent looking project!

Hope your buddy compensated you for your hard work. Heck, the only reason he was able to sell the vehicle is because of that FINE roof rack!

Thanks man. I appreciate the kind words. He actually did pay me a few bucks, but I had him do all the grunt work like cutting and grinding with myself doing all the welding.
 

bjaspud

Well-known member
Joined
Jan 20, 2010
Messages
97
Location
Cleveland, OH
I built some cross bars to bolt to the roof rails on my wife's Ford Edge. I made them from some flat oval tubing. Everything fits great but the darn thing whistles and moans when I get up to highway speeds. I had to take them off. Darn.

You pay Ford $200 for a roof rack and there are no cross bars. The factory set up is just about worthless.

Live and learn. Just venting.


Nice work by the way. Well done!
 

blazer7

New member
Joined
Aug 20, 2011
Messages
2
Aka I love that rack! Any chance you've still got that Sketchup file? I'd love to tweak it to fit my Rover.
 
OP
A

aka Larry

Well-known member
Joined
May 2, 2012
Messages
8,038
Location
Eastern, NC
Aka I love that rack! Any chance you've still got that Sketchup file? I'd love to tweak it to fit my Rover.

Thanks!

I think I still have the file, but it's on my netbook at home. I'll check tonight. Send me a PM with your e-mail addy so I can send it to you if I find it.
 

gear_driven

Member
Joined
Mar 9, 2014
Messages
17
Location
New York
Nice rack, I made one very similar to it in design for my uncles Jeep, I used JCR gutter mounts. I used a miller 252 to weld it up, using 35 wire and 75/25 mix. I also mounted a high lift jack too the side and installed light box's with led brake lights up top, and I mounted LED flood lights up front.
 

Attachments

  • 20160422_093623.jpg
    20160422_093623.jpg
    148.6 KB · Views: 107
  • 20160421_153126.jpg
    20160421_153126.jpg
    151.4 KB · Views: 94

bczygan

Well-known member
Joined
Nov 4, 2009
Messages
22,002
Location
DETROIT! Arsenal of Scrappers
Nice job!

What is the rain gutter capacity on that vehicle?

Are there certain points specified for the attachment?

Would 3 legs on each side spread the load better?

Would aluminum have saved much weight?

Bill
 

gear_driven

Member
Joined
Mar 9, 2014
Messages
17
Location
New York
Nice job!

What is the rain gutter capacity on that vehicle?

Are there certain points specified for the attachment?

Would 3 legs on each side spread the load better?

Would aluminum have saved much weight?

Bill
Thanks, I'm not sure of factory specs for rain gutters, but I'm sure it will hold 500lbs with no problem. I don't have the welding equipment for aluminum but that would definitely save weight.

Sent from my SM-G930V using Tapatalk
 

WoodsTruck

Well-known member
Joined
Jan 12, 2013
Messages
1,023
I used to have a Con-Ferr roof rack for my '71 Bronco. It was fabbed with 3/4" square tubing and stamped flat cross pieces. It didn't have a full floor it it but it was quite light using the smaller tubing. Never actually used it, shortened it up and then sold it.
 

MarkG

Well-known member
Joined
May 23, 2012
Messages
1,219
Location
Elgin, IL
Just a quick observation-----a welding jacket and jeans would probably add considerably to any future welding projects, but to each his own. :S If you haven't got any good burns yet welding dressed like that, you will, and then you'll understand! :D

Safety aside, looks like a fun project.
 

Defender110

New member
Joined
Feb 27, 2017
Messages
1
Hi Larry. I just came across your roof rack construction via Pinterest. I joined up just to say what a great job you did. I'm going to adapt your masterpiece to make a rack for my Land Rover. Cheers, Mike
 
To avoid these ads, REGISTER NOW!
Top Bottom