To avoid these ads, REGISTER NOW!

DIY Shower Install Issue

Derek8819

Well-known member
Joined
Aug 30, 2013
Messages
45
Location
New Orleans
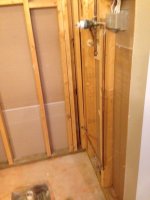
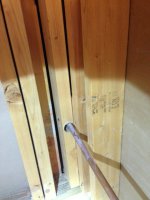
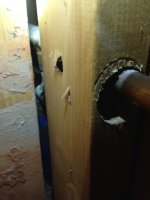
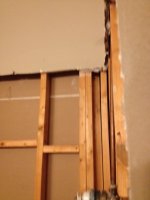
So, not so much installing a shower in my garage, but I am looking to you all for assistance. When my wife and I purchased the house 3-4 years ago it had a pre made fiberglass show in the master bath that just never fit in. We finally decided to rip it out and go tile. I made quick work of the old shower only to of course already begin discovering issues. The fiberglass shower did not sit flat against the studs so I am guessing the plumber did not see the need to do a through stud install of the water lines. Obviously this will not work with my new tile setup. Couple of things stick out to me as issue causing already. I do not think he should have gone through the stud with the cold water line sideways like you see. Also, I believe this shower branches from somewhere behind my main fireplace which I have no access to to make modifications. Looking at my pictures what do you guys suggest? I am going to call a professional, but I just want to make sure I know what to expect going in.

Thanks,

Derek
 

Attachments

  • photo 1.JPG
    photo 1.JPG
    107.6 KB · Views: 246
  • photo 2.JPG
    photo 2.JPG
    110.1 KB · Views: 206
  • photo 3.JPG
    photo 3.JPG
    113.8 KB · Views: 192
  • photo 4.JPG
    photo 4.JPG
    105.9 KB · Views: 177
  • photo 5.JPG
    photo 5.JPG
    93.7 KB · Views: 180
To avoid these ads, REGISTER NOW!

CTyankee

Well-known member
Joined
Jan 13, 2013
Messages
3,792
Location
CT
Amazing the half-*** work some folks will do. I assume there is no basement? Since you're going to be doing a tile install, I'd be inclined just to pad out the wall, reuse the feeds currently in place and lose a little in the stall size.
 
OP
D

Derek8819

Well-known member
Joined
Aug 30, 2013
Messages
45
Location
New Orleans
Yeah no basement, the bottom you see is the slab of the house. You think use some sort of furring strips to just space it out?
 

Roady94

Member
Joined
May 19, 2014
Messages
24
Location
CT, USA
Do you have access to the other side of the edge-drilled 2x4?

Looks like maybe the cold line was run that way in a misguided attempt to avoid sharing space with the electrical box. Maybe not. Maybe I'm looking for an explanation where none exists.

Quickest approach for someone without sweating skills is to build out the wall as CTyankee has suggested. The build-out can be just proud of the tube (1") or another dimension that allows you an aesthetic finishing solution where that surface returns to the existing wall. You may still need to move the mixer valve towards the shower space. Can't tell dimensions from pic.

If you can sweat copper fittings, then I would suggest running the cold line in the same fashion as the hot, dropping the mixer valve to avoid conflict with the electrical box.
 

CTyankee

Well-known member
Joined
Jan 13, 2013
Messages
3,792
Location
CT
Yeah no basement, the bottom you see is the slab of the house. You think use some sort of furring strips to just space it out?

Your plumber and/or tile guy will most likely tell you how they want the wall prepared. I'd imagine a cement board will be used to line the stall. If it were me, I'd rip some 2x material the needed depth and glue(liquid nails) and screw it to the existing studs.

Just saw what Roady94 said....Even if you go with building out the wall, I'd still definitely have the plumbing redone.
 
Last edited:
OP
D

Derek8819

Well-known member
Joined
Aug 30, 2013
Messages
45
Location
New Orleans
There is no access to the back side of where that waterline/stud initiate from. Its about 16ft down the dead space for the chimney/fireplace. So what now, just furring?
 

CTyankee

Well-known member
Joined
Jan 13, 2013
Messages
3,792
Location
CT
There is no access to the back side of where that waterline/stud initiate from. Its about 16ft down the dead space for the chimney/fireplace. So what now, just furring?

Were you planning on doing the plumbing your self?

Regardless of where the feeds to originate from, a plumber..or you if you're so inclined...can tap into them and reroute/redo the mixer value and shower head.
 
OP
D

Derek8819

Well-known member
Joined
Aug 30, 2013
Messages
45
Location
New Orleans
I will take a picture for you, but where the show head exits the valve is actually sort of "pinned" back to keep it at the normal depth. I believe that if I release it it will most likely spring in line with the rest of the depth of the incorrectly installed pipes.
 

rsanter

Well-known member
Joined
Dec 22, 2007
Messages
18,487
Location
visalia ca
Just fir it out a little. No big deal.
I would paint the studs with an oil based paint and use foam insulation in the walls to avoid potential problems if you ever have a water leak.
If you don't need the foam for insulation you will have it for noise reduction as showers can be noisy

Bob
 
OP
D

Derek8819

Well-known member
Joined
Aug 30, 2013
Messages
45
Location
New Orleans
Here is what I mean, you can see how they sloped it back to get from in front of the studs to behind the drywall. From the "feel" of the pipes it seems they are under tension and it most likely wants to return to the in front of stud depth.
 

Attachments

  • photo6.JPG
    photo6.JPG
    94.5 KB · Views: 93
To avoid these ads, REGISTER NOW!

CTyankee

Well-known member
Joined
Jan 13, 2013
Messages
3,792
Location
CT
I will take a picture for you, but where the show head exits the valve is actually sort of "pinned" back to keep it at the normal depth. I believe that if I release it it will most likely spring in line with the rest of the depth of the incorrectly installed pipes.

It's not going matter. The WHOLE wall will need to be furred out, so that the entire stud surface of the wall is on the same plane. Once you do that, even when you release the shower head pipe, it should still reside with the "new" thicker wall.

Again...all the plumbing within that wall should be redone, and within the depth of the "new" wall.
 
Last edited:

wnstwolf

Well-known member
Joined
Nov 7, 2007
Messages
837
Location
New York and PA
Fir it out and blue board or cement board the new walls. Strongly suggest the shlouter(sp?) system. They hay a floor pan kit as well as wall system that is almost fool proof as far as no leaks. It's the orange stuff.
 

slip knot

Well-known member
Joined
Mar 22, 2010
Messages
2,861
Location
Texas gulf coast
You are either gonna have to furr the existing wall out or re-do the supply plumbing. The shower valves cant be proud of the stud faces that much. it worked with the surround but it wont with tile.
 

KnurledNut

Well-known member
Joined
Jan 28, 2011
Messages
8,080
Location
n/a
I would notch the framing behind the cold line and set it back in the wall. At the most, it would require a couple elbows. Also, consider the placement of the drain with the system youre installing.
 

ScottsGT

Well-known member
Joined
Jan 1, 2014
Messages
4,883
Location
Lake Wateree, SC
I built a shower years ago using the rubber bladder over a concrete base and then concrete on top of it. The bladder goes up the wall about 12" and has hospital folds in the corner so the rubber is never cut.
Cement backer board goes over this creating a water proof barrier that water has to climb up 12" before anything not supposed to get wet will get wet.
The one mistake I made was I should have firred out the studs above the folded rubber bladder so my walls didn't sweep inwards slightly.
 

Casey69

Well-known member
Joined
Mar 15, 2011
Messages
798
Location
Earth
Amazing the half-*** work some folks will do. I assume there is no basement? Since you're going to be doing a tile install, I'd be inclined just to pad out the wall, reuse the feeds currently in place and lose a little in the stall size.

my thoughts too, including the "half-***" remark. some stock lumber would make it a cheap fix.

if you don't want to do this, i'm just just about a competent pro plumber could make quick work of this.
 
To avoid these ads, REGISTER NOW!
Top Bottom