To avoid these ads, REGISTER NOW!

Do Air Chisels Less than .401" Exist?

winlinmac

Well-known member
Joined
Aug 17, 2015
Messages
3,777
Location
USA
Some here may probably know that I'm stuck on getting a pinch bolt out of my steering knuckle. I sourced a cheap Air Chisel Set from Advance Auto Parts and realized the bit is a tad larger than the opening of the pinch bolt hole on my vehicle. I looked everywhere locally and online to the best of my ability and could not find sizes smaller than .401". I was hoping for something along the norms of 3/8". What's the solution here? Is grinding the shank down the only way? :confused:

Thanks
 
Last edited:
To avoid these ads, REGISTER NOW!
OP
W

winlinmac

Well-known member
Joined
Aug 17, 2015
Messages
3,777
Location
USA
Is there an air chisel where the shank is standard .401", but the remaining part of the bit is less than .401"

I can't fit the .401" bit into my pinch bolt hole. It will enlarge the hole and cause permanent damage to the steering knuckle, thus defeating the purpose of DIY. :(

Why? The shank is the part that goes inside the air hammer.
 
OP
W

winlinmac

Well-known member
Joined
Aug 17, 2015
Messages
3,777
Location
USA
I'm hoping that with an angle grinder, I can grind the metal down a tad bit (perhaps down to 3/8") so that it will be safe to air hammer it into the pinch bolt hole without damage. Is it possible? Or will the structural integrity of the chisel be compromised?

Some thing a grinder won't fix??
 

T45

Well-known member
Joined
Nov 20, 2014
Messages
3,253
What is happening with the pinch bold ?

Of course the tools exist, but this DIY may be getting expensive pretty soon !

Call snap on guy, lots of air hammer acessories if you don;t mind price.
 
OP
W

winlinmac

Well-known member
Joined
Aug 17, 2015
Messages
3,777
Location
USA
I hope it doesn't get expensive. The point of tackling this job myself was to save and avoid the hundreds for labor cost. Who would know it would land me with tools I had no anticipating of owning anytime soon. I'll thank VAG for that :lol: just doesn't add up right. :bounce:


What is happening with the pinch bold ?

Of course the tools exist, but this DIY may be getting expensive pretty soon !

Call snap on guy, lots of air hammer acessories if you don;t mind price.
 

dnschmidt

Well-known member
Joined
Oct 3, 2014
Messages
7,289
Location
Phoenix, AZ
Dude, are you for real? Every air chisel manufacturer on planet earth makes a taper punch with the standard .401 shank. The end that goes into the air chisel is irrelevant it's the business end that matters. Some of your questions are so weird I often wonder if you're serious.
 
OP
W

winlinmac

Well-known member
Joined
Aug 17, 2015
Messages
3,777
Location
USA
I think I need to proof-read what I type before I post. I understand every air chisel shank (which attaches to the air chisel) is .401". I meant to ask in respect to the bit size which inserts into the area the chisel is being introduced in (business end). I acknowledge that sometimes my questions are so weird :) ; Its my first time working with air tools.

Dude, are you for real? Every air chisel manufacturer on planet earth makes a taper punch with the standard .401 shank. The end that goes into the air chisel is irrelevant it's the business end that matters. Some of your questions are so weird I often wonder if you're serious.
 
OP
W

winlinmac

Well-known member
Joined
Aug 17, 2015
Messages
3,777
Location
USA
Now that is something I didn't think about. :beer:
I should practice more in terms of how to improvise. I also tend to follow protocol and never go around in concerns over safety, may be I should master the art of OSHA. :lol:

Can't you find the proper size drive pin punch and hit that with the air hammer???
 
OP
W

winlinmac

Well-known member
Joined
Aug 17, 2015
Messages
3,777
Location
USA
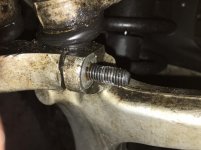
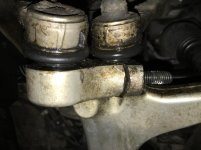
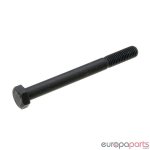
Here's the pinch bolt versus the new pinch bolt,
BOLT (M10X100, UPPER CONTROL ARM)


I'd like to see a picture of said pinch bolt please.
 

Attachments

  • IMG_2676.jpg
    IMG_2676.jpg
    123.1 KB · Views: 85
  • IMG_2674.jpg
    IMG_2674.jpg
    86.6 KB · Views: 89
  • IMG_2673.jpg
    IMG_2673.jpg
    123.1 KB · Views: 85
  • IMG_2672.jpg
    IMG_2672.jpg
    86.8 KB · Views: 80
  • n0347908.jpg
    n0347908.jpg
    18.7 KB · Views: 69

gdocktor3

Well-known member
Joined
Apr 18, 2015
Messages
5,419
Location
Connecticut
You need to practice the art of improvisation. Grind the cheap bits, find a smaller bolt to use as a punch, hit the opposite end with a hammer, grab the threaded end with vice grips and try working it back and forth, heat, lubrication, etc
 

Lotek

Well-known member
Joined
Dec 9, 2007
Messages
9,098
Location
Los Angeles, Ca.
Don't know that an air hammer would be my go-to tool in this case. A 3/8"pin punch and a 4lb engineers hammer would likely do less damage to the aluminum knuckle. Air hammers, especially cheap ones in the hands of a novice, can be a bit squirrelly...
 
To avoid these ads, REGISTER NOW!
OP
W

winlinmac

Well-known member
Joined
Aug 17, 2015
Messages
3,777
Location
USA
Thanks gdoctor3, I found a couple of punches to spare. I also have a spare pinch bolt; can't I just cut down that new pinch bolt in half, guide that into the pinch bolt hole, and air hammer away? I have very limited clearance between the wheel hub assembly and fender liner covering. I can't take out the whole part because of risk of damage to something else. Thanks again :)

You need to practice the art of improvisation. Grind the cheap bits, find a smaller bolt to use as a punch, hit the opposite end with a hammer, grab the threaded end with vice grips and try working it back and forth, heat, lubrication, etc
 

Dirty Diesels

Well-known member
Joined
Dec 27, 2013
Messages
1,295
Location
Nottingham, Nottinghamshire in the East Midlands o
Here's the pinch bolt versus the new pinch bolt,
BOLT (M10X100, UPPER CONTROL ARM)

Last time I did 1 of those on a VW Passat, I used a gas torch to heat it up and a pair of curved jaw vise grips, it came unstuck then, I were replacing both upper arms, so it didn't matter. Some Audi A4's and A6's have the same arms and they are known to sieze up the pinch bolt when the knuckles wear out.
 
Last edited:

bmwpowere36m3

Well-known member
Joined
Nov 8, 2012
Messages
1,125
OP,

What are doing? Are you replacing ball joints, the control arm, etc...? What are you potentially willing to "sacrifice" to get the joint separated.

I would first start by apply a little heat and penetrant to the bolt. Put the nut back on and give it a few whacks with a dead blow. Don't go too crazy and damage the threads, nut or bend the bolt. You could also take a fat chisel punch and give the control arm a good whack at the split (before doing the above).

If that didn't work...
 

gdocktor3

Well-known member
Joined
Apr 18, 2015
Messages
5,419
Location
Connecticut
Thanks gdoctor3, I found a couple of punches to spare. I also have a spare pinch bolt; can't I just cut down that new pinch bolt in half, guide that into the pinch bolt hole, and air hammer away? I have very limited clearance between the wheel hub assembly and fender liner covering. I can't take out the whole part because of risk of damage to something else. Thanks again :)

You could cut the new pinch bolt, but what if you need it? Don't you have something, anything else you could use? Piece of threaded rod, 1/4" black iron pipe, any other bolt, or the punch. Grind down one of those cheap pos air hammer bits and just use that. Then you'll have one for next time you find yourself in a situation like this. Heat that ***** up and it should come right out.
 
OP
W

winlinmac

Well-known member
Joined
Aug 17, 2015
Messages
3,777
Location
USA
bmw, I have several pinch bolts (of the same size) laying around (came included with my new upper control arms) and others as well.

I can't apply heat because the spindle is Aluminum, will potentially warp the area

What I'm doing is the following--
- Replacing Upper Control Arms
- Replacing Strut Mount
- Replacing Struts
- Replacing Inner & Outer Tie Rods

World of VAG :(

The bolt doesn't spin because it is badly seized (corrosion from salt and other elements)

I first attempting using a long ratchet with 16mm socket, broke the head off

The threads near the spindle end just don't budge (used locking pliers, C-clamp, pipe wrench, hammer (as realistically as possible)); I've also used a hammer and punch as demonstrated in various YouTube videos. The end result--either drill or use air hammer.

I find the air hammer a safer choice to avoid potential damage to the spindle-itself.
Last resort is drill.

The way gdoctor3 put, grind the air hammer bit down and get going. :)

Thanks
 
OP
W

winlinmac

Well-known member
Joined
Aug 17, 2015
Messages
3,777
Location
USA
What really startles is that on some models Audi chose to go with steel uprights whereas on others aluminum, what were they thinking? :headscrat

Last time I did 1 of those on a VW Passat, I used a gas torch to heat it up and a pair of curved jaw vise grips, it came unstuck then, I were replacing both upper arms, so it didn't matter. Some Audi A4's and A6's have the same arms and they are known to sieze up the pinch bolt when the knuckles wear out.
 

T45

Well-known member
Joined
Nov 20, 2014
Messages
3,253
Gnarly is galvanic corrosion from using hi-ten steel bolts into an ALU housing/? This thread is seems less to do with tools and more to with teqnique at this stage. Have your researched this repair before endeavoring to run with it? It seems at first blush to be well known as a problematic procedure, with expensive special tools from the OEM, which were probably required to compensate for the dodgy choices of the enineering dept. So you are up against all of that headwind...etc...I feel like this forum is enabling you make more bad choices, more than helping you at this stage.

what am i missing?
 

bmwpowere36m3

Well-known member
Joined
Nov 8, 2012
Messages
1,125
If you use ungodly amounts of heat... sure. I'm less familiar with VAGs as I mostly do MB and BMWs.

Another option is to cut the bolt at the pinch joint/slot to relieve pressure and separate the upper ball joint. However if the BJ stud is notched for the bolt, then don't bother.

A common problem on older MBs is the rear lower control arm bolts/BJs. The bolt seizes inside the BJ and you'll do more damage trying to heat it (too much) and smacking it OR is just won't go.

After some pounding, the only fix is to cut off the bolt in two places so the control arm can be separated from the hub. Then your left with replacing the BJ in the hub.
 

Dirty Diesels

Well-known member
Joined
Dec 27, 2013
Messages
1,295
Location
Nottingham, Nottinghamshire in the East Midlands o
What really startles is that on some models Audi chose to go with steel uprights whereas on others aluminum, what were they thinking? :headscrat

Switching from steel to Aluminium, was/is 1 way of keeping the weight down, but they also on some years rebadged Vw Passats, as A4's and Skoda Octavias, so they shared the same suspension components and engines aswell, possibly to keep production costs down.

BMW and Mercedes use similar aluminium arms on their cars!
 

bmwpowere36m3

Well-known member
Joined
Nov 8, 2012
Messages
1,125
Honestly the OP asks a lot of weird questions... and sometimes I think things are just above your level of general knowledge.

I agree with T45... honestly I would START by searching a VAG forum and gleam some info. Tips, tricks, techniques, tools... maybe a job best left to the professional.
 

bmwpowere36m3

Well-known member
Joined
Nov 8, 2012
Messages
1,125
And with steel and aluminum... aluminum will corrode at a faster rate than steel since its more anodic (generally speaking). Aluminum parts with steel fasteners is VERY common.
 

gdocktor3

Well-known member
Joined
Apr 18, 2015
Messages
5,419
Location
Connecticut
Try replacing a clutch on a Subaru WRX. The housings are aluminum and the studs bolts are steel. While using only jack stands in the middle of summer... That was a fun 3 days.... The OPs problem is cake compared to many other repairs.
 
OP
W

winlinmac

Well-known member
Joined
Aug 17, 2015
Messages
3,777
Location
USA
Using a dremel to cut the bolt from within the pinch-bolt slots may help relieve tension as another user put it. Time to buy a Dremel from Lowes / Home Depot, I think... :headscrat:

Thanks for the feedback. I'm hoping to learn from the process. Some where down the line, I need to try this on my own. There are plenty of threads on other forums on this basis as well as YouTube Videos which explain the removal process pretty well, but doesn't elaborate for those that don't have the right tools.

The actual tool for properly removing the pinch bolt costs over $500 directly from VAG. The labor will be around that price point as well, and that too without the parts. The dealership or another local mechanic overcharges for parts and the warranty is virtually non-existent.

I had a good experience with sourcing Euro-parts from stores like eEuroParts, EuropaParts, and FCP-Euro.

There may be a learning curve, but the more I get familiar, I'll gain the experience needed to more car repairs on my own.

I respect your feedback; for a job like this, it might end up costing more at the end as far as repairs go, but I'll be willing to take a chance on one side and assess to see how that goes.


Honestly the OP asks a lot of weird questions... and sometimes I think things are just above your level of general knowledge.

I agree with T45... honestly I would START by searching a VAG forum and gleam some info. Tips, tricks, techniques, tools... maybe a job best left to the professional.
 

Olafur

Well-known member
Joined
Jun 2, 2011
Messages
2,578
Location
Iceland
It looks like the bolt still has usable treads about a nut-full at the end. Put several washers on the bolt but leave enough room for the nut.

Put nut on and tighten it as much as you think it can take. Then use a punch (or bolt) and BFH and drive the bolt out from the other side. Tighten the nut as you go..

Ps
Even if you have decent .401 air hammer a BFH will do much more in this situation - even with limited room to swing it.
 
Last edited:

tarbellb

Well-known member
Joined
Apr 17, 2011
Messages
5,776
Location
Oregon
Dont use a dremel, those are strictly for crafts.

Buy a corded multi tool, way more power, better accessories, and just as easy to manipulate. Clearance will be the only issue.

Btw, have you tried separating the two pieces with a wedge/chisel to relieve stress on the bolt yet?
 
OP
W

winlinmac

Well-known member
Joined
Aug 17, 2015
Messages
3,777
Location
USA
The pinch bolt is mostly smooth throughout, no place to notch the balljoint stud, it seems. I see most folks using a punch and hammer to get the bolt out. As it gets closer and closer to the spindle, using a hacksaw helps to prevent the pinch bolt from bottoming out onto the spindle.

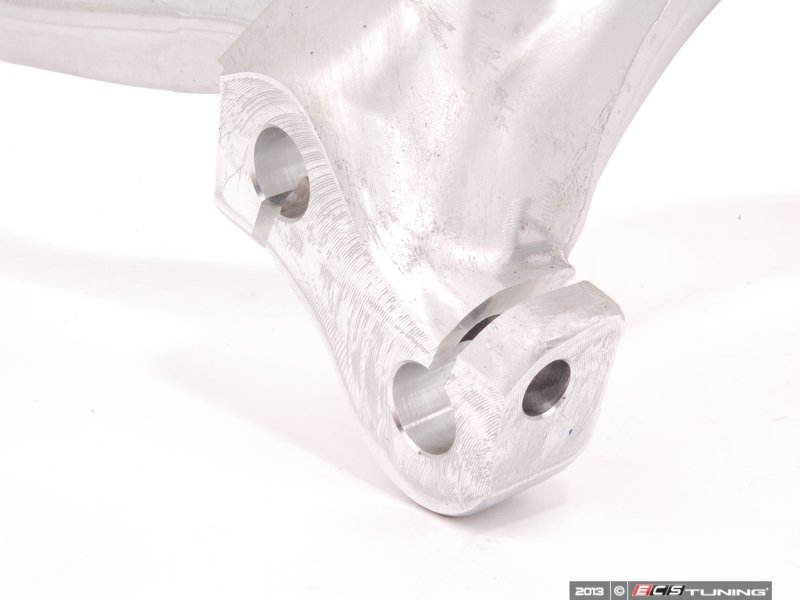
On the VAG cars, Upper Control Arms and Pinchbolt goes through here,

364688_x800.jpg


I'm pretty sure the pinchbolt helps to compress the pinch bolt slots to keep the upper control arm ball joints tight and snug, you can't force the control arm ball joints out without removing the pinch bolt and / or damaging the spindle first. The upper front and rear control arms are connected to the spindle as shown above.

The pinch bolt nut is torqued at 55 ft lbs. :)

If you use ungodly amounts of heat... sure. I'm less familiar with VAGs as I mostly do MB and BMWs.

Another option is to cut the bolt at the pinch joint/slot to relieve pressure and separate the upper ball joint. However if the BJ stud is notched for the bolt, then don't bother.

A common problem on older MBs is the rear lower control arm bolts/BJs. The bolt seizes inside the BJ and you'll do more damage trying to heat it (too much) and smacking it OR is just won't go.

After some pounding, the only fix is to cut off the bolt in two places so the control arm can be separated from the hub. Then your left with replacing the BJ in the hub.
 
To avoid these ads, REGISTER NOW!
Top Bottom