

You are using an out of date browser. It may not display this or other websites correctly.
You should upgrade or use an alternative browser.
You should upgrade or use an alternative browser.
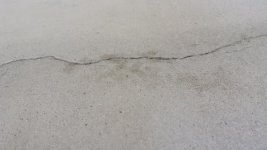
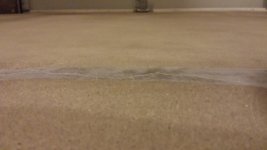
Do these cracks need to be filled?
- Thread starter ProjectEK
- Start date

kd3pc
Well-known member
repair them, and then make sure to follow the directions to prep the floor....and you may want to research the intended product. In the long run, given the prep materials and labor - a non-box store epoxy will give you much more reliable service.
There are several reputable, read great, companies represented here who will give you top notch advice, and references. Or search and read some of the flooring posts here. I hate to see you be disappointed, down the road, for the sake of a $150...or have to pay to grind or remove the initial coating.
Best of luck, what ever you choose.
Do these cracks need to be repaired, or do u think the epoxy will fill them?
Btw I'll be using solvent based Rust-oleum
Thanks
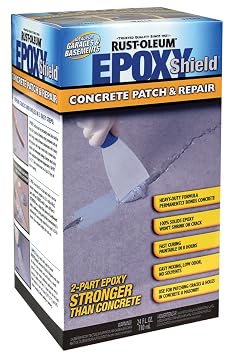
Yes they need to be filled in. Epoxy won't fill much of anything unless it's a crack fill mix that is formulated to do so. Rustoleum's product for this should be fine.
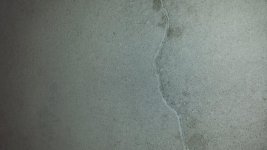
More importantly, have you already etched? It looks like your concrete is very white, like there may be a film of calcium carbonate on it from the etching. If so it'll need to be pressure washed off.
The floor looks white because that pic was taken right after grinding w a diamond grinder. I have yet to power wash and degrees. I just bought some epoxy shield concrete patch. Any suggestions on applying it etc etc?
Thanks
Nah, applying it for the first time myself tonight. We're at similar stages on our floor projects.
Nah, applying it for the first time myself tonight. We're at similar stages on our floor projects.
Lol ill be patching tonight as well.. share your experience with me, I'll do the same.
Lol ill be patching tonight as well.. share your experience with me, I'll do the same.
Will do, just waiting for the concrete to finish drying at this point. I've been etching and cleaning for two weeks. Luckily I live in the desert, so the water basically gets sucked out of the concrete in 24 hours tops.
Shea
Well-known member
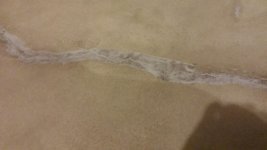
It's a good idea to chase those cracks first to remove the weak edges before you fill them.
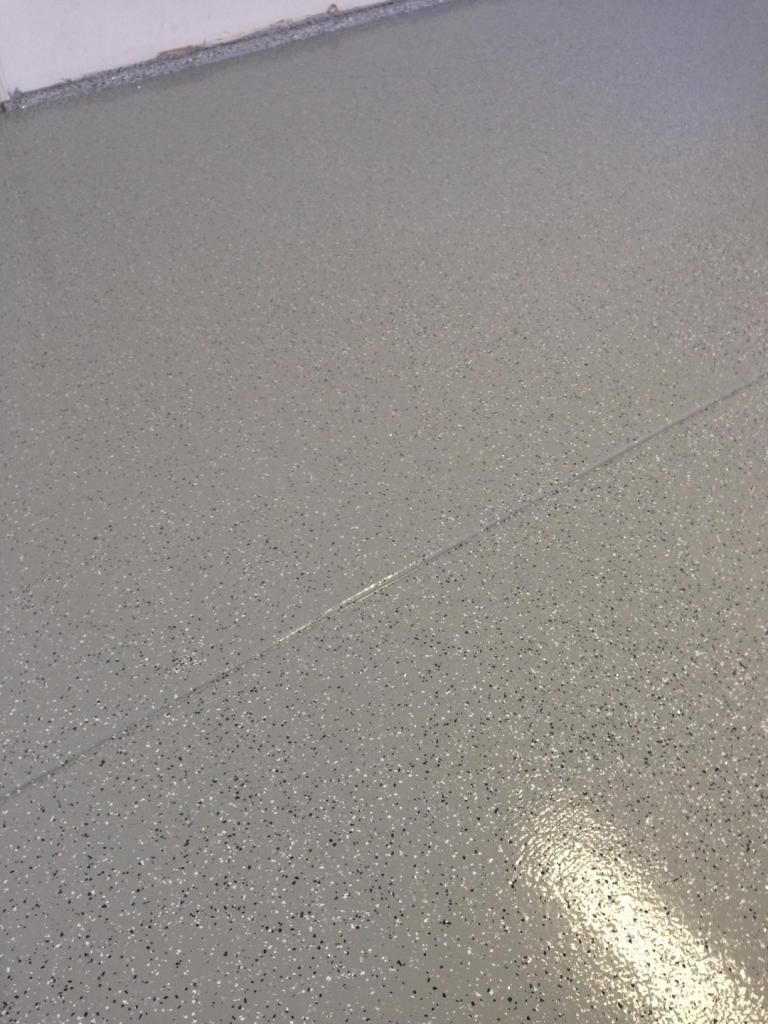
Here's my before and after on the crack repair with this product from Rustoleum.
I think it'll hold up just fine.


I just ran a bead of it down all the expansion joints and along the walls and then used a soft rubber caulking tool to even it out.

I had a little extra so I decided to use it as a sort of "primer" for my oil spots since I'm still not confident they're 100% clean. The oil had years to sit there, so I don't guess you can ever really get it out. I figured I might have better luck with a 100% solids epoxy as the first coat on those spots. These areas had also been badly over-etched from my repeated attempts to remove the oil, so it helped to smooth them out.

Forgot to add, I also sealed up the joint at the edge by the wall everywhere but at the top of the garage where it joins the house.

Last edited:
Here's my before and after on the crack repair with this product from Rustoleum.
I think it'll hold up just fine.
I just ran a bead of it down all the expansion joints and along the walls and then used a soft rubber caulking tool to even it out.
I had a little extra so I decided to use it as a sort of "primer" for my oil spots since I'm still not confident they're 100% clean. The oil had years to sit there, so I don't guess you can ever really get it out. I figured I might have better luck with a 100% solids epoxy as the first coat on those spots. These areas had also been badly over-etched from my repeated attempts to remove the oil, so it helped to smooth them out.
Forgot to add, I also sealed up the joint at the edge by the wall everywhere but at the top of the garage where it joins the house.
Looking good, I used the same patch kit. Do u plan to grind the epoxy flat? Here's my progress. I patched, then grinded flat with an angle grinder. I'm waiting for it to dry, then I will coat on wed.
Attachments

looking awesome. mine floor is still drying out. ill post pics asap
Thanks, oh and not sure what kind of roller covers you plan to use but Wooster Epoxy glide were complete ****. Started leaving HUGE fibers everywhere immediately. No chance it was a dry roller or anything like that, and I "de-fuzzed" them with duct tape before I started. Luckily I had some other roller covers on standby and they did pretty well. Not specifically for adhesive, but mohair, woven, 18" covers. They did the trick.
One thing I'm nervous about is there was a little slip up during application. I was low on epoxy toward the end so I went back to the previous mix bucket to get more and I grabbed the bucket I had combined the Part B bases in. I was on the second kit, and I thought I was grabbing the remains of the first kit's bucket. I didn't want to activate the epoxy in the same bucket I had mixed the bases together in because I knew there would be base I couldn't get off the sides of the bucket.
Anyway, I did about a 6" swipe of cutting in with literally just straight part b with no part a in it before it dawned on me that this was non-activated epoxy. I immediately scraped it off with a paint scraper and wiped it off the best I could with some zylene on a towel. Then I rolled the **** out of that area with mixed epoxy hoping to push past the part b residue that was still there. I'm just afraid I'm going to have a weak spot, but I guess it's small and there's nothing I can do about it now.
Any thoughts on sanding through to concrete in this area after 24 hours and before I apply coat 2?
Last edited:
Thanks, oh and not sure what kind of roller covers you plan to use but Wooster Epoxy glide were complete ****. Started leaving HUGE fibers everywhere immediately. No chance it was a dry roller or anything like that, and I "de-fuzzed" them with duct tape before I started. Luckily I had some other roller covers on standby and they did pretty well. Not specifically for adhesive, but mohair, woven, 18" covers. They did the trick.
Wow, thanks you just saved me a headache because i planned on using Wooster rollers! i see we are using the came epoxy, any suggestions on how i should apply yhr first coat, heavy, thin?
Wow, thanks you just saved me a headache because i planned on using Wooster rollers! i see we are using the came epoxy, any suggestions on how i should apply yhr first coat, heavy, thin?
Based on A LOT of searching around here I would say your first coat should be thin or VERY thin. I read something here recently that contradicted that, but that was one post against probably a dozen in favor of a very thin, solvent based, like product primer. In other words, Rustoleum Pro makes this easy because coat one counts as a perfect primer.
The lone voice in favor of a thick first coat was where a guy was suggesting keep a wet roller to prevent streaks, but I think that ignores one problem to solve another less important problem. And you can solve the streak problem another way; with a second coat. You can't solve a bubble problem with just a second coat, so priority one is prevent bubbles from off-gassing, which requires a thin first coat.
To that end, I think you should keep a medium wet roller, so "not too loud/dry" and "not to quiet/wet", which is going to make it prone to lose a little lint. Woven mohair is the best you can hope for in this department, and I would definitely go with 18" on at least a 6' handle. There are all sorts of tips about preventing bubbles; don't mix too aggressively, pour it on the concrete vice into a roller pan, don't apply while it's hot and getting hotter, but I didn't do any of that and I don't think the Rustoleum pro cares a bit. In fact, I broke all three of those rules and because it was a thin layer of solvent based epoxy, I got away with it with ease. No bubbles anywhere.
A 3/8" or 1/2" nap roller will hold A LOT of product, so I used medium pressure while rolling just to push it out pretty thin. I covered 650 sq/ft with 4 gallons, which came out pretty thin because it was so porous. If you pour it on the floor (which I tried once in a small area) it will need to be squeegee'd so it doesn't end up super thick where it was poured. The roller won't push it away from there like a squeegee would. I will pour it out and squeegee and backroll it for coat two, but I rolled it from a tray for coat 1.
I found one long thread in particular where the OP (and then follow on people with the same disaster) were posting about major issues with Epoxycoat bubbling while it cured. All the pros were saying the guy should have primed with a high solvents product and that it should have been a very thin layer, but the people at Epoxycoat void the warranty if you put anything down under their product so this has gotten to be a common problem. The thin primer/1st coat supposedly locks away moisture from your "money" layer that you put down as a second coat. That's my plan. 4 more gallons which should go A LOT further now that the pores are filled in. 16hrs later it looks good, no bubbles, but lots of uneven finish. NO idea why Rustoleum ever says one coat should do. I guess they figure the chips will hide the unevenness. Good luck.
Last edited:
One thing I'm nervous about is there was a little slip up during application. I was low on epoxy toward the end so I went back to the previous mix bucket to get more and I grabbed the bucket I had combined the Part B bases in. I was on the second kit, and I thought I was grabbing the remains of the first kit's bucket. I didn't want to activate the epoxy in the same bucket I had mixed the bases together in because I knew there would be base I couldn't get off the sides of the bucket.
Anyway, I did about a 6" swipe of cutting in with literally just straight part b with no part a in it before it dawned on me that this was non-activated epoxy. I immediately scraped it off with a paint scraper and wiped it off the best I could with some zylene on a towel. Then I rolled the **** out of that area with mixed epoxy hoping to push past the part b residue that was still there. I'm just afraid I'm going to have a weak spot, but I guess it's small and there's nothing I can do about it now.
Any thoughts on sanding through to concrete in this area after 24 hours and before I apply coat 2?
ahh that *****. im new to this, so i wouldnt know what steps could be taken to correct that mishap.
ahh that *****. im new to this, so i wouldnt know what steps could be taken to correct that mishap.
It "seems" to have cured very well this morning. I'll probably hit it with the sander a bit and see if it loosens. Shouldn't be a big deal. It's under one of the mats in my overall plan anyway.
Decided to sand that area pretty good and just recoat it with everything else today. I think it went pretty well considering I was by myself. Chip distribution is even enough for me and I'm the inspector so it passes. Can't wait to scrape it and clear it tomorrow. Then it cures for a Urethane coating in a week.


Oh and just to add to the thin primer coat discussion, I actually did find about a dozen bubbles in my first coat where it went on very thick, so a thick first coat could have been a major problem, especially if I didn't plan to recoat. Since it was a primer coat, I just sanded them off and slathered on the second coat.
As for the second coat, I don't see how rustoleum ever expects the 3x3 or 4x4 area gameplan to work out. You can do it in 200 sq/ft (10x20) sections with spiked shoes a squeegee and an 18" roller, and you'll be WAY more likely to get even chip distribution this way. If you're doing 3x3 sections, you'll just be overlapping chips on the previous section the whole way through the job. It's hard not to get heavy spots like that. I have a few spots that are "slightly" heavier than the rest, but you have to look for them. I did it in three sections and it was pretty fast.
This also allowed me time to tape off and do a full broadcast on the raised sections on the sides. They are pretty beat up so I wanted a heavy coating of chips on them, but there was no good way to do that with the floor wet with epoxy, so I taped the floor, cut in the sides, coated them, then pulled up the tape, all while the entire batch of epoxy was already mixed. Means you have to cut in twice basically but it was easy.
I also put all 4 gallons together, against the directions, because I wanted to ensure an even color on the second coat.
Last edited:
 thanks again for the advice!! im a lil pissed, I went into the garage to see how it was drying, and I swept my my finger across the floor to check if there was any "dust" left from diamond grinding, and there is
 so it looks like Ill have to barrow a pressure washer and flood it with water again. this means ill have to put off painting for another few days.
Decided to sand that area pretty good and just recoat it with everything else today. I think it went pretty well considering I was by myself. Chip distribution is even enough for me and I'm the inspector so it passes. Can't wait to scrape it and clear it tomorrow. Then it cures for a Urethane coating in a week.
didn't even notice this post. your floor looks awesome! I like your choice of color for the flakes! I am going to skip the flake/clear on my floor since ill be using the garage to build/work on cars. it will see a lot of abuse from floor jacks, jack stands etc. etc. there's a member on here that used the same product, and it has held up GREAT to the same abuse with only two coats, with no flake/clear.
Thanks. Yeah it seems like posts show up at strange times here. I'll post something, and then come back later and find something posted before my post that wasn't there when I posted. If that makes any sense.
Anyway, trust me, I can relate. I spent two weeks preparing my floor and it just kept dragging out because of similar issues. I'd pressure wash meticulously, and then still find areas with residue the next day. So, back to the pressure washer I would go. Luckily in the desert it's not hard to get stuff to dry.
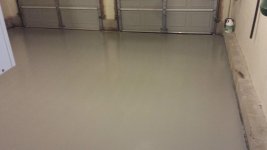
Good luck. I'm happy with how mine turned out. I'll clear coat it tomorrow and be done with it for a while. Urethane can wait. Need the garage back in service and the rest of the makeover complete.
Anyway, trust me, I can relate. I spent two weeks preparing my floor and it just kept dragging out because of similar issues. I'd pressure wash meticulously, and then still find areas with residue the next day. So, back to the pressure washer I would go. Luckily in the desert it's not hard to get stuff to dry.
Good luck. I'm happy with how mine turned out. I'll clear coat it tomorrow and be done with it for a while. Urethane can wait. Need the garage back in service and the rest of the makeover complete.


benwah
Well-known member
Check your product data sheets. That epoxy may have a short recoat window, if it cures for a week you may have to abrade the surface before applying your urethane.
Check your product data sheets. That epoxy may have a short recoat window, if it cures for a week you may have to abrade the surface before applying your urethane.
Thanks. I was planning to let the epoxy cure and abrade it before applying urethane. I couldn't find a urethane you could apply as a "recoat" over epoxy. The product data sheets and customer service lines all said the epoxy had to be fully cured then sanded before the urethane could go down.
Rustoleum pro has a 72 hour recoat window for another layer of color and a 5 day recoat window for Rustoleum clear, not that I really trust that, but that's what it says.
Last edited:
u did a great job! I layed my first coat today. it went very well! I returned my rollers and picked up some Purdy Whitedove Woven rollers and they worked like a CHARM! not one issue with them. i will be laying down my second coat tomorrow morning. i will update with pics later.
u did a great job! I layed my first coat today. it went very well! I returned my rollers and picked up some Purdy Whitedove Woven rollers and they worked like a CHARM! not one issue with them. i will be laying down my second coat tomorrow morning. i will update with pics later.
Thanks. Only lesson learned from today is that the clear coat epoxy instructions should say you have to restir every time you load your roller if you're using the non-skid additive. It says stir often, but that's not often enough. It needs to be EVERY SINGLE TIME YOU LOAD YOUR ROLLER, or you will get clumps of non-skid. And for god's sake, whatever you do, don't dump the last of your clear out of the bucket thinking you'll just roll it out. The non-skid will have settled no matter how often you stirred and you'll have one flat area where there's way too much non-skid. I used half of one pouch in two kits and it was plenty.

Well I laid the second coat today and all went well. Not one bubble. I'm happy with how it turned out.
Lookin' good.


Well I laid the second coat today and all went well. Not one bubble. I'm happy with how it turned out.
So how are you making out? My project is coming along. 7 more cabinets to assemble but the BMW clock is up so it's on now, lol.
