
You are using an out of date browser. It may not display this or other websites correctly.
You should upgrade or use an alternative browser.
You should upgrade or use an alternative browser.
Does machine work count?
- Thread starter -lecroix-
- Start date
KingPerformance
Well-known member
- Joined
- Jan 11, 2007
- Messages
- 321
I love the smell of cutting oil in the morning ... afternoon ... and late into the evening. I do some cadd work. In years past I worked in a rapid prototype lab and it was all sterile and smelled of chemicals. I can still remember the first time I walked into a REAL machine shop. It was amazing. It is just such a shame where all our machine work is going. Love the wheel! Show us more!
PAToyota
Well-known member
Nah, that doesn't count at all... 
Seriously, mighty sweet work. Are you taking orders?
Seriously, mighty sweet work. Are you taking orders?
Here's a few more with pics along the way of a different wheel "in process" ... enjoy.
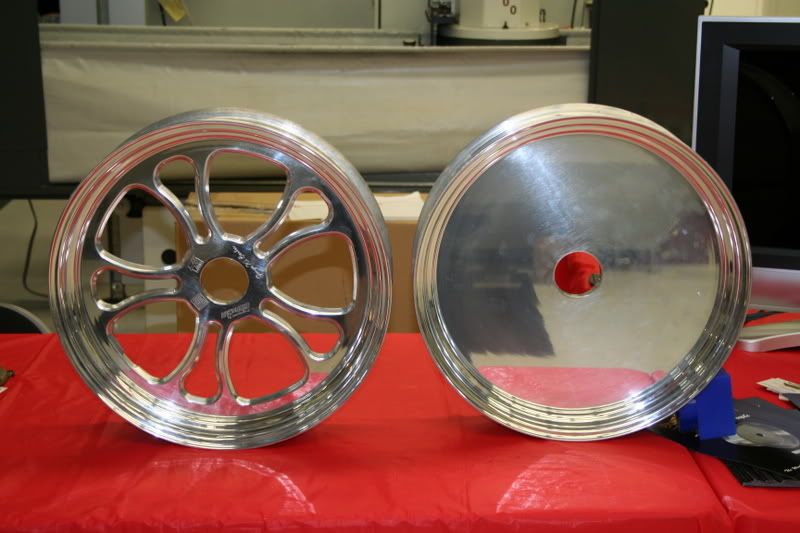
Fresh new shiny wheel blank is positioned on table ... notice the duct tape (always a new use for duct tape ) between the "rim" portion of wheel and the machine table ... this is to keep the wheel edge nice and shiny and to prevent nicks or scratches during the machining process. Nothing worse than a scratched up rim-edge to ruin a brand new wheel.


Mounting/hub pattern (holes around large center hole) are drilled & reamed ... and then the "starter" holes are drilled for the larger "open" portions of the wheels that are going to be removed during the machining process. Notice too that the "toe clamps" have now been installed ... gotta keep this puppy in one place while all the cutting is going on.

mounting/hub pattern is in along with the "starter" holes ...

next the larger "open" areas are roughed out ...
during rough machine ...

after rough machine ...

"drops" or the material that will not be needed are removed from the "open" areas of the wheel ... notice how the center section is featureless and "flat" looking ... we'll take care of that in the next step

at this point, we are ready to start the finish machining of the wheel ... this is what takes the most time ... this consist of any fine work like chamfering or radiusing of edges ... machining of any "flutes" or cosmetic features and/or any engraving that might take place ...notice the edge of the spokes in this case. once finished, the spokes will resemble a knife edge.


Taa-Daa!!! finish machined and ready for buff/polish and/or plating ...

Fresh new shiny wheel blank is positioned on table ... notice the duct tape (always a new use for duct tape
) between the "rim" portion of wheel and the machine table ... this is to keep the wheel edge nice and shiny and to prevent nicks or scratches during the machining process. Nothing worse than a scratched up rim-edge to ruin a brand new wheel.
Mounting/hub pattern (holes around large center hole) are drilled & reamed ... and then the "starter" holes are drilled for the larger "open" portions of the wheels that are going to be removed during the machining process. Notice too that the "toe clamps" have now been installed ... gotta keep this puppy in one place while all the cutting is going on.
mounting/hub pattern is in along with the "starter" holes ...
next the larger "open" areas are roughed out ...
during rough machine ...
after rough machine ...
"drops" or the material that will not be needed are removed from the "open" areas of the wheel ... notice how the center section is featureless and "flat" looking ... we'll take care of that in the next step
at this point, we are ready to start the finish machining of the wheel ... this is what takes the most time ... this consist of any fine work like chamfering or radiusing of edges ... machining of any "flutes" or cosmetic features and/or any engraving that might take place ...notice the edge of the spokes in this case. once finished, the spokes will resemble a knife edge.
Taa-Daa!!! finish machined and ready for buff/polish and/or plating ...
Last edited:
PAToyota
Well-known member
Thanks for sharing! Neat to actually see the process!
thefairlaneman
Banned
Cool. a stupid question I guess,but just how do you determine a wheel is strong enough to carry the stress/weight .
thefairlaneman said:Cool. a stupid question I guess,but just how do you determine a wheel is strong enough to carry the stress/weight .
Not a stupid question at all. Production wheels (wheels sold to the public) must be sent to an independent testing lab and they are testing using F.E.A. (Finite Element Analysis) standards as well as stress tests, non-destructive and destructive testing. These tests are performed on prototype wheels. These tests are required by D.O.T. as well as the insurance company that carries the manufacturers Liability Insurance. Once everyone "signs off" concerning the design, then you can go into production.
The wheels shown above are NOT production wheels, they are one-off's that were cut for demo purposes to show my machine's capability, so no testing was required.
Coach James
Well-known member
Another question about wheels. When some builder like Orange County Choppers(Don't throw things at me) makes a wheel for some company bike, do they have to be tested also?
Coach
Coach
I can't say for sure, but I am going to guess no.
My assumption is the purchaser of the bike assumes responsibility by way of a contract or release when he takes ownership. Most of those bikes are built for show and/or promotional purposes only and don't see the sort of road time that would cause time-induced stresses on the wheel. Whereas production wheels sold to the public are going to see daily and/or weekly use.
My assumption is the purchaser of the bike assumes responsibility by way of a contract or release when he takes ownership. Most of those bikes are built for show and/or promotional purposes only and don't see the sort of road time that would cause time-induced stresses on the wheel. Whereas production wheels sold to the public are going to see daily and/or weekly use.
Canadian Charlie
Banned
Yes machine work counts, nice job
strizzy
Well-known member
Very awesome. I too was curious about how it is determined that a wheel is strong enough; thanks for clearing that up.
About how long does either wheel take as far as machining time?
I love stuff like this...THANKS!
About how long does either wheel take as far as machining time?
I love stuff like this...THANKS!
Woogeroo
Well-known member
very cool.
I'm in machine tool school right now, still on the manuals right now.
That is very neat, nice work.
-W
I'm in machine tool school right now, still on the manuals right now.
That is very neat, nice work.
-W
Greenridge Metal Works
Member
Very cool!
C_F
ALLIANCE MEMBER
Well...this is an eleven year old thread I hadn't seen before.
It's a good one though, very interesting!
It's a good one though, very interesting!
pamike
Well-known member
What model machine?
laser3kw
Well-known member
I absolutely love 2d / 3d cnc work. I work in 3d modeling all day, haven't gotten tried of it in 15 years
nice design and execution on the rim.
nice design and execution on the rim.
Stuart in MN
Well-known member
It looks like the original poster was banned over a decade ago, so don't expect any responses on what model machine was used....
laser3kw
Well-known member
Well...this is an eleven year old thread I hadn't seen before
It looks like the original poster was banned over a decade ago, so don't expect any responses on what model machine was used....
That's what you get for posting late on Saturday night. I didn't even notice it was a zombie thread.....
Willie Makeit
Well-known member
- Joined
- Dec 30, 2013
- Messages
- 918
What model machine?
just looking at the interior shots, I'm gonna say a Haas VF series