To avoid these ads, REGISTER NOW!

DogHouse tile floor - pre-thread: Need Mud job help

ScaldedDog

Well-known member
Joined
Jan 15, 2008
Messages
1,065
Location
Sedalia, CO/NSB, FL
After stalling and over-thinking for a long time, I'm finally hoping to get my tile floor done this winter. Before I do that though, I have a couple of drain issues that I'd like to fix as part of this project, and I need the forum's help. The garage is a 450sf 2-car and a 1000sf 3-car/shop, connected by a 40sf hallway.

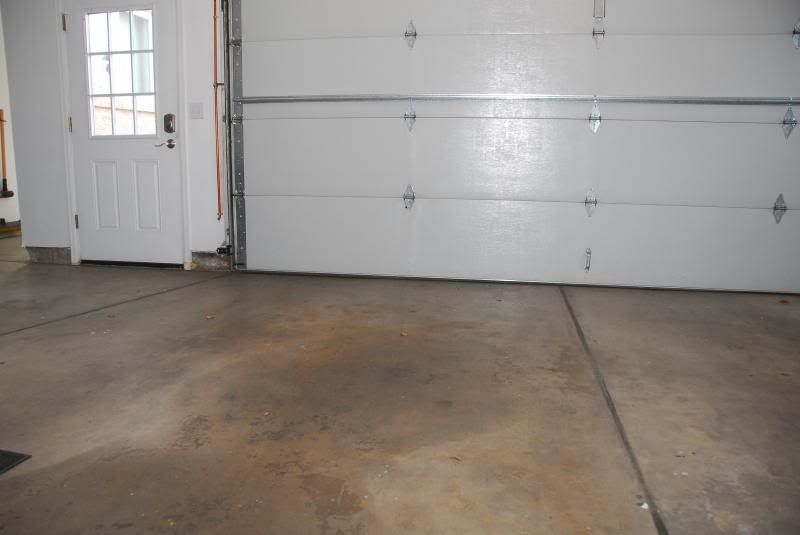
The issue in the 2-car is that the lowest point is right in front of the man door in the photo below:
ND2h_12766_zps2257bb25.jpg


When a snowy car pulls in at night, there's a 3/8" to 1/2" puddle in front of that door in the morning.

Option 1 to fix it would be to mud the entire low area to reestablish the normal slope, sort of like this:

2C-Drain-fix-Option1_zpsfb031b22.jpg


This would create an "edge" at the door, and mean that after tiling, the distance between the apron and the top of the tile would be much larger on one side of the garage than the other. I wouldn't be able to use a premade aluminum "ramp" at the tile edge.

Option 2 is to only raise the area in front of the door with mud, and create a roughly 1' ramp down to the floor, something like this:

2C-Drain-fix-Option2_zps4b3781aa.jpg


This would channel the water toward the door, and seems somewhat easier to do than Option 1. You'll see in a later photo that there's already a similar ramp from the hallway to the 3-car, though it was placed that way from the beginning. My questions to those of you who've done something like this:

1) Do you agree Option 2 makes the most sense?

2) What products would I use to to fill in the low spot, and to build the ramp? I assume a plain ol' self leveling concrete would work for the fill, but what's the best choice to build the ramp?

3) Once complete, could this area be left untiled for weeks - maybe lots of weeks - without damaging it? In other words, are these sorts of repairs robust enough to "be the floor" for awhile?

The second problem I'd like to fix is in the 3-car side, whose floor is nominally flat. When I park my snowy daily driver on the right, all the melted snow ends up in front of the lift in the middle bay, like this:

ND2h_12768_zps200c30e5.jpg


I think my only option here is to fill in the low area in front of the lift so it is the same height as the right bay. The water from the car still has to go somewhere, so I'll probably end up with a ribbed parking mat to trap it. I'd use the same material here that I use to raise the floor in the other garage, correct? Can you think of any better ideas?

I appreciate any help you guys can be on this!

Mark
 
To avoid these ads, REGISTER NOW!

Dakota00

Well-known member
Joined
Mar 9, 2008
Messages
1,078
Location
Woodbridge, Ontario
To fix the low spot option 1 is the right way to go. I can see the flatness of the floor dipping by looking at the seal on the garage door near the man door.

As for materials to level, you can use self leveling mix. I personally use tile thinset mixed to a consistency of pancake batter so it's easier to level out with a straight edge and it's much cheaper too.

As for the low spot in front of the lift, it will have to be filled in so the water doesn't collect in front. I actually would give the area a slight crowning so water will always run away from the lift.
 

BarnFab

Well-known member
Joined
Aug 4, 2012
Messages
83
I would go with Option 1 but if all you are trying to do is push water away from your door then two should be fine. Use quick set self leveling.

Side question, have you got any more info on your lift ? How high does it go ?
 
OP
S

ScaldedDog

Well-known member
Joined
Jan 15, 2008
Messages
1,065
Location
Sedalia, CO/NSB, FL
To fix the low spot option 1 is the right way to go. I can see the flatness of the floor dipping by looking at the seal on the garage door near the man door.

It's even easier to see from the outside:
ND2h_12767_zpsc658d756.jpg


Do you say option 1 because it's easier to tile over than #2, or some other reason? My concern with #1 is that I'll have a much larger "ledge" on that side of the garage than the normal one that's present with any tile job on the other side. That doesn't seem as aesthetically pleasing, and seems like more of a trip hazard. I don't know what I don't know, though, and so appreciate the schooling.

In the pic of the 3-car space, you can see a "ramp" similar to what I'm thinking for Option 2 leading into the hallway connecting garages.

Dakota00 said:
As for materials to level, you can use self leveling mix. I personally use tile thinset mixed to a consistency of pancake batter so it's easier to level out with a straight edge and it's much cheaper too.
Will either, or both, of these survive as the floor surface for up to a couple of months, if necessary?

Dakota00 said:
As for the low spot in front of the lift, it will have to be filled in so the water doesn't collect in front. I actually would give the area a slight crowning so water will always run away from the lift.
It's hard to see from the original pic, but the lift base actually sits 1" above the floor. Tiling around it will eat about half of that, but it'll still be within the specifications recommended by Rotary. The area in the foreground in front of the lift is a little low. Would I actually have to fill it in ahead of time, or could I just use extra thinset when setting the tile, and keep the tiles level with the rest of the floor?

I would go with Option 1 but if all you are trying to do is push water away from your door then two should be fine. Use quick set self leveling.

Side question, have you got any more info on your lift ? How high does it go ?

You are correct about my goals. I'm fine with the water staying in the garage against the door seal, but want it out behind the cars, not in front of the man door.

The lift is a Rotary SL210-RA from 2009. Search for my username and the words "Rotary" or "ground" in the general garage forum, as I've mentioned it over there a bunch. I'm a short 5'10", and can lift my 8000lb Excursion too high for me to work on. I love the lift!

EDIT: This is a good thread on these lifts, with lots of pics.

Mark
 
Last edited:

Dakota00

Well-known member
Joined
Mar 9, 2008
Messages
1,078
Location
Woodbridge, Ontario
Do you say option 1 because it's easier to tile over than #2, or some other reason? My concern with #1 is that I'll have a much larger "ledge" on that side of the garage than the normal one that's present with any tile job on the other side. That doesn't seem as aesthetically pleasing, and seems like more of a trip hazard. I don't know what I don't know, though, and so appreciate the schooling.

The floor should be flat, not with a ramp to the side of the garage door and in front of the man door. That presents as a tripping or when wet a slipping hazard. Fix the floor using the option #1 idea. Keeping the floor flat up to the garage door. Continue laying the tile past the garage door to the end of the garage slab on the outside, like I've done on my floor. Now the part that was filled in will be slightly higher than the other side, like you mentioned. The first row of tiles in front of the garage door will be sloped to make up the differents on the floor height on that one side. This way there's no tripping hazard and from the outside you wont notice the slope too much. I hope you are following what I'm talking about.

Will either, or both, of these survive as the floor surface for up to a couple of months, if necessary?
I suggest not fixing the floor until you are ready to lay the tiles. Doing it the way you want will cause for more work and wasted effort in cleaning, prepping and possibly causing damage to the fill in material.

It's hard to see from the original pic, but the lift base actually sits 1" above the floor. Tiling around it will eat about half of that, but it'll still be within the specifications recommended by Rotary. The area in the foreground in front of the lift is a little low. Would I actually have to fill it in ahead of time, or could I just use extra thinset when setting the tile, and keep the tiles level with the rest of the floor?

You can prefill the area prior to laying the tiles, or if it's not much of a low spot you can fix the area with extra thinset when setting the tiles. It's your choice, but I suggest if you have little to no experience laying tiles to fix the floor before hand.
 
Last edited:
OP
S

ScaldedDog

Well-known member
Joined
Jan 15, 2008
Messages
1,065
Location
Sedalia, CO/NSB, FL
I hope you are following what I'm talking about.

Yep. It make sense. So I'd just slope the "outside" tiles on the "tall side" with thinset, and not build a ramp ahead of time?


Dakota00 said:
...if you have little to no experience laying tiles...

Ahhh, yeah, that'd be me. I confess that 1567sf of tile seems like an enormous job for someone who's never done it.

Mark
 
To avoid these ads, REGISTER NOW!

Dakota00

Well-known member
Joined
Mar 9, 2008
Messages
1,078
Location
Woodbridge, Ontario
Yep. It make sense. So I'd just slope the "outside" tiles on the "tall side" with thinset, and not build a ramp ahead of time?
Ahhh, yeah, that'd be me. I confess that 1567sf of tile seems like an enormous job for someone who's never done it.

Mark

Correct, do not build up the slope ahead of time. Fix the low spot just under the garage door where it comes to rest, do not go pass to the outside. You'll need the tolerance to adjust the "threshold" tiles to accommodate the slope, when setting the tiles.

When laying your tiles do not start at the front of the garage. Either start from the back making sure you end with a full tile at the "threshold" part in front of the garage door. Or measure out the first 2 rows of tiles at the front of the garage and start laying your tiles working towards the back of the garage, like I did. It'll make it easier to set the "threshold" tiles and to adjust the slope with the rest of the floor already installed.

BTW, how many inches is to the face of your garage door and to the beginning of the drive way? This will be roughly the length of your "threshold" tiles.
 
OP
S

ScaldedDog

Well-known member
Joined
Jan 15, 2008
Messages
1,065
Location
Sedalia, CO/NSB, FL
BTW, how many inches is to the face of your garage door and to the beginning of the drive way? This will be roughly the length of your "threshold" tiles.

8 1/2" from the outward facing door edge to the edge of the garage floor. Would you run tile out to that edge, then cover the expansion joint with whatever edging you use, or would you allow for that edging to cover only garage floor, and shorten up the threshold tile to accommodate that?

One other total newb question, since you sort of brought it up: How do you calculate exactly where the edge of the last tile will fall on the other side of the garage? Is it as simple as assuming a tile is actually larger on two sides by the width of the grout joint? (e.g. A tile that is actually 12x12, and grout joints of 1/16, means that a row 10 tiles long takes up exactly 10 5/8".)

Thanks for all your input on this. I appreciate it.

Mark
 

Dakota00

Well-known member
Joined
Mar 9, 2008
Messages
1,078
Location
Woodbridge, Ontario
8 1/2" from the outward facing door edge to the edge of the garage floor. Would you run tile out to that edge, then cover the expansion joint with whatever edging you use, or would you allow for that edging to cover only garage floor, and shorten up the threshold tile to accommodate that?

Place the tile edge protector at or very close to the edge of the expansion joint. This will all depend on how straight the edge of the garage slab is. Then shorten up the threshold tiles to what you need.

One other total newb question, since you sort of brought it up: How do you calculate exactly where the edge of the last tile will fall on the other side of the garage? Is it as simple as assuming a tile is actually larger on two sides by the width of the grout joint? (e.g. A tile that is actually 12x12, and grout joints of 1/16, means that a row 10 tiles long takes up exactly 10 5/8".)

Thanks for all your input on this. I appreciate it.

Mark

In theory yes, but it's more accurate laying out 10 tiles with spacers in place, then measure the exact distance. Then you can figure out exactly where your tiles will end by adding or subtracting the amount of tiles needed. Don't forget you'll also need to square up the room as well. So tiles running the length of a wall don't start at 5" and then end up being 11" at the other end. :) Same goes for the front threshold tiles too.

Once you are satisfied with your layout and everything is marked, snap caulk lines and always double check and triple check your marks and lines!!
 
OP
S

ScaldedDog

Well-known member
Joined
Jan 15, 2008
Messages
1,065
Location
Sedalia, CO/NSB, FL
Fix the floor using the option #1 idea. Keeping the floor flat up to the garage door. Continue laying the tile past the garage door to the end of the garage slab on the outside, like I've done on my floor. Now the part that was filled in will be slightly higher than the other side, like you mentioned. The first row of tiles in front of the garage door will be sloped to make up the differents on the floor height on that one side. This way there's no tripping hazard and from the outside you wont notice the slope too much.

Hey Dakota, will this idea work:

I'm thinking about using the option #1 idea, as you suggested, but stopping with the leveling at the inside edge of the garage door track, or roughly 11.5" from the outside edge of the slab, as seen in this photo.

ND2h_12796_zpsd23ab59d.jpg


It'll leave a small ledge underneath the rail, but that'll be impossible to trip over. I'd like a little more slope starting right inside the garage door to keep so much water from collecting there, and to reduce the amount of water I have to squeegee out of the garage. I'd back the edge a little further into the garage, if I could, but that brings the edge in to where it would be possible to trip over it.

Does this make sense?

By the way, I've ordered tile, so I'll post further questions - and they will be legion - in my floor thread.

Mark
 

Dakota00

Well-known member
Joined
Mar 9, 2008
Messages
1,078
Location
Woodbridge, Ontario
Mark,

It's best to stop the leveling at the 9.0" mark, where the garage door seal will be level and do it's job by keeping the water out. Plan is to eliminate the water from entering the garage period!! What's going to happen if you stop at the 11.5" water will continue to bypass the garage door seal. BTW, you'll need to cut at least 1" off the bottom of the rail.
 
OP
S

ScaldedDog

Well-known member
Joined
Jan 15, 2008
Messages
1,065
Location
Sedalia, CO/NSB, FL
I got this done today, and I think it's going to work. Last night I primed the floor with Levelquik primer...

ND2h_12804_zps97e0a724.jpg


... Laid my barrier at the recommended spot under the door, and caulked the edge so the self-leveling concrete wouldn't flow under the barrier...

ND2h_12805_zpsdf0b6593.jpg


... and extended the existing expansion joint up so that the self leveling concrete will have one, too:

ND2h_12807_zpsab344eee.jpg


I'm not certain this last step was necessary, but I saw others had experienced tenting of the material without it, and it doesn't hurt anything to have it.

This morning my wife and I placed 2 50lb bags - about 8G of material - into the area:

ND2h_12808_zpsd7a7770b.jpg


You can see some trowel marks in it, and still can tonight, but I think it'll be fine. I may test drainage later this weekend, but a level indicates the water should now flow to the door.

I'll post one more update to this thread if I test the fix, then the rest of my updates will be in my floor thread.

Mark
 
Last edited:
To avoid these ads, REGISTER NOW!
Top Bottom