OP

You are using an out of date browser. It may not display this or other websites correctly.
You should upgrade or use an alternative browser.
You should upgrade or use an alternative browser.
Don Campbell's Workshop
- Thread starter Don Campbell
- Start date


OP
Don Campbell
Well-known member
Grader progress picture today shows the first sheet metal cut out and installed over the support frame. Also sheet metal started over the sheering shaft. I got started on the blade circle parts too.
OP
Don Campbell
Well-known member

Sunbimmer
Well-known member
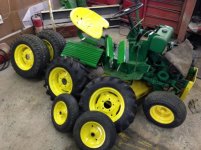
Today I pulled out some of my shop projects and I am realizing I got a real Problem
Uhm... yeah I think so too

But I think one of the good kind, fantastic herd

xtremek
Well-known member
Uhm... yeah I think so too
x2
Hey Don, I volunteer to help you with your issue. I will gladly help relieve you of one of your beautiful herd. I'm hooking the trailer up right now and should be at your house in about an hour and a half.

Do you ever do anything in orange, or red and black, or blue and white, or red and tan?
Crazy Backyard Builder
Well-known member
Hey, you are doing what you enjoy that's what matter's !
OP
Don Campbell
Well-known member
Thanks ,
I am so enjoying working in my little workshop
Today you can see I am working on the front frame parts. I have the rear cross piece in place that is holding the two lift cylinders. Also I have the front cross piece in place that supports the scarifer lift linkages. Today I should get the new blade cut and bent for it.
Attachments

upndown
Well-known member
WOW, there must be some serious jealousy in your neighborhood. Amazing work Don..
Amazing work Don..
OP
Don Campbell
Well-known member
OP
Don Campbell
Well-known member
Looks about the same today but I attached the a-frame to the blade for the first time. Also built rear blade support brackets. I also attached the lift cylinders for the first time . Up front on the frame I cut and welded a mounting plate for the whole blade assembly to anchor too.
Attachments

Ross/Kzoo
Well-known member
I haven't received any up dates lately on Don Campbell's garage. Just checking to see if all is OK?
OP
Don Campbell
Well-known member

Today I pulled out some of my shop projects and I am realizing I got a real Problem
yep.....looks like u need a bigger back yard
OP
Don Campbell
Well-known member
OP
Don Campbell
Well-known member
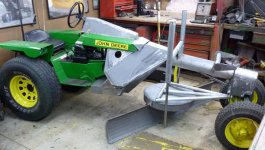
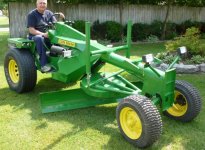
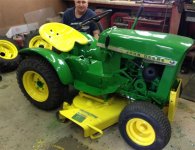
Today I fired up the grader and drove it out of the workshop for the first test drive. It rode good but the steering was very tight. I will have to figure out a small gear box in the front to help steer easier. But overall it is going to be a fun little outfit to drive . My wife just downloaded a video on you-tube at doncampbellequipment if anyone would like to see it moving. 
Attachments

xtremek
Well-known member
Hey Don, I need some work dne on my driveway. Can I borrow that grader? lol
OP
Don Campbell
Well-known member
I got the grader roughed in and driveable so I pulled it out of the workshop for now. Today I started building the last belly blade for my last little tractor . I figured if I lined up my plow truck, my mini loader bucket, my snowblower and all my little tractors with blades and made one pass in the snow it would leave a path plowed 46 feet wide.
I think I'll be done building blades after this project, ha,ha.
I think I'll be done building blades after this project, ha,ha.
Attachments

OP
Don Campbell
Well-known member
OP
Don Campbell
Well-known member
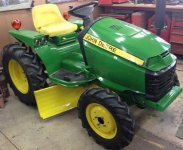
Here is todays project in the workshop. I have had 6 tires and rims sitting around for two years and I keep telling myself to make some small trailers with them. I should get this one painted tomorrow and Monday I will get started on the next one. This is number four so I will have six lawn trailers in a week or so. I will bundle a trailer and a blade with each tractor I sell , ha,ha.
Attachments
Ross/Kzoo
Well-known member
Nice trailer Don. What gauge is the bed and fenders and what size was used for the frame?
sean Buick 76
Well-known member
WOW, great job on all the projects!!!!
OP
Don Campbell
Well-known member
It is just 18ga. , once it is bent it is quite strong for a small lawn cart. Here is a picture of the painted trailer. It used up two more of my tires and rims. The bad news is yesterday I found a great deal on two more tires and
rims
I feel very lucky to have my little workshop to putter in. It is very small but I sure have put out a lot of projects in it. This afternoon the trailer and tractor will be pulled out and a brand new restoration project will be pulled in . I'll post a picture tonight of my next one.
rims
I feel very lucky to have my little workshop to putter in. It is very small but I sure have put out a lot of projects in it. This afternoon the trailer and tractor will be pulled out and a brand new restoration project will be pulled in . I'll post a picture tonight of my next one.
Attachments
marius_nortje
Well-known member
- Joined
- Jun 15, 2014
- Messages
- 107
wys vir john smitt
OP
Don Campbell
Well-known member

OP
Don Campbell
Well-known member
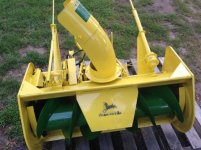
OK, here is garden tractor number 12 . I got it pulled in the workshop after supper and couldn't resist doing a little quick sanding on the fenders. I will resand it all down and repaint it to get it to shine again. Probably change the tires too . It runs and mows and even has a nice snowblower .
I will sand and tweak the snowblower too and get it looking good .
$200.00 I could not go wrong. I figure two weeks it should look pretty good then I will get back to trailer number 5
I should be able to get it to shine as good as my first 110 project i did a year ago.
When you get old like me it is great fun puttering in the shop
Attachments

OP
Don Campbell
Well-known member
xtremek
Well-known member
OK, I just had a brain fart. I've been following along an loving all of this, even though it's all about the Green instead of the Big Red(IH). But what about a mini pulling tractor setup? You could build a sled and tractor. I know they do that for real, but it could a cool addition to your collection. Just a thought.
rmalkow2
Well-known member
Just finished reading thru this whole thread. Totally amazing and adding my kudos for your skills and creativity. It shows that a lot can be done with simple tools. I'm glad you took time to show your tools too. It helps as I think about what to acquire for myself.
Scuderia-F1
Well-known member
Great shop and fabulous project!
Thanks for sharing!
Thanks for sharing!
OP
Don Campbell
Well-known member
Thanks ,
A mini detailed pulling sled is a great idea ! That would look good and a nice unique item to round out my display at the tractor show. I also am going to make a round fender sulky to pull behind one of the round fender tractors . I think that would be unique . I want my first tractor show visit to have a nice variety of unique things something people will enjoy seeing.
Todays progress shows the painted seat looking like new again. I hammered out a few dents, filled in and sanded it. Also painted more rims yellow . I sanded the hood support bars and the grill and got them painted.
Now I am starting to sand the rear of the main frame.
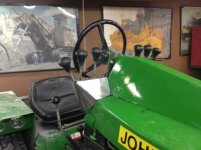
Yes I am proof a person can do a lot in a small workshop and very few tools. My workshop is the size of a car and a half garage. Not even a two car garage. If you google doncampbellmodels and click on (images ) you can see more of the projects I built in this mini workshop. I love my little workshop .
A mini detailed pulling sled is a great idea ! That would look good and a nice unique item to round out my display at the tractor show. I also am going to make a round fender sulky to pull behind one of the round fender tractors . I think that would be unique . I want my first tractor show visit to have a nice variety of unique things something people will enjoy seeing.
Todays progress shows the painted seat looking like new again. I hammered out a few dents, filled in and sanded it. Also painted more rims yellow . I sanded the hood support bars and the grill and got them painted.
Now I am starting to sand the rear of the main frame.
Yes I am proof a person can do a lot in a small workshop and very few tools. My workshop is the size of a car and a half garage. Not even a two car garage. If you google doncampbellmodels and click on (images ) you can see more of the projects I built in this mini workshop. I love my little workshop .
Attachments
Ross/Kzoo
Well-known member
Looks good Don. When you paint the rims I take it that you dismount and sandblast the rims, then paint, correct?
Last edited:
OP
Don Campbell
Well-known member
No
I just sand them with the tires on and paint them with the tires mounted. Nothing fancy but looks much nicer than the rust.
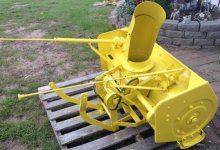
Today's picture shows the snowblower that came with the deal. The sheet metal was in excellent condition. I did a little painting and it really looks good for over 50 years old.
Would you believe I bought a Bolens articulating mower yesterday
I need help
I just sand them with the tires on and paint them with the tires mounted. Nothing fancy but looks much nicer than the rust.
Today's picture shows the snowblower that came with the deal. The sheet metal was in excellent condition. I did a little painting and it really looks good for over 50 years old.
Would you believe I bought a Bolens articulating mower yesterday
I need help
Attachments
Ross/Kzoo
Well-known member
No. it's only an addiction when your wife tells you it is. Secret?---- Just don't tell her. LOL
OP
Don Campbell
Well-known member
ha,ha
My wife is so good about it , whatever I spend she gets the same amount so she has no problem me getting them. She often thinks I should spend a little more on them
Todays progress picture shows the frame all sanded and painted.
It is slowly taking shape. I bought it 6 days ago.
My wife is so good about it , whatever I spend she gets the same amount so she has no problem me getting them. She often thinks I should spend a little more on them
Todays progress picture shows the frame all sanded and painted.
It is slowly taking shape. I bought it 6 days ago.
Attachments


OP
Don Campbell
Well-known member
OP
Don Campbell
Well-known member

OP
Don Campbell
Well-known member
I ordered a Handy 1000 lb air lift with 12 in. side extensions today for my workshop. I also ordered two manual tire changers . One for small center garden tractor rims and one for larger center rims. With 13 lawn tractors and 6 trailers that is over 60 tires to keep inflated.
Attachments

Ross/Kzoo
Well-known member
I'm sure that you'll get plenty of use out of that lift!
OP
Don Campbell
Well-known member
I am very excited to get the lift, 2 more weeks before it is delivered.
I hauled home tractor number 14 the other day
I am loving this garden tractor hobby
I changed my first garden tractor tire on my new manual tire changer and it worked great
The guy is delivering my Bolens frame steer tomorrow Should be another fun shop project.
I hauled home tractor number 14 the other day
I am loving this garden tractor hobby
I changed my first garden tractor tire on my new manual tire changer and it worked great
The guy is delivering my Bolens frame steer tomorrow
Should be another fun shop project.