
You are using an out of date browser. It may not display this or other websites correctly.
You should upgrade or use an alternative browser.
You should upgrade or use an alternative browser.
Double Garage - build and show
- Thread starter ftaffy
- Start date
Intro:
Been reading this site for a long time and saved 100s probably 1000s of pictures of others garages for inspiration so decided to put some up of my humble (was looking at some of the save pics and keep thinking wow I have a long way to go!) garage in return.
We built our first home in Melbourne, Australia and moved in at the start of 2016, one of the big things was getting a garage I could actually modify after years of renting. It helped to have an understanding wife, I got a garage and she got a room sized walk in robe so we are both happy.
Garage plans/Cad model
Plans for garage space, Electrical drawing (Since doing this I would have spaced some power points around more as the clusters are not as handy as I planned and also put a couple high on the walls for odds and ends.

Build pic:


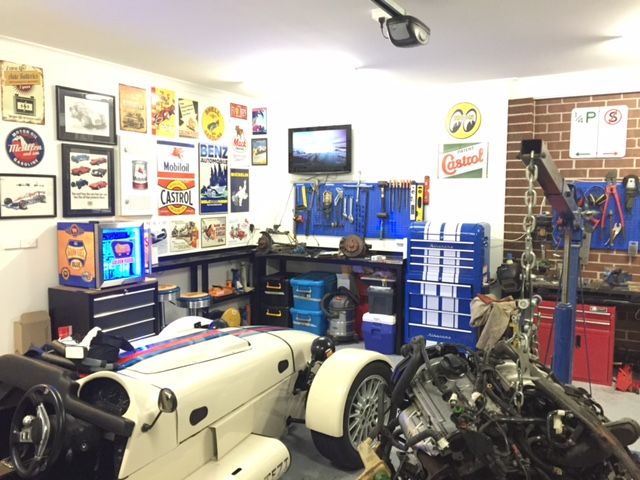
Some details of the finished garage
~5.5m W x 6m D (36.98m^2), has 4 single fluoroes (was not allowed more or duals due to power efficiency reasons by the builder…), 4 off 10A dual outlets and a single 15A which ended up in the wrong place as they forgot when installing it.
Pics of it ‘new’:


I spent a while planning out the garage, some sketch up ideas are below. The idea was that it’s a split design, with one part being show room and the other half build shop thus the title ‘build and show’.

Not sure what I am going to do when I need space for a 3rd project, possibly one of the toys will need to leave home. Mine and the wife’s car already live outside and I need to widen the drive so they can both fit but that is another story.
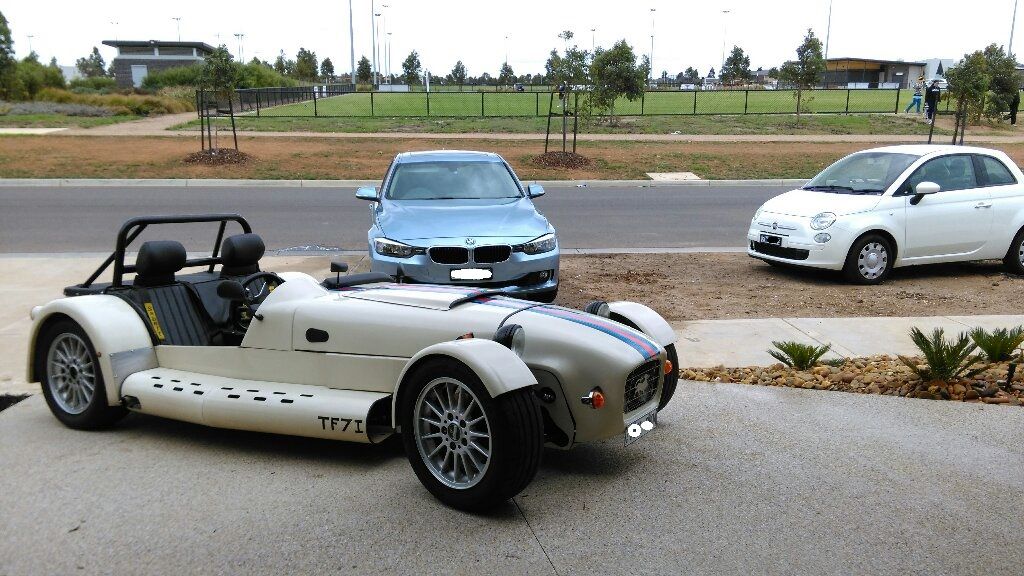
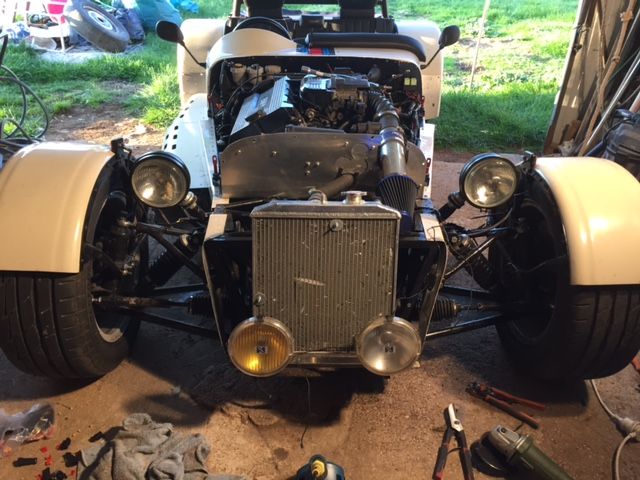
The car is not a Caterham but rather a locost (Lotus 7 replica but slightly larger) which I finished and got road registered just before we moved into the house, so this garage is going to be storage for this car while I work on new build.
Car is powered by a BMW M44 4Cly engine (1895cc, 138hp/180nm) and weight is ~650kg (Public Weight Bridge) and yes it’s fast but not the fastest thing on 4 wheels but I am happy with its performance as it ability is beyond my skill level.
Pics of the car:
Been reading this site for a long time and saved 100s probably 1000s of pictures of others garages for inspiration so decided to put some up of my humble (was looking at some of the save pics and keep thinking wow I have a long way to go!) garage in return.
We built our first home in Melbourne, Australia and moved in at the start of 2016, one of the big things was getting a garage I could actually modify after years of renting. It helped to have an understanding wife, I got a garage and she got a room sized walk in robe so we are both happy.
Garage plans/Cad model
Plans for garage space, Electrical drawing (Since doing this I would have spaced some power points around more as the clusters are not as handy as I planned and also put a couple high on the walls for odds and ends.

Build pic:


Some details of the finished garage
~5.5m W x 6m D (36.98m^2), has 4 single fluoroes (was not allowed more or duals due to power efficiency reasons by the builder…), 4 off 10A dual outlets and a single 15A which ended up in the wrong place as they forgot when installing it.
Pics of it ‘new’:


I spent a while planning out the garage, some sketch up ideas are below. The idea was that it’s a split design, with one part being show room and the other half build shop thus the title ‘build and show’.

Not sure what I am going to do when I need space for a 3rd project, possibly one of the toys will need to leave home. Mine and the wife’s car already live outside and I need to widen the drive so they can both fit but that is another story.
The car is not a Caterham but rather a locost (Lotus 7 replica but slightly larger) which I finished and got road registered just before we moved into the house, so this garage is going to be storage for this car while I work on new build.
Car is powered by a BMW M44 4Cly engine (1895cc, 138hp/180nm) and weight is ~650kg (Public Weight Bridge) and yes it’s fast but not the fastest thing on 4 wheels but I am happy with its performance as it ability is beyond my skill level.
Pics of the car:


Last edited:
Upgrades to date
Floor
First job was to paint the floor with epoxy paint as every other garage I have worked in has ended up with oil stains which are never coming out! Really happy with the result.


Toolbox, cabinets and benches
Toolbox:
Next was to get a new toolbox, had been eyeing off one of these (800 which is little much to spend when I can by one half the price that does exactly the same function/size) and the wife said just get it (Thanks ).


Benches
I needed some new benches as my old one were either knocked together or a massive job which was simply too big to be of use.
So drew up some plans and sent them off them off to be fabricated while I knocked off 1001 jobs around the house. All steel construction with a 3mm top with reinforcement under the top plate, not planning to weld or bash parts on these but will be used for assemble of heavy items.
The small bench as an opening for a couple of bar stools and a shelf to hold axle stands and jacks.
The larger is open underneath to allow for storage tubs and for roller cabinets
Sketch up:

The finished products:


Welding bench is something picked up in a house wrecking (yes they exist to my surprise, this one was called Lal Lal demolitions for those in Victoria) and has done a good job to date being bashed belted etc. Vice is a cheap Chinese job in need of TLC or the bin. It’s on the right in the picture below.
Added some pegboards – match the toolbox on both sides

Non-functional things – If it does not involve tools its this
Started to put some up some signs, more signs can be seen in the rest of the pics. It’s an ever growing thing.
The shell bowser on the right of the first pic was another wife present, she’s been doing well!
Pic:


Fridge
A present from the wife. Looks great but need to work out how to install at a good height. I don’t want it on the floor so need to find a cabinet for it to sit on.

Added some Ikea cabinets I found on gumtree (Aussie craiglist), only after getting home did I realise I was short of glass.... So need to find/source at least 3 more pieces, might get 9 and some more pegs as it’s possible to fit some more cars in there. Yes I am into Ferraris, big fan of the 250 series of cars with a hopeful build of one of those to come in the future but current funding won’t allow for it to be done in a suitable timeframe.

Later I got a 3rd which was not a good colour match, so some painting was required.
Choices were white or black, since I had white house paint vs black car paint I went with the white.
Hope to finish painting these this week.
Entertainment
Installed a TV on the wall and added a google chromecast. Which offers a few benefits including youtube, Netflix, etc but also I can screen mirror drawings up onto the screen.
No pic… will add one tonight as I appear to have forgotten to photograph it!
Also have a radio that needs to be installed which has moved from garage to garage with me for a long time, so decided not to get a new smaller unit. Let’s me listen to the cricket and footy.
Also don’t have an as is photo any newer then the benches pics, will update once I knock over the list below.
In progress works which will be done this week.
Wall cabinet
Installing a wall cabinet, plan is to add another in time but one gets the gear I wanted out of tubs and sorted.
Getting stuff off the floor
Installing some hooks to store the lawn gear out of the way until they get a new home when funding allows for a garden shed.
Compressor
With floor space as a premium I decided to install a shelf to hold the compressor, it’s only a basic unit but planning to get a belt driven unit down the track once this one kicks the bucket. Plan is to install some reticulated lines around the garage as a future upgrade but for the time being the hose will length will suffice.
Last edited:
Future plans
• Under bench cabinet/draws – Pick up a unit tomorrow night that I won on ebay for 1/3 price of one in the shop. Brand new, so happy with that.
• Get some kind cabinet to hold the fridge at a nice height, struggling for ideas so may be a black or blue filing cabinet if I can find a suitable size and $
• Wall cabinets – need at least 1 more of the current type. It will fit perfectly next to it.
• Buy a 3in1 roller/folder guillotine – next build is a AL frame, going to the larger parts done off site but small brackets etc. Hoping to speed up the process as doing it all by hand was a killer.
• Buy a bandsaw, cutting jigs as I previously used a jigsaw which was ok but want better control cutting curves.
• Add a cheap 3d printer to the tool kit, planning to make the bucks (Process being buck, mould, part) for some fibreglass parts using 3d printing as the car is being detailed designed in CAD before any steel/AL is cut.
• Welding screen on shower rail off the roof around the welding bench
• Build table + Engine dolly thing for new project
• Hard compressed air lines + a retractable holes reel
• Upgrade lights to double fluoroes – more light is always better, though this garage is miles ahead of my old one with a single crappy fluoro.
• Get a garden shed that can fit lawn mower and the rest of the tools. A bonus would be fitting the engine crane as it is a PITA to store when not in use!
• Racing sim retro body sim thing…
• Maybe a portable scissor or an in floor lift – who does not want one of these?
Next project is a mid-engine build based around a VW/Audi 2000 era V6 and transaxle gearbox (ACK/APR V6 DOHC 30V 2771cc, 190hp and 280nm) which will by styled along the lines of a late 60’s F1 car (Target weight is <450kg = ~420bhp/tonne which will make it fast enough). Just for fun and to get into some hill climbing and track days in something I don’t mind damaging but also like the look of, not trying to enter historic or win trophies. The clubby has too many one off parts and I don’t want to risk it as I am sure my abilities will fail it.
Build table: The car build needed a build jig to keep things square so knocked out one of those but decided to make this one on a table on wheels as opposed to my last one which was a removable top which the A frame stands would be used to support the car in build. It offers the benefit that I can store all the parts under the table as opposed to needing more storage around the garage and it can be wheeled over to the side.
Example Pic of the idea, but might beef it up a little to allow for some beatings to make things fit!

Engine dolly: While I have an engine stand for working on the engine itself, what I am going to need is a dolly to drop the engine/box on while it’s out of the car, seeing a lotus factory pic of how lotus moved there DFV for the 49 builds has me interested. It’s just a wooden box on casters that is wide enough to fit the engine and long enough for the engine+box and pulled around with a draw bar. Small, cheap to make and seems practical when the engine and box are bolted up.
3in1 machines: While I hear bad stories about some and others say keeping work moderate they work ok. My plans for the new build are to outside larger pieces to be laser cut and folded but for smaller brackets to be done by me. These will be thin AL and I don’t have the space or funds to buy all 3 tools. Probably one of these type of units either 760mm or ~1000mm jobs.
https://www.machineryhouse.com.au/Combination-Panbrake-Folder-Guillotine-Roll
Pic:

Racing Sim: I actually need to do some mock ups for the new build (test some construction ideas and also that I will fit!) so could turn the sizing jig into one of these no problem. Not that I actually have time to play any games these days but this might motivate me when it’s too cold and wet to take the 7 out.
Something like this is likely

Hard air lines: Plan is to run hard lines once I install a belt compressor to 3 outlets around the garage. One above the welding bench, one on the brick wall near the door and one above the other work benches.
• Under bench cabinet/draws – Pick up a unit tomorrow night that I won on ebay for 1/3 price of one in the shop. Brand new, so happy with that.
• Get some kind cabinet to hold the fridge at a nice height, struggling for ideas so may be a black or blue filing cabinet if I can find a suitable size and $
• Wall cabinets – need at least 1 more of the current type. It will fit perfectly next to it.
• Buy a 3in1 roller/folder guillotine – next build is a AL frame, going to the larger parts done off site but small brackets etc. Hoping to speed up the process as doing it all by hand was a killer.
• Buy a bandsaw, cutting jigs as I previously used a jigsaw which was ok but want better control cutting curves.
• Add a cheap 3d printer to the tool kit, planning to make the bucks (Process being buck, mould, part) for some fibreglass parts using 3d printing as the car is being detailed designed in CAD before any steel/AL is cut.
• Welding screen on shower rail off the roof around the welding bench
• Build table + Engine dolly thing for new project
• Hard compressed air lines + a retractable holes reel
• Upgrade lights to double fluoroes – more light is always better, though this garage is miles ahead of my old one with a single crappy fluoro.
• Get a garden shed that can fit lawn mower and the rest of the tools. A bonus would be fitting the engine crane as it is a PITA to store when not in use!
• Racing sim retro body sim thing…
• Maybe a portable scissor or an in floor lift – who does not want one of these?
Next project is a mid-engine build based around a VW/Audi 2000 era V6 and transaxle gearbox (ACK/APR V6 DOHC 30V 2771cc, 190hp and 280nm) which will by styled along the lines of a late 60’s F1 car (Target weight is <450kg = ~420bhp/tonne which will make it fast enough). Just for fun and to get into some hill climbing and track days in something I don’t mind damaging but also like the look of, not trying to enter historic or win trophies. The clubby has too many one off parts and I don’t want to risk it as I am sure my abilities will fail it.
Build table: The car build needed a build jig to keep things square so knocked out one of those but decided to make this one on a table on wheels as opposed to my last one which was a removable top which the A frame stands would be used to support the car in build. It offers the benefit that I can store all the parts under the table as opposed to needing more storage around the garage and it can be wheeled over to the side.
Example Pic of the idea, but might beef it up a little to allow for some beatings to make things fit!
Engine dolly: While I have an engine stand for working on the engine itself, what I am going to need is a dolly to drop the engine/box on while it’s out of the car, seeing a lotus factory pic of how lotus moved there DFV for the 49 builds has me interested. It’s just a wooden box on casters that is wide enough to fit the engine and long enough for the engine+box and pulled around with a draw bar. Small, cheap to make and seems practical when the engine and box are bolted up.
3in1 machines: While I hear bad stories about some and others say keeping work moderate they work ok. My plans for the new build are to outside larger pieces to be laser cut and folded but for smaller brackets to be done by me. These will be thin AL and I don’t have the space or funds to buy all 3 tools. Probably one of these type of units either 760mm or ~1000mm jobs.
https://www.machineryhouse.com.au/Combination-Panbrake-Folder-Guillotine-Roll
Pic:
Racing Sim: I actually need to do some mock ups for the new build (test some construction ideas and also that I will fit!) so could turn the sizing jig into one of these no problem. Not that I actually have time to play any games these days but this might motivate me when it’s too cold and wet to take the 7 out.
Something like this is likely

Hard air lines: Plan is to run hard lines once I install a belt compressor to 3 outlets around the garage. One above the welding bench, one on the brick wall near the door and one above the other work benches.
Updates from last night activities:
A BMW 3 series does not fit a 600x600x460 tool chest FYI... i had to go home and get the wifes fiat much to the guys amusement.
It also changed from being under bench to being under fridge, a better solution as i no place to put the esky and will probably need the space for a couple more tubs to hold overflow gear that i dont have a home for but still use every now and then.
Tool chest:

Tool chest under the fridge:

Also got cracking with painting
The three model car cabinets

The compressor shelf (over sized to fit a belt compressor)

A general shot of the garage in an extremely messy state! Working towards cleaning it up - made a large pile of bin gear near the the entrance so may go dumpster hunting later in the week to clear it out!

sean Buick 76
Well-known member
Nice work I really like the tube frame chassis!
Sadly i cannot lay claim to the tube frame chassis, the guy who made it is on a clubby forum in Australia. The car has since been picked up by Race car replicas, the performance is said to be impressive.
My current designing is a aluminium monocoque, will see how that goes as its a abit of fun to make it all join up.
Made some progress cleaning out the garage and getting things on walls. Have emptied 7 tubs, only 4 left (well 6 actually but 2 contain parts for the next build so dont count). Apart from the compressor which i didnt really think about very well. Placed the shelf above the door height but didnt allow the height of the compressor... so its now on the floor while i ponder moving the shelf.
Also got the chromecast running on the TV, brilliant for having something going in the background while in the shed.
Ran power for the fridge and battery charger, nothing exciting just an extension lead hidden under the back lip of the bench using stuck on cable tie mounts.

Next target is going to be wooden mock up of the interior spacing. But still working on suspension as that will guide some of the interior shape as i plan reuse some hidden structure for dual purpose. This is slow going when your trying to mix and match OEM parts and keep the budget down. Luckily time i have so can keep looking at everyone elses garages!
Cheers,
Taffy
My current designing is a aluminium monocoque, will see how that goes as its a abit of fun to make it all join up.
Made some progress cleaning out the garage and getting things on walls. Have emptied 7 tubs, only 4 left (well 6 actually but 2 contain parts for the next build so dont count). Apart from the compressor which i didnt really think about very well. Placed the shelf above the door height but didnt allow the height of the compressor... so its now on the floor while i ponder moving the shelf.
Also got the chromecast running on the TV, brilliant for having something going in the background while in the shed.
Ran power for the fridge and battery charger, nothing exciting just an extension lead hidden under the back lip of the bench using stuck on cable tie mounts.


Next target is going to be wooden mock up of the interior spacing. But still working on suspension as that will guide some of the interior shape as i plan reuse some hidden structure for dual purpose. This is slow going when your trying to mix and match OEM parts and keep the budget down. Luckily time i have so can keep looking at everyone elses garages!
Cheers,
Taffy
Will keep going with posting in my own thread 
Added a whiteboard and took the clubby for a coffee meet up.
Also changed it to be on club plates, which are 90 day use plates that historical or replicas of historic cars can use over here.
Did a lot more design work on the single seater mono design but still a long way to go and not a lot to show for it! Forgot how much time goes into designing even the basic design.

Cheers,
Taffy
Sorry very late reply! Thanks hnsy.
Not made huge progress on the garage, been playing with the car as it heads into our summer and getting it sorted for hopefully a lot of driving!
When winter rolls around plan to get back into project building and garage upgrades.
My compressor has died, so have a larger belt driven one on the way that needs a little TLC but will up tool capacity nicely.
Had the car out for some drives though:
Yarra ranges

Mt Macedon

Meredith

Not made huge progress on the garage, been playing with the car as it heads into our summer and getting it sorted for hopefully a lot of driving!
When winter rolls around plan to get back into project building and garage upgrades.
My compressor has died, so have a larger belt driven one on the way that needs a little TLC but will up tool capacity nicely.
Had the car out for some drives though:
Yarra ranges
Mt Macedon
Meredith
matt_i
Well-known member
This is very cool! I love the rounded look of those blue toolboxes. Building a car from scratch has got to be a giant undertaking...I can only imagine. Do you use a CAD program or how does the design get captured into plans?
Mpower5266
Well-known member
Wow this is awesome. My walls in my basement are very similar, I cant wait to see what else you do with them.
Hey Matt, i do use CAD to do the design and analysis of parts and then a general fit up but i still come back to making a wood mock up of how things are going to work ergonomically. Clearances in CAD always look huge until you have to fit a spanner and your hand in to do up that bolt or find out your too big to fit in the seat...
Some examples:

Lotus 25 mono tub i have been playing with, wanted to do a 49 but my metal working skills are not up the that challenge at this stage. While i am able to make a lot of the parts work the VW/Audi V6 i have while correct HP is not the right size and the uprights were proving difficult. After a drive a few weeks ago and looking at the BAC mono i think a road legal single seater might be an interesting direction to take, spaceframe chassis though to avoid many of the issues with AL mono frames.


Any making the aero screen for the clubby was done using a ply template - still stuffed it up mind you so will need to make another when i get around to it.
Thanks Mpower, your basement has some really nice BMW signs. I keep my eye out for some to add to the walls.
Been looking to add an older E30 to the collection, would have to replace the blue F30. Would love an E30 318is coupe but there prices have gone skyrocketing lately over here.
Have added some 1967 F1 replica posters prints to back wall, will take a photo hopefully tonight. The shed is a mess as i stripped out the drive train for the clubman as a uni joint is playing up in the tailshaft and i swapped the diff.
Edit:
Matt, In relation to making a car its not as hard as you would think. I didnt know how to weld, cut AL, paint or fibreglass before starting this project. Check out 'How to build a sports car', the haynes manual for building a Lotus 7 replica. Lots of parts are off the shelf and plenty of modification plans can be sourced.
The rounded toolbox is by a company in Aus called Kincrome, they are not cheap and was my splash out item for the garage as i loved the shape. It cost more then the custom made fully steel work benches! https://www.kincrome.com.au/search?ProductSearch=retro
I see they are selling Red and Black version at Bunnings at the moment but seem to have stopped selling the Blue and White versions.
Last edited:
The new prints on the wall, need to fill in the pillar to the left with small A4 size metal signs but they are cheap and easy to find.

Replaced the tailshaft, dropped in the spare diff i had and took it for a drive. Back end totally locked up... turned it the diff was dry either the previous owner had drained or it was stored upside down. The net result was not good anyway. Reinstalling the 318IS one i was using.
Must say i am very happy that put the epoxy on the floor. Makes it so much nicer to work in the garage. Do need some lower level lights to light under the car, etc.

