To avoid these ads, REGISTER NOW!

Dream Shop Idea Generator

Wiebster

Well-known member
Joined
Jul 18, 2015
Messages
194
Location
Rapid City, Sd
I’m moving this post over to General Discussion with the hopes of generating more ideas before my Monday pour.

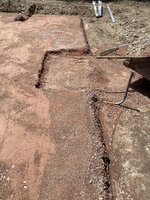
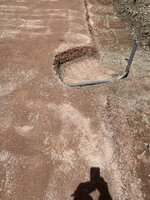
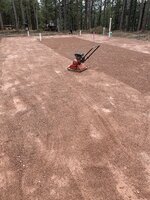
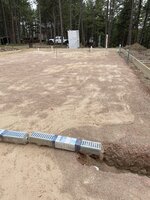
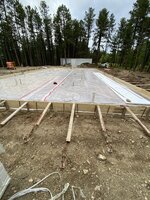
Hi everyone, I’ve been on here a few times to get suggestions for problematic situations that have popped up over the years but still definitely a newbie on this awesome site. I’ve come to the conclusion that if I don’t build now, I’ll be too old to really enjoy the fruits of my labor. Soooo, I’ve jumped in with both feet and started building my dream shop, at least as dreamy as I can afford (barely). I’ll update you with more pictures from the beginning of site prep but I need to skip right to the issue at hand. The concrete contractor has formed the perimeter and I have been getting the insulation, vapor barrier, and in floor pex installed getting ready for the big pour this week or next. As much as I’ve read on Garage Journal, thought about for 40 years, observed at other shops, I’m just concerned I’m forgetting something that I won’t be able to remedy after the pour. Do you see or can think of anything that I need or should do before the mud arrives? To save you from wondering what I have done, I’ll try to list what I thought was important.
The shop will be divided into 3 seperate areas. Wood working, metal working, and automotive.
  1. Good solid undisturbed base
  2. 4” base course, packed more times than I can count
  3. thin layer of crusher fines to protect my 6 mil vapor barrier
  4. vapor barrier
  5. 2” FlexxBoard25 insulation
  6. 1/2” pex O2 barrier
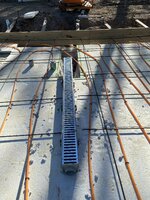
  7. 6’ linear drain to daylight
  8. thickened areas for 2 post lift
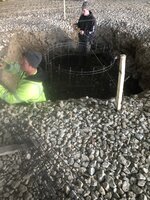
  9. thickened area (36” dia) for jib crane
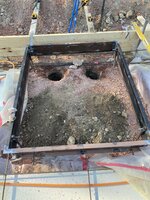
  10. 4’x4’ recessed area for freight elevator base (recessed 6 3/4”)
  11. 6” and 4”under slab dust collection system
  12. 4”sewer stem
  13. conduit for 1” water line
  14. Many runs of under slab conduit of various sizes for lift, table saw, in floor outlets, elevator, short cut to other side of shop to save on wiring
  15. Fiber optic and cat5 cables
  16. 0000 aluminum for service panel (largest power company would put in)
  17. 5-6” concrete pad (to be poured soon)
  18. Shop is 40x72
That’s about all I can think of so on with the pics. Any suggestions, even crazy ones, are welcomed and appreciated.

Attachments​

  • IMG_9981.jpeg
    IMG_9981.jpeg
    1.6 MB · Views: 26
  • IMG_9982.jpeg
    IMG_9982.jpeg
    1.3 MB · Views: 26
  • IMG_0145.jpeg
    IMG_0145.jpeg
    1.2 MB · Views: 27
  • IMG_0144.jpeg
    IMG_0144.jpeg
    1.8 MB · Views: 27
  • IMG_0143.jpeg
    IMG_0143.jpeg
    2.2 MB · Views: 27
  • IMG_0142.jpeg
    IMG_0142.jpeg
    2 MB · Views: 24
  • IMG_0137.jpeg
    IMG_0137.jpeg
    1.9 MB · Views: 24
  • IMG_0159.jpeg
    IMG_0159.jpeg
    1.5 MB · Views: 24
  • IMG_0162.jpeg
    IMG_0162.jpeg
    1.3 MB · Views: 24
  • IMG_0167.jpeg
    IMG_0167.jpeg
    994 KB · Views: 26
I should also mention heating this shop is not my concern as I don’t spend winters here. I’m just looking for ideas to make the shop more user friendly. I’ve thought of three more ideas I’d like to get done if I can today before the pour. I’m welding a steel “box” of angle iron and 1/8”x6” plate for the elevator to sit in so the elevator floor is flush with the concrete when in the down position. I was previously going to just form this into the concrete but have since decided to embed this steel box into the concrete and concrete around it. I’m also going to try to embed some flat plates at least 1/2” thick maybe 12” square, flush with the concrete in both the metal working and auto shop that I could weld or drill and tap into for any type of anchor or pull plate that might be needed in the future. I could also weld or bolt a tool to them without having to drill and anchor into the concrete. Along those same lines I was thinking about doing the same with a 2” square receiver hitch type tube embedded flush so that I could drop any number of attachments/devices/tools into when needed but pull them out when not needed. I would tie these into the rebar below before pouring. Any thoughts on doing this and the best locations for them?


I know I didn’t give you guys much time but I have two days to get everything I forgot, overlooked, neglected, etc to get done before the floor is poured. Just coming here to look for ideas. With that said, I did get my elevator base steel box built and installed, pex manifold built and installed, pressurized to 60psi, and my in floor drain installed and plumbed to the outside of the building. (will dig to daylight later). Concrete guy showed up to tie rebar. Getting close

Attachments​

  • IMG_0178.jpeg
    IMG_0178.jpeg
    1.3 MB · Views: 0
  • IMG_0179.jpeg
    IMG_0179.jpeg
    1.4 MB · Views: 0
  • IMG_0175.jpeg
    IMG_0175.jpeg
    1.4 MB · Views: 0
 

Attachments

  • 1717817002776.gif
    1717817002776.gif
    42 bytes · Views: 43
  • 1717817002901.gif
    1717817002901.gif
    42 bytes · Views: 26
  • 1717817002860.gif
    1717817002860.gif
    42 bytes · Views: 17
  • 1717817002818.gif
    1717817002818.gif
    42 bytes · Views: 15
  • 1717817002984.gif
    1717817002984.gif
    42 bytes · Views: 13
  • 1717817002943.gif
    1717817002943.gif
    42 bytes · Views: 13
  • 1717817002733.gif
    1717817002733.gif
    42 bytes · Views: 20
Last edited:
To avoid these ads, REGISTER NOW!

Fixr

Well-known member
Joined
Dec 23, 2012
Messages
9,708
Location
SW VA
That was quite a mess of a post. I barely skimmed it and it's probably too late to make much in the way of changes. I'll give you standard advice:

You've forgotten quite a few things that you will later think you *should* have done. And the contractor(s) won't do everything the way you had in mind. It's probably too late to bring everything to a screeching halt and make it perfect.

So plan to live with it and deal with it. You can throw more money at it, and you can try to fix it yourself, And/or you can work around it. Or just shut it all down and plan on trying to start it back up when you have it all figured out.

ETA: At some point, you have to shoot the engineers and build the damned thing.
 

Fixr

Well-known member
Joined
Dec 23, 2012
Messages
9,708
Location
SW VA
The jib crane area is 18” thick with #4 rebar running thru it and 36” in diameter . How thick should it be?
I'm not experienced, but that sounds about right for a light/medium truck engine crane

Edit: listen to @zkdiesel, not me.
 

Fixr

Well-known member
Joined
Dec 23, 2012
Messages
9,708
Location
SW VA
Seems like this thread should have been posted several years ago. But having said that, I wouldn't mind getting to have this shop, mistakes and all.
 
To avoid these ads, REGISTER NOW!
OP
W

Wiebster

Well-known member
Joined
Jul 18, 2015
Messages
194
Location
Rapid City, Sd
I guess now that I’m thinking about it I could have posted 20 years ago at the rate I’m getting anything done on it.
 

TurnipTruck

Well-known member
Joined
Aug 28, 2005
Messages
1,582
Location
Southcentral Alaska
The valve shop at work got a 5k@15’ jib crane added recently. The excavation looked like a 5’ cube with at least a half dozen layers of 3/4” rebar grids and 24” J bolts.
 
OP
W

Wiebster

Well-known member
Joined
Jul 18, 2015
Messages
194
Location
Rapid City, Sd
I had no immediate plans for the jib crane. I didn’t realize you had to have an excavation the size of a root cellar. I see small jib cranes that advertise only needing 6” of concrete if there are no cracks. I thought three times that depth was plenty. I certainly don’t plan on a 5k pound capacity crane. Overhead is always a good option too, but I thought it would be nice to swing the arm out the over door, unload the truck and swing back inside the shop.
 

Jackfre

Well-known member
Joined
Dec 26, 2010
Messages
4,412
Location
N CA
IN my 30x30 shop I embedded 5 receiver hitches. One was in line with the center of the big door. welded pieces of rebar across them prior to placement. That unit was tipped back a bit so when a load was placed it wouldn’t magically slip out. That worked out well. The other four were carefully laid out in about a 10x12 rectangle. Once the mud started flying my one legged finisher kinda lost interest in my precise lay-out but that was ok. My best use of these was to take two of the hitches and set angle iron in the ceiling so I could put a 10’ (my ceiling height) piece of Unistrut from the floor up to the ceiling making a vertical rack to fabricate steel fence panels. Once laid out I could assemble the rack in about 20 minutes and down in about 10. After the pour I found the mis-alignment required the cross pieces to shown to be able to plumb to a rafter. Worked out really well for me.
 

Attachments

  • IMG_1119.jpeg
    IMG_1119.jpeg
    673.2 KB · Views: 21
  • IMG_1118.jpeg
    IMG_1118.jpeg
    535.4 KB · Views: 19
OP
W

Wiebster

Well-known member
Joined
Jul 18, 2015
Messages
194
Location
Rapid City, Sd
Excellent idea Jackfre! I planned on putting some of those in but didn’t know where or how. The rectangle is a great idea. How long of pieces did you put in? Did you pound the rebar into the base course or how did you keep them in precise position. Did you cap the bottom or just leave it open? I appreciate the idea, and will post pics of how my turned out. A one legged finisher, that dedication!
 

kwb

Well-known member
Joined
May 1, 2009
Messages
1,781
Location
PNW
I have had several freestanding Jib's installed. Spec for about 250# 12ft reach was a 48x48x48" cube and a specific rebar cage.

There are ways to attach to a structural slab as well but you aren't going to have that in a typical (even at GJ specs) home garage build.
 
To avoid these ads, REGISTER NOW!
Top Bottom