
kalthans
Member
I've been meaning to start this build thread for some time, but am only now getting around to it. I'd been using a flimsy Northern Tool welding table for some time and needed something sturdier and truer to work with. I knew early I wanted something that had the ability to shift my vise and grinder off my workbench so I could free up that space a little.
Luckily I stumbled on Duker's welding table build. I was absolutely floored. It was like those moments in movies where the clouds open up and a shaft of sunlight bathes the object of your desire in golden hues. I will admit now that I immediately set out to shamelessly copy a lot of the features he incorporated into his table.
First and foremost I loved the way he incorporated vertical tool boxes into his table. I was on a bit of a budget, so instead of Mac I went with Harbor Frieght. My the space in my garage was limited...I'd be working with a top around 24x48 instead of Dukers 38x60. (it actually ended up being 26x48 for reasons i'll go into later). so I knew I wouldn't be able to bookend the bench with tool boxes.
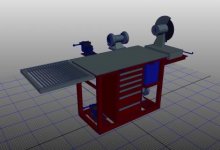
I started by pre visualizing the layout in Maya. A fabrication specific software package would have been more appropriate (like Solidworks), but Maya is what i was most familiar with, so that’s what I went with. I tried using some engineering plugins for it so i could use standard steel materials as primitive shapes, but it was more trouble than what it was worth. In the end I found the easiest thing to do was to create a starter primitive shape of known size (in this case a one-foot long section of 2x2 square tube) and then clone & scale that as necessary to create the various dimensions required for the build. it was surprisingly easy once i got a lot of the scale multipliers memorized (i.e. a 1.5 scale equated to 18 inches, etc).
Here’s the layout i started with. The most notable design feature beyond all of Duker’s base features is the provision for mounting accessories around all four sides of the table. The two short ends of the frame have the 2x2 tubes spaced 22” apart. That same dimension is present on the interior cross sections that poke out of the long side of the table. This means any accessories I want to plug in (like the plasma table and cutoff saw) can be switched to any of the four sides. The 22” dimension was dictated by the width of the toolbox in the middle. (More pix to come of all this later).
I'm pretty far along in the build, but would love feedback and suggestions (be brutal, i can take it).
Once again, I can't give Duker enough credit for how inspiring his build was. Thanks so much for the expansive build thread and YouTube video.

Luckily I stumbled on Duker's welding table build. I was absolutely floored. It was like those moments in movies where the clouds open up and a shaft of sunlight bathes the object of your desire in golden hues. I will admit now that I immediately set out to shamelessly copy a lot of the features he incorporated into his table.
First and foremost I loved the way he incorporated vertical tool boxes into his table. I was on a bit of a budget, so instead of Mac I went with Harbor Frieght. My the space in my garage was limited...I'd be working with a top around 24x48 instead of Dukers 38x60. (it actually ended up being 26x48 for reasons i'll go into later). so I knew I wouldn't be able to bookend the bench with tool boxes.
I started by pre visualizing the layout in Maya. A fabrication specific software package would have been more appropriate (like Solidworks), but Maya is what i was most familiar with, so that’s what I went with. I tried using some engineering plugins for it so i could use standard steel materials as primitive shapes, but it was more trouble than what it was worth. In the end I found the easiest thing to do was to create a starter primitive shape of known size (in this case a one-foot long section of 2x2 square tube) and then clone & scale that as necessary to create the various dimensions required for the build. it was surprisingly easy once i got a lot of the scale multipliers memorized (i.e. a 1.5 scale equated to 18 inches, etc).
Here’s the layout i started with. The most notable design feature beyond all of Duker’s base features is the provision for mounting accessories around all four sides of the table. The two short ends of the frame have the 2x2 tubes spaced 22” apart. That same dimension is present on the interior cross sections that poke out of the long side of the table. This means any accessories I want to plug in (like the plasma table and cutoff saw) can be switched to any of the four sides. The 22” dimension was dictated by the width of the toolbox in the middle. (More pix to come of all this later).
I'm pretty far along in the build, but would love feedback and suggestions (be brutal, i can take it).
Once again, I can't give Duker enough credit for how inspiring his build was. Thanks so much for the expansive build thread and YouTube video.
Attachments
Last edited:


