To avoid these ads, REGISTER NOW!

Dukers Garage Projects

Duker

Well-known member
Joined
Sep 25, 2010
Messages
10,861
Location
Livingston, TX
I am in simple awe of the many members of this forum at not only their skills but their ingenuity. The wealth and depth of knowledge is amazing. The number of ideas I have pulled from my short time on the forum outnumbers my ability to implement them in my future dream workshop.

While there are some amazing dream workshops that have been chronicled here ( and I admit I am extremely envious ) its the guys who taken limited resources and restored equipment to better than new or have taken their limited space and have come up with creative solutions that have impressed me the most. You can almost feel the pride when they post their story to the board.

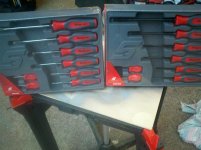
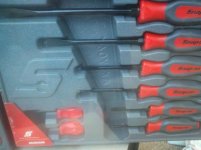
I thought my workshop and tool collection was OK but how quickly I have been humbled by guys who have nine drawers of screwdrivers and 5 drawers of sockets. Yes, maybe thats a little obsessive compulsive but we all have our own idiosyncrasies. I was actually doing alright on my tool budget until I joined this list but now I find myself browsing the SO catalog adding items to my wish list that I will probably never buy, hell I didn’t even know I needed those tools until I came here! Sure, the idea of blowing my children’s college fund on new tools and a new workshop has crossed my mind more than once, but for now like many I work out of my garage looking for opportunities to upgrade my tools whenever I can until the day I can build that dream shop.

But alas I digress....

A little brief history:

I am third generation woodworker as my family history goes but I pay the daily bills by my work in the investment business. Early on in my career I took a sabbatical from the investment world and worked full time as a cabinet and furniture maker. Business was good and soon I had a three year backlog of orders. However, life threw my wife and I a curve in trying to start a family and soon our only option was adoption. The good news is that three beautiful children now grace our home but at a cost of me going back into the investment business as the disparity of income was too great and two of my children have special needs. Now my time is limited to working on projects at night or on the weekends.

The goal of this thread is to contribute in some small way to guys like myself who love the challenge of building something but are not professional wrenchers or fabricators. I love to weld but I appreciate a good welder who is a craftsman and the same for mechanics. To me you can never fully appreciate someones skill (or why the charge what they do) until you have tried it yourself. This will be the story of my workshop adventures, mistakes and all....

Regards

Duke aka Duker


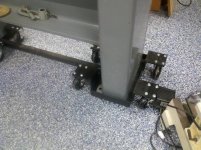
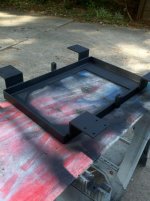
My first post in the thread is a video of a small conversion of a Rockwell Delta lathe that I bought at auction a few weeks back. The link below describes my weekend project of converting a three phase lathe I bought at an auction to single phase and wiring up a reversing drum switch. I also show the mobile base I built. However, as mentioned above I will show when things do not always go as planned....:)


The following projects will soon follow...

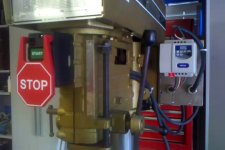
Wiring up a VFD- Variable Frequency Drive to a Powermatic 1200 Drill press (another auction buy)
Custom Wrench holders
Custom Socket storage
Custom Socket Rails
T-Handle Hex Key tote tray for metric and sae
 
To avoid these ads, REGISTER NOW!
OP
D

Duker

Well-known member
Joined
Sep 25, 2010
Messages
10,861
Location
Livingston, TX
Touche....

So you didn't dig the youtube video...lol I will posts pictures and use video when it might make the examples easier to follow. Thanks.
 

cryptrx

Active member
Joined
Mar 28, 2010
Messages
27
Duke,

great video and very well lit shop. Thanks for taking the time, out of what must be a very busy schedule, to post.

I am interested in what you think of the lathe, as I am planning on going to an auction next week to bid on the very same model. Thanks for saying how much you paid for it.

I am also looking forward to your opinions on the PM1200 drill press. From the pictures I've seen of them, they are pretty heavy duty.

And, if you're serious about letting go of the LVC starter/transformer doohickey setup, I am interested.

Thanks

-- Bill
 
OP
D

Duker

Well-known member
Joined
Sep 25, 2010
Messages
10,861
Location
Livingston, TX
Duke,

great video and very well lit shop. Thanks for taking the time, out of what must be a very busy schedule, to post.

I am interested in what you think of the lathe, as I am planning on going to an auction next week to bid on the very same model. Thanks for saying how much you paid for it.

I am also looking forward to your opinions on the PM1200 drill press. From the pictures I've seen of them, they are pretty heavy duty.

And, if you're serious about letting go of the LVC starter/transformer doohickey setup, I am interested.
j
Thanks

-- Bill


Bill, PM me your address and I will send the starter to you.

In regards to the drill press it is a beast. I couldn't pass it up even though I have an old Delta 17 already that is also pretty heavy and well built. The drill press came from the UT college system here in Texas and barely looks used. The press is three phase as well but I have a Toshiba VFD that I can use for the phase conversion and speed selections. The only thing it appears to be missing is the chuck and taper. If you know of anyone with a nice Jacobs chuck and 3MT shaft I am in the market! :) I will hopefully get it wired up and build the mobile base for it in the next couple of weeks.

As for the Rockwell lathe, it seems to be a pretty solid little lathe. A few years back I had a similar Powermatic and it appears to very close in its capabilities with the inboard and outboard turning. I replaced the belt with a link belt and the vibration at the head is minimal. If you use a short spur in the tail stock and have half the tail stock on the bed you can squeeze 40" between centers so its pretty accurate that the capability is listed at 39". If there is anything else I can add let me know.
 

Attachments

  • Powermatic1.jpg
    Powermatic1.jpg
    142.3 KB · Views: 1,211

cryptrx

Active member
Joined
Mar 28, 2010
Messages
27
Duke,

PM sent


Both of those machines appear to be in great condition. I'd say that definitely calls for a you **** considering what you paid for the lathe.

Thanks for your opinions on the press and the lathe. Makes me feel more confident in bidding on the lathe next week.

When you get the Drill Press up and running, it would be good to know what you think of the variable speed system in a drill press, verses a change pulley setup. Is their a loss or gain of power at certain speeds, or do you prefer one over the other for any reasons?

Thanks again

-- Bill
 

rburke65

Well-known member
Joined
Nov 10, 2007
Messages
12,349
Location
Canfield, Ohio
Oh no!! Some who can write a proper sentence, spell, convey a thought, punctuate, and use periods! Nice video.
 
OP
D

Duker

Well-known member
Joined
Sep 25, 2010
Messages
10,861
Location
Livingston, TX
It has been a good Saturday, I was able to complete some projects and find what I think was a decent bargain off of CL. I spotted an ad for some Snap On screwdrivers late Friday night and early this morning I went and bought two new 8 piece sets of screw drivers still in the packaging. I dont really need two sets but for $150 bucks I couldn't pass them up. One is the black finish (GSHDX80R) and the other is regular chrome finish. I am trying to decide whether I like the chrome or black finish better to determine which set I may sell. So far I am leaning towards keeping both! You can never have too many tools right?? :thumbup:
 

Attachments

  • Snapon1.jpg
    Snapon1.jpg
    138.7 KB · Views: 517
  • Snapon2.jpg
    Snapon2.jpg
    141.1 KB · Views: 372
  • Snapon3.jpg
    Snapon3.jpg
    139 KB · Views: 359
Last edited:
OP
D

Duker

Well-known member
Joined
Sep 25, 2010
Messages
10,861
Location
Livingston, TX
One of the projects I finished up today was the mobile base to my Rockwell lathe. In the previous video I did, I mentioned a “flaw” in the original design of the base. I was able to fabricate, weld and install the additional casters needed to remove the flex.

I also finished up the base of the Powermatic 1200 drill press I bought at auction recently. I will hopefully have a video out tomorrow if I can finish up the wiring for the VFD that I am installing.

Here are some pics of the complete lathe mobile base.
 

Attachments

  • lbase1.jpg
    lbase1.jpg
    147.5 KB · Views: 736
  • lbase2.jpg
    lbase2.jpg
    149.7 KB · Views: 616
  • lbase3.jpg
    lbase3.jpg
    151.4 KB · Views: 559
Last edited:
OP
D

Duker

Well-known member
Joined
Sep 25, 2010
Messages
10,861
Location
Livingston, TX
The other project I was able to knock out today was this mobile grinding and sanding station. I have had some of these tools sitting in storage and others mounted on individual stands. I was tired of trying to move them around to gain access to them. By creating a larger surface area I was able to consolidate them down to one mobile base using some legs from an old lathe that I had rebuilt years ago and mounted on a new base. The legs were too nice to toss and they finally were put to good use. I need to clean up the surfaces of the tools as the humidity has rusted everything again even though I had Boshield on them. Love that Houston Humidity even in a drought.
 

Attachments

  • sand3.jpg
    sand3.jpg
    145.1 KB · Views: 778
  • sand2.jpg
    sand2.jpg
    145.5 KB · Views: 722
  • sand1.jpg
    sand1.jpg
    145.3 KB · Views: 980
OP
D

Duker

Well-known member
Joined
Sep 25, 2010
Messages
10,861
Location
Livingston, TX
The last project I was able to complete (little re-work still needed to be done) this weekend was for a Powermatic 1200 drill press i recently acquired at auction. I finished the mobile base and converted from three phase by adding a variable frequency drive (VFD). The following pics are the base and some components of the stabilizers on each side to keep the base from moving.

I will be uploading a video shortly that walks through the project briefly. Apologies in advance for the shaky camera phone video quality.
 

Attachments

  • Dbase05.jpg
    Dbase05.jpg
    106.5 KB · Views: 654
  • Dbase01.jpg
    Dbase01.jpg
    145.3 KB · Views: 574
  • Dbase03.jpg
    Dbase03.jpg
    145.9 KB · Views: 541
  • DBase02.jpg
    DBase02.jpg
    138.6 KB · Views: 526
Last edited:
OP
D

Duker

Well-known member
Joined
Sep 25, 2010
Messages
10,861
Location
Livingston, TX
Here is the video walking through my drill press project. Again, apologies for the shaky and fuzzy video. I am using the camera on my phone so the resolution and my camera skills are mediocre at best.


kngkong

Well-known member
Joined
Oct 25, 2009
Messages
368
Location
Wellington, New Zealand
Here is the video walking through my drill press project. Again, apologies for the shaky and fuzzy video. I am using the camera on my phone so the resolution and my camera skills are mediocre at best.


Hey Duker,

Checked out your video. Nice job

I had installed a VFD on my Bridgeport and everyone made it clear not to run power to motor through a switch from VFD and that it should be direct. You can remotely control the VFD via control wires so you can run your start/stop switch like that but for the health of the vfd through a switch was not suggested.

I could never get an answer as to why though.
This is what I found, would like to know if you have found differently.

Thanks for the videos, subscribing.
 
Last edited:
OP
D

Duker

Well-known member
Joined
Sep 25, 2010
Messages
10,861
Location
Livingston, TX
kngkong,

I tried to find some research indicating why there should not be a switch in between the VFD and the power source. Each reference I found referred back to the starter switch. I thought it might have something to do with the magnetic contacts perhaps because the inverter does stay powered up for about 30 seconds after the power is turned off so maybe it is a safety issue? At this point I really dont have a good answer or rationale. My rationale for having the safety kill switch was that it is easier to replace a VFD versus one of my body parts if things started going bad in a hurry! :)

If you happen to come across any information please pass it along. Thanks.
 

kngkong

Well-known member
Joined
Oct 25, 2009
Messages
368
Location
Wellington, New Zealand
just had a quick look

a couple quotes from this thread

"Switching the output side of a VFD is generally not done, because the resulting voltage spikes generated by interrupting the current through the inductive motor windings can destroy the output transistors in the VFD."

"You can switch the output of a VFD only when it is at zero hertz i.e. stopped."

You can still control your vfd from the emergency stop switch by using the control relay wires to your vfd. Instead of running the power through the switch you run relay wires from your switch and control the vfd.
 
To avoid these ads, REGISTER NOW!
OP
D

Duker

Well-known member
Joined
Sep 25, 2010
Messages
10,861
Location
Livingston, TX
Thanks, for the link. I will dig through those posts. Since I have it switched on the input side it's more like a loss of power versus the risk of power spikes that could occur if switched on the output side. The manual does discuss some relay switching options so it may be time to call in the professional help before I cook my VFD. Thanks Again.
 

cryptrx

Active member
Joined
Mar 28, 2010
Messages
27
Hi, duke,

Thanks for posting another great writeup of your projects.

As for the VFD, I have also heard that putting a switch between the VFD and the motor is bad for the transistors-- both from the manufacturer of my VFD and from those on the Practical machinist forum dedicated to VFDs and such.

On my mill I connected the E-stop to the VFD control inputs allotted for it. Going this route comes with the added bonus of being able to use the breaking feature of the VFD to stop the motor as quickly as you want.

Most VFD manufacturers have really crappy manuals for their products but great technical support people that will spend the time to help you sort out any problems without rushing you.

Hope this helps,

-- Bill
 
Last edited:
OP
D

Duker

Well-known member
Joined
Sep 25, 2010
Messages
10,861
Location
Livingston, TX
Thanks Bill, That's a good idea. I will call or send an email to the folks I got the VFD from to see if they can offer some help and information. The Practical Machinist site does have a wealth of information although it is tough sometimes to narrow it down to the pertinent threads and dig out what you need.
 
OP
D

Duker

Well-known member
Joined
Sep 25, 2010
Messages
10,861
Location
Livingston, TX
Its been awhile since I have been able to complete a project in the garage. I am currently in the midst of building an 8’ x 12’ shed, restoring two Powermatic jointers, two Powermatic belt/disc sanders, and a Clausing drill press. I just picked up this week another project which is a Blackhawk S4 jack that needs to be restored.

The latest project that I can now check off the to-list is a Wilton Bullet vise. I bought the vise from a GJ’er and this is what it looked like upon disassembly.

Vise1.jpg


Vise2.jpg


Vise3.jpg


Vise4.jpg


All in all , the vise was in pretty good shape outside of rust and dirt and some minor repairs. It was interesting to find that the vise was made of different date stamped parts so this looks like it was someone else’s project a few years ago scrounging parts to make a complete vise.

After a lot of wire brushing and scrubbing it was ready for some paint. It had been a while since I masked something off so it took a little practice to get back in the swing of making the curves with tape again. Unfortunately I didn’t take any pictures during this part of the process.


Vise5.jpg


I am planning to build a workshop in the fall and I will be going with a red and black color theme (yes I know not very original) so I matched up the color of the vice to go with some cabinets I will be making including a workbench similar to GJ member Steevo’s bench. However, I will be going with the 56” HF cabinets as the depth and length of the drawers better fit my woodworking tools. The color is Harbor Freight Red but since I would rather not call it that I am going to go with my custom color of Duker’s “Arrest Me Red” with thanks to the guys at my local Ace hardware for getting the color almost dead on.

Vise6.jpg


Vise7.jpg


Vise8.jpg


I was also going to file down the hammer marks and clean up the jaws some more but I kind of liked that this vise had been used and showed its history. I still have some clean up to do where my taping was a little “off” and at some point I might highlight the letters on the vise but for now its done! Hopefully, it will serve me (and if I am lucky my son) for years to come. :)
 
OP
D

Duker

Well-known member
Joined
Sep 25, 2010
Messages
10,861
Location
Livingston, TX
Today is clean up in the shop as I can longer move around and I am tired of moving the same thing out of my way 20 times to get something done.

Two of the things I kept moving were some Nicholson File sets I bought back in the “Amazon File Bonanza” last year and the other was a box I got from Prince’s Auto a couple of weeks ago (both thanks to the GJ Hot Deal Index.)

A simple project I have been wanting to do was find some ergonomic file handles like I have on one of the Nicholson file sets.

File1.jpg


I kept searching the web and when I would find the handles at a decent price (i.e. like $3.95ea) they would either be out of stock (on perpetual backorder) and suggest a more expensive replacement (i.e. $12.95ea) or sell out completely before I could get an order into the system.

So, back to the Prince’s box…. Prince’s ran a no shipping cost special and one of the items was a cheap set of screwdrivers with some ergonomic handles for $8.00. For the price of one Nicholson handle with shipping I could do the whole set so they sucked me in and I bought the screwdrivers.

Today I took the handles off and installed them on my other set of files. At first I tried the pry bar method in the vise but that was not working so I ended up taking a propane torch and heating the screwdriver shaft and working the handle off that way. While the plastic was still soft I replaced the handle on the file. I had a little bit of handle melt where the hard plastic contacts the rubber handle but they are on the files nice and solid.

However, for 8 bucks I now have another set with comfortable handles that are even color coded, yellow for round and red for flat. I kept my OCD to minimum and didn’t put them all on the same way lining up the colors but boy did I have to resist the urge…. :)

They worked so well I am trying to see if I need to run to Harbor Freight tomorrow with my 25% off coupon and pick up another set for some other round files I have.

File2.jpg
 
OP
D

Duker

Well-known member
Joined
Sep 25, 2010
Messages
10,861
Location
Livingston, TX
Re: Dukers Garage Projects - The Shed

I have not been able to spend as much time in the shop as I would like to due to my better half's projects. One of her long time requests was to have a garden/potting shed that looked like a little cottage. I had been putting the project off but recently she said I could use some of it for lumber storage and it quickly moved up the to-do list (funny how that worked out.)

Due to my HOA restrictions the largest shed I could have was a 100 square feet so I ended up building a 8' x 12' with a little lean too off the back. I went with this versus a 10x10 as I wanted to try out building a hip roof and this dimension worked better at keeping the roof profile a little lower so my neighbors wouldn't see a higher pitched roof.

I just finished building the front and side steps today which leaves a little more trim, cutting off the Tyvek wrap hanging beneath the Hardie Plank, some flower boxes and final paint.

Shed_1.png


Here is a side view.

Shed_2.png


I built some lumber racks on the inside and I was also able to add racks made from 4x4's and 3/16" angle under the lean-too as well for some outdoor wood storage for woods like Ipe, Cedar and other species of wood that I use occasionally.


Shed_LR1.png
 

machine_punk

Well-known member
Joined
May 14, 2011
Messages
2,540
Location
Napa Valley, California
Looking great, DUKER!

Down here, we can get those Nicholson file handles at Home Depot...I have them on all my main files.

That shed looks great! I'm sure your wife will be pleased with that as a potting shed. That is an interesting idea, using the angle iron as the supports for your wood storage.

M_P
 
OP
D

Duker

Well-known member
Joined
Sep 25, 2010
Messages
10,861
Location
Livingston, TX
Looking great, DUKER!
That shed looks great! I'm sure your wife will be pleased with that as a potting shed. That is an interesting idea, using the angle iron as the supports for your wood storage.
M_P

Thanks M_P, I am glad the shed is almost done. It might buy me a weekend for my own projects! :)

As for the lumber racks, they are a quick and simple design. Its a common method that can be seen "down east" in Maine quite a bit. If you use wet treated lumber you want to stack them up right away with lumber so that they all contract at the same rate and same level. This was a lesson I learned from some built many years ago.
 
OP
D

Duker

Well-known member
Joined
Sep 25, 2010
Messages
10,861
Location
Livingston, TX
It has been awhile since I have been able to post an update on projects in the garage. I have the following projects underway but as usual none close to being completed.

Cherry Cabinets for a home office
Saw Blade holders (for dado sets etc)
Mahogany Trim for interior of front door.
Raised Shutters for exterior windows.
Mobile base for metal band saw I bought at an auction.
Wood working bench
Clausing Drill Press
Welding Table
And the list goes on…

This week I was able to get running a Wells 8M band saw I bought off of Craigslist awhile back. I had been looking for a bigger saw than my little Harbor Freight unit for rough cutting larger pieces of metal for a long time. While my little HF saw has served me well and I have certainly gotten my money’s worth of cuts, I wanted something a little more substantial and something I didn’t have to shim or set up every time I wanted to cut something wider than two inches!

Wells1.jpg


Wells2.jpg


The Wells is a solid beast of a saw. I added a Teco N3 VFD since the saw was three phase to be able to run it in my little shop. This also allowed me to easily convert it to variable speed without having to adjust the belt. I put the VFD into an enclosure to keep chips and debris out.

Wells3.jpg


Originally the saw had a mechanical stop, which still functions, but the contacts were getting very worn (another project to rebuild one day) so I installed start/stop push buttons wired to the VFD to operate the saw. I am waiting for a contact switch I ordered to bring it back to an automatic shut off. However, the saw operates great with just the buttons so that project may get shelved for awhile.

Wells4.jpg


The saw was a first step in the next project on the list which is a welding table. I will start a separate thread on that build but here a pic of the one of the casters I am using sitting on top of a tool box that I also found off of Craigslist that will be mounted under the table.

WeldTable1.jpg
 
OP
D

Duker

Well-known member
Joined
Sep 25, 2010
Messages
10,861
Location
Livingston, TX
Update on some recent projects... I finally finished the welding table! There is a thread in my signature if you want to see the end result. For a fathers day gift I built my dad a workbench based on Steevo's design. My dad had a couple of craftsman tool chests and I bought him a Harbor Freight chest and used it to complete this workbench. It was a fun project and he is ecstatic to have the extra storage for all of his turning supplies.
 

Attachments

  • FathersDay.jpg
    FathersDay.jpg
    105.9 KB · Views: 499
OP
D

Duker

Well-known member
Joined
Sep 25, 2010
Messages
10,861
Location
Livingston, TX
The Houston heat has killed almost all willpower to work in the shop but I did manage to finish up what was supposed to be one of those “simple” projects - a mobile base for a Jet metal band saw I acquired at auction awhile back.

BSaw.jpg


With my new welding table and dry cut set up it was a joy to cut and weld up the parts. However, I should have known things were going to get worse when I started to rush the project. When the temp outside is 100+ degrees the last things you want to wear are sleeves and I paid the price when I didn’t pay attention and set my elbow down on the last bead I had done and singed the skin while finishing up the frame. It was late, I was tired and I threw in the towel until this weekend.

Today I got a few hours this morning to finish up painting and putting the casters on the frame. My neighbor helped me move the saw to the new frame and it was immediately obvious that my measurements were off. It would still work but it just frustrates the heck out of me when I make simple mistakes.

My mounting plans went somewhat awry as well when I went to get some threaded L bolts they were out. I had to buy a U bracket and cut the ends to make the mounting hardware. I had chose this method to bolt the band saw down to the frame as I intend to build a slide in case that will have two drawers in it for storage. Using through bolts would have made that difficult to work around.

BSaw1.jpg


Since I tend to learn more from my failures then I do from my success I may go back and rethink the design. While the current set up is solidly mounted to the frame I probably would have been better off adjusting the frame size and using some carriage bolts as this method of mounting while effective is just plain ugly. I still need to cut off the bolts which will make it a little better looking.

BSaw2.jpg


BSaw3.jpg


The good... The casters I bought from Caster City work great. It is as smooth as can be when rolling around the shop. I would highly recommend them.

The bad... It is so smooth that I am afraid even with the casters locked it might slide on the floor when pushing a piece of metal through the saw. I will have to test it out later to see if that is the case.

So, what was supposed to be a easy, few hours project ended up scorching some skin and looking like a hack job. At least for now I can move it off to the side easily without having to drag it across the floor or using a dolly to move it.
 
OP
D

Duker

Well-known member
Joined
Sep 25, 2010
Messages
10,861
Location
Livingston, TX
Had a fun little project this weekend that snuck into the to-do list. A couple of months ago I was one of the lucky folks who were able to take advantage of a sale posted in the “Hot Deals” section of the board. The deal was the Harbor Freight industrial sand blast cabinet that normally retails on the site for $999.99. For under $350 delivered to my door I couldn’t pass it up. The problem was I now had a very large immovable object blocking the front of my garage.

I assembled the cabinet to measure for a mobile base. I didn’t have any channel large enough so I ended up making a run to my local steel supply to buy some 4” channel and some 1.5” square tube.

I fabbed up this mobile base using some casters I had purchased previously at HF that I had planned on using for another project.

HFSandBlast1.jpg


I made the pedal part of the mobile base. All I have left to do is mount the foot pedal to the base and it is ready for blasting.


HFSandBlast2.jpg


I wanted to test how it would roll and it was much better than I expected. I can now center the cabinet in the channel and secure it with a bolt.

The height ended up being perfect as I can pull up my Craftsman stool and reach the pedal to engage the gun.

Next major project is a revamp of the shop and hopefully start on my version of a Steevo workbench. In tribute to Steevo I have named it Steevo on Steroids.... It 6 sections of bench but the configuration is not exactly what you might think.... :)
 
OP
D

Duker

Well-known member
Joined
Sep 25, 2010
Messages
10,861
Location
Livingston, TX
It seems like forever since I have been able to post an update on a garage project. This weekend I completed stage 1 of what I am calling my workstation. This project is a tribute and blatant copy of Steevo’s great contribution to the site. Hopefully, (if all goes as planed) I will have taken his concept and added my own little twist. The workstation will be a series of workbenches and built in storage.

Why a workstation and not just a workbench? Well, as can happen in life, I was thrown a curve recently. I had big plans to have started on my new workshop in December but some major current and future medical expenses for my youngest daughter have postponed that indefinitely.

So, facing both stress and disappointment, I decided to take the pile of lemons now tossed in my lap and make one huge *** margarita in an effort to give me something else to focus on and thus the birth of the workstation.

Since no new workshop was on the horizon I decided to re-do my garage and take a little bit of my former build budget and splurge on a new set of workbenches and storage that I will leave as a little mystery for now. I will have a separate thread that will detail the whole process once I get a little further along in the build.

Here is the beginning of stage 1 of the build – the first workbench. This bench will house two HF 56” cabinets. There will be two of these in the same corner configuration as Steevo’s workbench. However, this will also have a center cabinet separating the two at a 45 degree angle. I will explain why I chose the 56” cabinets in the separate build thread.

Workbench2.jpg


The challenge with the 56" cabinets is their height and weight. The final height of the bench may be taller than most folks may be comfortable with but after working on my welding table which is higher than standard I have enjoyed having a taller work surface. Additionally, I had to add some extra center feet to account for the span and weight.

End view:

Workbench1.jpg


That's it for now. Hopefully I will have enough done by Thanksgiving to start the build thread and delve more into the details.
 

Hot Chop shop

Well-known member
Joined
Apr 12, 2013
Messages
628
Location
Las Vegas
Looking forward to your version of SteveOs bench.. I recently built a smaller version and love it... I actually just finished my dedicated welding table and I came across your design... Very impressive how it turned out, it's making me rethink some stuff... Just when I was so happy to get off welding on the floor...


Sent from my iPad using Tapatalk HD
 
OP
D

Duker

Well-known member
Joined
Sep 25, 2010
Messages
10,861
Location
Livingston, TX
I was so happy to get off welding on the floor... Sent from my iPad using Tapatalk HD

I felt the same way after building my table. Up until I finished the table I was usually on the floor trying to piece things together. It has made a huge difference as I am sure you have experienced. I just wish I had more time to use it! :)

I took a look at your bench and table. Very nice work! :thumbup:
 

Hot Chop shop

Well-known member
Joined
Apr 12, 2013
Messages
628
Location
Las Vegas
I felt the same way after building my table. Up until I finished the table I was usually on the floor trying to piece things together. It has made a huge difference as I am sure you have experienced. I just wish I had more time to use it! :)

I took a look at your bench and table. Very nice work! :thumbup:

Hey thanks.... My back sure is a lot happier... I find there is never enough time in the day to play in the garage... Life seems to always get in the way.

I had so much fun building the bench I'll probably redo it down the road if I ever manage to close on a house...after I move it, I might cut it in half and add a hole in the middle to be able to push a stool in and also add a receiver hitch for a vise/grinder and a retractable hose reel and extension cord reel or just add another section to the end... As long as I do it when it's not July here and I am not being roasted.

Also that vise on your welding table is awesome! I also unfortunately found the vise thread here and I am hooked... I have bought several locally but haven't had any luck finding a massive one that is over-kill that for some reason I need... I keep putting off drilling holes in either bench to permanently mount one cause I know I'll eventually find a big guy.
 
OP
D

Duker

Well-known member
Joined
Sep 25, 2010
Messages
10,861
Location
Livingston, TX
I really like your bench grinder/sander station that you made, thanks for sharing your builds!

Thanks Jesse, it has worked well in that it's accessible and mobile so that I can store it out the way or roll it out to the driveway when I have to create a lot of dust. I read your workbench build and I like the stain.

Also, let me add my thanks for your service to our country. My neighbors across the street lost their son in Iraq and it's always a sobering reminder when his unit comes to their house on the anniversary of his death to visit "Mom" as they all call her.


Really inspiring work.
And inspiring story of the sacrifices you've made for your kids and family. Well done.

Matthew.

Thank you for the comments Matthew. I am no different than any other dad in that you "do what you gotta do" for your kids. Hopefully, one day I will get to build my shop but I would trade it everyday for the health of my family.
 
To avoid these ads, REGISTER NOW!
Top Bottom