To avoid these ads, REGISTER NOW!

Dumb question, how to cut baseboard to go around a half pole?

To avoid these ads, REGISTER NOW!

Shiftless

Well-known member
Joined
Mar 9, 2014
Messages
14,595
Location
East Bay SFO
If you need a filler that will sand REALLY smooth, use this.
Pre fill the deep cracks. Let it dry. Then smooth on a thin coat with a flexible putty knife or even better a plastic spreader. Then sand with fine paper...like 400. Even better, a sanding sponge.

Then prime paint, inspect, use more 907 if necessary, re-prime and paint.

This stuff dries and hardens very quickly. Get it online or at the auto parts store.

This will enable a smoother job than any wood filler I have ever tried.

Do any of you guys use this on wood instead of on auto body? I do.


.
 

Attachments

  • F54559CF-1F29-4D98-A5AD-A0A27A9CA328.jpg
    F54559CF-1F29-4D98-A5AD-A0A27A9CA328.jpg
    65.4 KB · Views: 53
Last edited:

Falcon67

Well-known member
Joined
Jun 11, 2009
Messages
18,371
Location
Merkel, TX
Looks like the same base mold we use in this house. Kudos, I would have just feathered the ends into the pole and gone on down the wall.
 

Innovate1

Well-known member
Joined
Jul 28, 2014
Messages
4,299
Location
Illinois near St. Louis, Missouri
Looks really good so far. I like how you did a test case with scrap material. Makes the final job go so much more smoothly and turn out more like you expect. It's overkill for some but it's well done details like this that really make something stand out from typical.
 
OP
N

NewShockerGuy

Well-known member
Joined
Oct 12, 2010
Messages
2,481
Location
Northern Virginia / DC
Forgot to post the pics yeseterday.

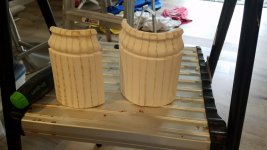
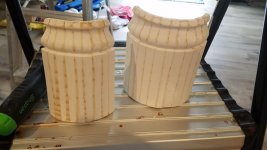
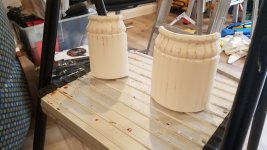
Everything seems to be glued nicely. I sanded and this was the result. It's got it's first layer of filler. So I will be sanding that shortly. Then doing another layer. Hopefully two is all that is needed. I think the only minor issue is going to be when I cope the joint on the flat piece leading into the curve. There will probably be some slight overlap or a gap that will be filled with caulk.. but again, considering my skill level or lack there of, I will be the only person that knows.

The missile idea would have been super cool, i can just see that I would either trip or knock the forward facing fin off.

Iif I had the tools and knew how. I think gluing pieces together then cutting a radius then cutting the mold to the profile would have been faster/proper way to do it.. I just have zero clue how that would have even worked. I can't believe some of the skill on here that people show with wood working and they make it look like it's no big deal. This alone took some time..hahah And it's probably like a 3 out of 10 for how it looks honestly compared to what a carpenter would produce. I did cut the second pole pieces slightly different and added more of an angle on the very end pieces compared to the first. It's funny to see how much the pole sticks out on the one piece compared to the other. Makes me wonder wtf was the person previously doing when they did the basement and why they choose to do what they did.

Appreciate the comments. I'm trying to make it look nice. I feel like the entire basement has taken way longer than it should have. I bought the flooring back in 2018 but that was when my father was ill, then when he passed I had zero motivation to do anything in the basement, I think I was just over whelmed with all of the stuff that needed to be done, from the stairs, to running wire to speakers, bedroom...etc. Finally got out of that funk a while back and said he'd want you to get this **** done already... do it. With Covid, it's kinda been nice working a week on/off because I've been able to get a lot of the trim stuff and details done.

This is the last part so I'm happy it's going and will be done hopefully by the weekend.

-Nigel
 

Attachments

  • curve1.jpg
    curve1.jpg
    116.1 KB · Views: 106
  • curve2.jpg
    curve2.jpg
    61.1 KB · Views: 111

PugetDude

ALLIANCE MEMBER
Joined
Mar 13, 2013
Messages
22,478
Location
Superstition Mountains, AZ
Forgot to post the pics yeseterday.

Everything seems to be glued nicely. I sanded and this was the result. It's got it's first layer of filler. So I will be sanding that shortly. Then doing another layer. Hopefully two is all that is needed. I think the only minor issue is going to be when I cope the joint on the flat piece leading into the curve. There will probably be some slight overlap or a gap that will be filled with caulk.. but again, considering my skill level or lack there of, I will be the only person that knows.

The missile idea would have been super cool, i can just see that I would either trip or knock the forward facing fin off.

Iif I had the tools and knew how. I think gluing pieces together then cutting a radius then cutting the mold to the profile would have been faster/proper way to do it.. I just have zero clue how that would have even worked. I can't believe some of the skill on here that people show with wood working and they make it look like it's no big deal. This alone took some time..hahah And it's probably like a 3 out of 10 for how it looks honestly compared to what a carpenter would produce. I did cut the second pole pieces slightly different and added more of an angle on the very end pieces compared to the first. It's funny to see how much the pole sticks out on the one piece compared to the other. Makes me wonder wtf was the person previously doing when they did the basement and why they choose to do what they did.

Appreciate the comments. I'm trying to make it look nice. I feel like the entire basement has taken way longer than it should have. I bought the flooring back in 2018 but that was when my father was ill, then when he passed I had zero motivation to do anything in the basement, I think I was just over whelmed with all of the stuff that needed to be done, from the stairs, to running wire to speakers, bedroom...etc. Finally got out of that funk a while back and said he'd want you to get this **** done already... do it. With Covid, it's kinda been nice working a week on/off because I've been able to get a lot of the trim stuff and details done.

This is the last part so I'm happy it's going and will be done hopefully by the weekend.

-Nigel

Looks good Nigel! Glad you stuck with it and figured out a solution..
 
OP
N

NewShockerGuy

Well-known member
Joined
Oct 12, 2010
Messages
2,481
Location
Northern Virginia / DC
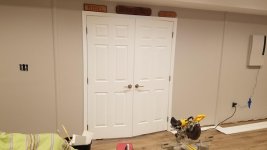
About a day behind with some things but here are some updated rough pics. Baesboards are painted and drying before second coat gets put on.

Took a couple pics of the room to show the pole placement. It's wack. lol

Did two coats of filler and sanded it all down on the round pieces. Looks ok honestly. Once it's fully painted it should hopefully look nice. Obvious small gaps that will get addressed but overall turned out pretty good. Will update once everything is on the wall and caulked.

-Nigel
 

Attachments

  • trim03.jpg
    trim03.jpg
    101 KB · Views: 131
  • trim02.jpg
    trim02.jpg
    101.8 KB · Views: 113
  • trim01.jpg
    trim01.jpg
    137.8 KB · Views: 97
  • room2.jpg
    room2.jpg
    81.5 KB · Views: 86
  • room1.jpg
    room1.jpg
    77.9 KB · Views: 87
To avoid these ads, REGISTER NOW!

aka Larry

Well-known member
Joined
May 2, 2012
Messages
8,099
Location
Eastern, NC
I have to say I thought this sounded like a lot of extra worth for nothing, but I'm happy to say I was wrong, because that looks damn good! Nice details like that really show up in certain situations, and make all the difference.

Nice job man! :thumbup:
 
OP
N

NewShockerGuy

Well-known member
Joined
Oct 12, 2010
Messages
2,481
Location
Northern Virginia / DC
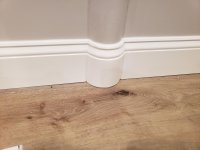
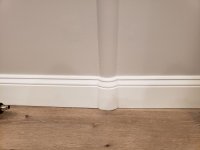
Quick pics below.

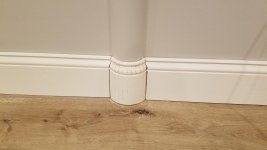
Came out ok. I could have sanded certain areas down more to make it more even but it's over with and at least the baseboards wall look like it was somewhat planned and not half assed like before...lol

-Nigel
 

Attachments

  • baseboard1.jpg
    baseboard1.jpg
    121.4 KB · Views: 72
  • baseboard2.jpg
    baseboard2.jpg
    112.4 KB · Views: 68
  • baseboard3.jpg
    baseboard3.jpg
    90.5 KB · Views: 57
Last edited:

MarkG

Well-known member
Joined
May 23, 2012
Messages
1,219
Location
Elgin, IL
I would back miter the piece on the wall to get close to tangent. Caulk and paint. Small section of pole doesn't have baseboard.

Its the basement and you already have a bump in the wall from the pole so you weren't going for grade-A finishing or you would have firred the wall out and hidden it completely.

Hope that doesn't read as harsh.

I'm with kwb! I've worked with trim carpenters who would have done just that, and it would have been my first choice as well. Nothing wrong with it at all.

The poles would have been hidden inside the wall, typically.
 
Last edited:
OP
N

NewShockerGuy

Well-known member
Joined
Oct 12, 2010
Messages
2,481
Location
Northern Virginia / DC
^ The only problem with doing it that way it and not having the trim go around the pole you would see the gap left from the floor to the pole. There would have been nothing hiding it and it would have looked unfinished. Completely agree about them firring out the wall though.. Still not sure on the thought process of them not hiding the pole like they did from the other side of the basement, perhaps it was cheaper to do it and that's why the original owner did it? Entire basement is finished..perhaps they thought by not doing this in that room you gain 2" of extra width? lol

-Nigel
 
Last edited:

jackman1967

New member
Joined
Jul 25, 2020
Messages
1
Location
ca
Re: Dumb question, how to cut baseboard to go around a half round pole?

rip baseboard at lower detail then cut the lower section on the back about 1/4 inch apart vertically leaving about 3 /16 of material that will be flexable the top i would rip at details you will need to allow for saw blade thickness and cut the back again then wrap the post glue with panel adheshive to bare metal bracing the molding tight go slow not to break the peices when finish bondo sand and paint
 
To avoid these ads, REGISTER NOW!
Top Bottom