Hi all - this will actually be my first post on the forum; have lurked for a while but thought i'd finally pipe up. The level of knowledge here blows me away and this is a total noob question, so go easy on me.
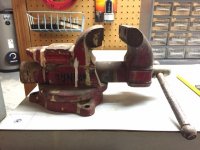
I recently received an old Dunlap 5244 bench vise my dad found in his basement - was my grandfather's. From what i've found online these were made from the late 1940s-early 1960s. Cosmetically it's in pretty rough shape, but all the mechanicals appear to be intact.
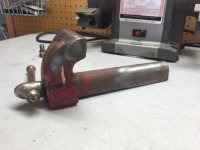
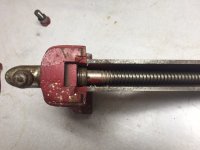
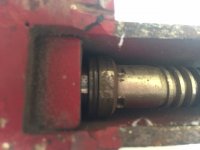
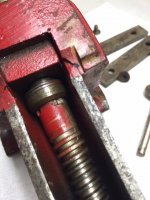
I've started the disassembly process so I can restore it, but i've run into an roadblock - as you can see, there's a big spacer and washers on the main screw inside the dynamic jaw. There are 4 gouges/raised spots on the main screw that are holding these spacers in place. I'd like to get the screw entirely out so I can clean and paint thoroughly, but I can't figure out how to get those washers off.
So far the only thing i've found is the following video of a guy restoring a similar 5244 - he just grinds the raised nubs off with a dremel:
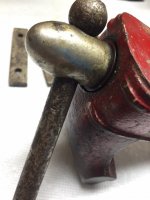
Wondering if there's any way to get the screw out without having to grind it off...i'd be concerned with how the washers would stay in place after I put it back together. So far I haven't been able to get the front handle off...i'm not sure if it comes off or how best to do it.
Any ideas?
Thanks! Oh - if this is the wrong forum, mods please feel free to move it.
I recently received an old Dunlap 5244 bench vise my dad found in his basement - was my grandfather's. From what i've found online these were made from the late 1940s-early 1960s. Cosmetically it's in pretty rough shape, but all the mechanicals appear to be intact.
I've started the disassembly process so I can restore it, but i've run into an roadblock - as you can see, there's a big spacer and washers on the main screw inside the dynamic jaw. There are 4 gouges/raised spots on the main screw that are holding these spacers in place. I'd like to get the screw entirely out so I can clean and paint thoroughly, but I can't figure out how to get those washers off.
So far the only thing i've found is the following video of a guy restoring a similar 5244 - he just grinds the raised nubs off with a dremel:
Wondering if there's any way to get the screw out without having to grind it off...i'd be concerned with how the washers would stay in place after I put it back together. So far I haven't been able to get the front handle off...i'm not sure if it comes off or how best to do it.
Any ideas?
Thanks! Oh - if this is the wrong forum, mods please feel free to move it.