To avoid these ads, REGISTER NOW!

Eastern PA shop addition

Finallygotit

ALLIANCE MEMBER
Joined
Jul 6, 2013
Messages
4,086
Location
Tucson, AZ
attachment.php


You might want to find out what caused those gear teeth to strip. I had that happen on one of my vehicles. Would up being a blend door was getting pinched due to the housing warping inward. That was a fun fix. :headshake

:beer:
 
To avoid these ads, REGISTER NOW!
OP
T

tweidman

Well-known member
Joined
Dec 1, 2009
Messages
505
Location
Ackermanville, Pa.
You might want to find out what caused those gear teeth to strip. I had that happen on one of my vehicles. Would up being a blend door was getting pinched due to the housing warping inward. That was a fun fix. :headshake

:beer:

I did some reading up on this and it seems to be a really common issue with my generation truck. The new one is working perfectly with no issues. The first one lasted 100k so I can't complain too much. Fingers crossed that I don't have any other issues.:evil:

I'm not sure if the Doorman replacement part is using better plastic on those gears, or maybe not? :headscrat
 
OP
T

tweidman

Well-known member
Joined
Dec 1, 2009
Messages
505
Location
Ackermanville, Pa.
I can't believe I spent almost the whole weekend installing this beast. :willy_nil
The old opening was for a single oven and removing all that 50's brick was a total pain. This a job that I am very happy is over. My wife is happy, just in time for turkey day. :rocker:
 

Attachments

  • 20171112_141056.jpg
    20171112_141056.jpg
    147.6 KB · Views: 125
OP
T

tweidman

Well-known member
Joined
Dec 1, 2009
Messages
505
Location
Ackermanville, Pa.
I just noticed the other day the my epoxy floor is not holding up. Where I park the epoxy is lifting. I don't know what I could have possibly done wrong to cause this? I went out of my way to make sure I prepared the floor before putting it down. Anyone know if it's possible to fix this? :mad:
 

Attachments

  • 20171112_183641.jpg
    20171112_183641.jpg
    148.5 KB · Views: 98
  • 20171112_183714.jpg
    20171112_183714.jpg
    155.2 KB · Views: 106
Last edited:

Finallygotit

ALLIANCE MEMBER
Joined
Jul 6, 2013
Messages
4,086
Location
Tucson, AZ
Sorry you have this to deal with. I have never had that problem and I put a few of those floors down. I would be interested to hear if that is indeed repairable.
 
OP
T

tweidman

Well-known member
Joined
Dec 1, 2009
Messages
505
Location
Ackermanville, Pa.
Sorry you have this to deal with. I have never had that problem and I put a few of those floors down. I would be interested to hear if that is indeed repairable.

I started a new thread in the flooring section and posted this as well. I think it will get more attention over there? I sure hope I am not starting over with my floor. If I am starting over I may have to go with a race deck type product after this happened with Armorpoxy. :dunno:
 
OP
T

tweidman

Well-known member
Joined
Dec 1, 2009
Messages
505
Location
Ackermanville, Pa.
I was back on the kitchen reno project this past weekend.
I had to remove the 1950's wall refrigerator first. What a heavy awkward beast that thing was to get off the wall. I probably should not have attempted it by myself (with a little help from the wife), but I did. :headscrat
I also demo'd the cabinets below, which were built as custom built ins, rather than actual cabinets. It was a little weird thinking that the last time anyone turned some of these screws was 1957 by my grandfather.

I guess my grandfather put up the ply on the wall and wired it before he decided on the wall mount refrigerator. I found some hacking hidden behind the old fridge.
 

Attachments

  • 20171202_103234.jpg
    20171202_103234.jpg
    140.5 KB · Views: 746
  • 20171202_144608.jpg
    20171202_144608.jpg
    139.9 KB · Views: 130
  • 20171202_190030.jpg
    20171202_190030.jpg
    138.9 KB · Views: 123
  • 24131042_1886576268324058_6834565220684642739_n.jpg
    24131042_1886576268324058_6834565220684642739_n.jpg
    78 KB · Views: 131
OP
T

tweidman

Well-known member
Joined
Dec 1, 2009
Messages
505
Location
Ackermanville, Pa.
I had to remove another original feature to the house over the weekend.
My grandfather built this drawer to hold a counter top mixer. and it also housed the mixer accessories.
I'm not sure where he got the idea for it, but it was a cool thing to have.
 

Attachments

  • 20171202_150251.jpg
    20171202_150251.jpg
    140 KB · Views: 116
  • 20171202_150331.jpg
    20171202_150331.jpg
    140.3 KB · Views: 119
OP
T

tweidman

Well-known member
Joined
Dec 1, 2009
Messages
505
Location
Ackermanville, Pa.
This past weekend I dropped our new sink into the new cabinets. I have it sitting in some plywood as a temporary situation until we get our counter tops ordered. With the prep sink in, it will make the removal of the main sink on the other side of the kitchen a little bit better to live with. I also fitted the drawer that I am losing under the sink into the other cabinet to the right as a pull out shelf. It works really nicely.

I also started the new electrical runs out to the new main panel. Although, I only got one circuit totally hooked up (to my new fridge)
I also started to re-insulate with Roxul R-15 made for 2x4 construction. I must say that I really like working with Roxul, I wish I would have used it in my shop walls.
 

Attachments

  • 20171212_070618.jpg
    20171212_070618.jpg
    139.7 KB · Views: 79
OP
T

tweidman

Well-known member
Joined
Dec 1, 2009
Messages
505
Location
Ackermanville, Pa.
I spent a bunch of time chasing wires and removing old wiring from the walls this past weekend. What a thankless job that is :(
I did manage to get all of the new wiring run out to the new panel. Although, I only got time to hook up one new circuit completely. Now the dishwasher is on it's own circuit and hooked up.
I also removed some more of the built in cabinets and wall boards. This task is taking so much more time then I would have ever guessed. These built ins are attached everywhere including the ceiling so you can't just rip them out or unscrew them from the wall like traditional cabinets.
I was able to get some more insulation done and the wires stapled down.
Next step lighting and some new ply on the walls.
Definitely some slow going. :sad:
 

Attachments

  • 20171217_184926.jpg
    20171217_184926.jpg
    143.9 KB · Views: 72

Finallygotit

ALLIANCE MEMBER
Joined
Jul 6, 2013
Messages
4,086
Location
Tucson, AZ
I spent a bunch of time chasing wires and removing old wiring from the walls this past weekend. What a thankless job that is :(

Tell me about it! I had to replace ALL of the switches and outlets in my house. Those things were a fire waiting to happen. And the house was only 20 years old. Cheap contractor grade ****. :sad:

You're making headway, just keep at it. BTW, didn't you know that these things always take longer than expected? :lol_hitti

:beer:
 
OP
T

tweidman

Well-known member
Joined
Dec 1, 2009
Messages
505
Location
Ackermanville, Pa.
Over the Holiday I was able to get e few more things done in the kitchen.
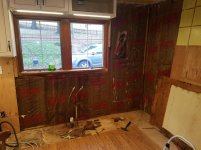
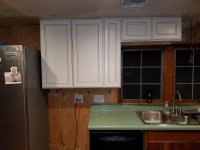
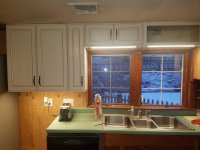
I was able to get my last circuit hooked up and all of the wiring finalized on the part of the kitchen I have ripped apart. Now I have a separate circuit for the fridge, dishwasher, and kitchen outlets on the this side of the kitchen. I also have a separate circuit for the lights and a separate switch to control the sitting area, the main kitchen area and the under cabinet lights.
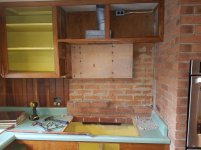
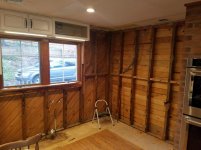
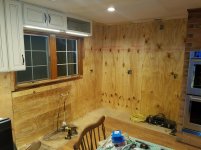
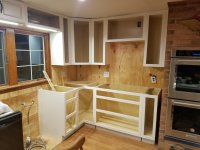
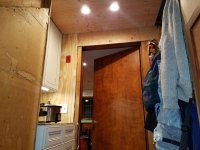
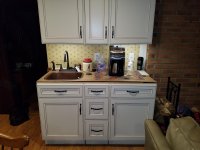
I was able to mount up some new ply on the walls and get everything ready for the cabinets in that section.
I was also able to get all of my new ceiling canisters installed and wired, ten in all. During that process I discovered how to remove all the teeth on my hole saw :wtf:
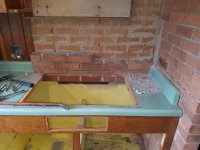
We decided to dress up the small pantry closet we had in the adjoining stairway landing by installing a set of cabinets in there. I spent a whole day ripping everything out of that closet nook and bringing the ceiling height back up. My grandfather really over built the heck out of this area, I'm not sure why he had so much lumber and huge nails in a closet? What a PITA. :eyecrazy: Nothing is ever easy.....
 

Attachments

  • 20171226_205951.jpg
    20171226_205951.jpg
    142.4 KB · Views: 88
  • 20171226_210032.jpg
    20171226_210032.jpg
    128.1 KB · Views: 94
  • 20171226_205931.jpg
    20171226_205931.jpg
    138.8 KB · Views: 88

Finallygotit

ALLIANCE MEMBER
Joined
Jul 6, 2013
Messages
4,086
Location
Tucson, AZ
.......I was also able to get all of my new ceiling canisters installed and wired, ten in all. During that process I discovered how to remove all the teeth on my hole saw :wtf:.....

Stop! :willy_nil

So how does one remove all of the teeth on a hole saw? :headscrat Lord knows I've tried, not on purpose of course, but I was only able to remove a couple. How did you remove ALL of them? :headscrat

Nice progress BTW.

:beer:
 
OP
T

tweidman

Well-known member
Joined
Dec 1, 2009
Messages
505
Location
Ackermanville, Pa.
After two holes in the ceiling most of the teeth are gone and by halfway through the third hole...no more teeth on a bi-metal hole saw. For the last few holes I found a saw that said it would work on brick and concrete with carbide teeth and that hole saw held up well.

Sent from my SM-T320 using Tapatalk
 
Last edited:

1/2 Cup

Member Emeritus
Joined
Apr 28, 2012
Messages
19,283
Location
Shepparton. Victoria. Australia
After two holes in the ceiling most of the teeth are gone on my and by halfway through the third hole...no more teeth on a bi-metal hole saw. For the last few holes I found a saw that said it would work on brick and concrete with carbide teeth and that hole saw held up well.

Sent from my SM-T320 using Tapatalk

tweidman unreal..:shocking:
 
OP
T

tweidman

Well-known member
Joined
Dec 1, 2009
Messages
505
Location
Ackermanville, Pa.
Over new years I finished the pantry area, except for the counter and finish paint and trim. What a total pain that was, I reported back a few post how hard it was to demo the closet. That was only half the battle, the electric was all put straight through the floor in the closet. I had three switches that all needed to be disconnected and the wires pulled out of the floor then rerouted up through the sill plate. :sad:
After way too much time spent on this simple pantry, I got the cabinets installed and the under cabinet light hooked up. I still have a few more things to do in there, but it is functioning again as a pantry.
 

Attachments

  • 20180103_065109.jpg
    20180103_065109.jpg
    135.5 KB · Views: 66
To avoid these ads, REGISTER NOW!
OP
T

tweidman

Well-known member
Joined
Dec 1, 2009
Messages
505
Location
Ackermanville, Pa.
Over the break I was able to get a few shots of the house with the completed siding and trim. I think it came out really well and the shop blends in the way I was planning.
 

Attachments

  • 20171209_125334.jpg
    20171209_125334.jpg
    143.4 KB · Views: 120
  • 20171209_125329.jpg
    20171209_125329.jpg
    142.3 KB · Views: 700
OP
T

tweidman

Well-known member
Joined
Dec 1, 2009
Messages
505
Location
Ackermanville, Pa.
I was back at it again this past weekend. This time to tackle the ceiling and lighting in the mini butlers pantry area. That ceiling was a real PITA. :mad:

Sunday I took my bride out for her Birthday breakfast. Then I started on the cabinets. As usual, it took twice as long as it should have. I was double checking measurements and then I had to cut some of the existing trim around the window to allow for me to hang the cabinets. I never knew how hard cherry was, man that stuff is tough to cut. :dunno:
I started at the center of the window, as my only known starting point, other then the corner, I hope that does come back to bite me. :headscrat
It's nice to see some of the cabinets up. Hardware comes later in the week.
Knobs and pulls would be nice. Those self closing drawers are impossible with a pull.
 

Attachments

  • 20180107_191142.jpg
    20180107_191142.jpg
    141.7 KB · Views: 65
  • 20180107_191126.jpg
    20180107_191126.jpg
    139.5 KB · Views: 71
OP
T

tweidman

Well-known member
Joined
Dec 1, 2009
Messages
505
Location
Ackermanville, Pa.
I made a bit more progress this weekend. I started the under cabinet lighting on the main part of the kitchen. I was also able to hang one more cabinet above the sink.
I also made some templates to mount the cabinet hardware and got all the hardware mounted on the cabinets that are installed.

Then I took a break to clean up my shop a little. Leaving the car in there with snow and ice after driving has made a huge mess of my shop floor and created a humidity problem. So, I mopped up the mess and then installed a dehumidifier.
It seems to be doing a good job so far. No more fogged up windows...:beer:

I think this weekend will be the big push to really get the kitchen done. I plan on removing the remaining cabinets. I hope to get the walls re-insulated at the very least. At best, maybe I can get some of the final cabinets up.:headscrat

After that, I need to order my counter tops and then its time to build the island....:D
 

Attachments

  • 20180113_172643.jpg
    20180113_172643.jpg
    143 KB · Views: 60
  • 20180116_071946.jpg
    20180116_071946.jpg
    139.3 KB · Views: 58

1/2 Cup

Member Emeritus
Joined
Apr 28, 2012
Messages
19,283
Location
Shepparton. Victoria. Australia
tweidman, renovations seem to take a fair bit of time especially if you are doing them your self. I find that most of my time is taken not so much doing the work but chasing stuff up..

You have done well..:thumbup:
 
OP
T

tweidman

Well-known member
Joined
Dec 1, 2009
Messages
505
Location
Ackermanville, Pa.
Boy isn't that the truth.

Good job on the progress. I take it from the smile that you're looking forward to the island build.

:beer:

Thanks guys.

It is not so much that I am looking forward to the island build itself, but I am looking forward to getting to the point of the island build, because the end will be near. :beer:
 
OP
T

tweidman

Well-known member
Joined
Dec 1, 2009
Messages
505
Location
Ackermanville, Pa.
There was no update last week because I had the flu and could not work at all.
This weekend I was feeling better and got on the final stage of demo. As usual the demo was ridiculously difficult. The built in cabinets were screwed to the walls all over the place. I had a brick back splash to tear down and the microwave wall mount was crazy. That mount my grandfather made could have held up a truck. :lol: 
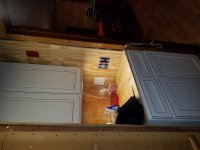
Just demo took a day and a half. I'm glad to have that behind me.
I'm also super glad to be done driving nails through the panel board he used behind the cabinets, there must have been 100 nails in each piece. Each panel nail had to be driven through the panel with a punch. :mad:
 

Attachments

  • 20180127_130149.jpg
    20180127_130149.jpg
    142.6 KB · Views: 62
  • 20180127_130153.jpg
    20180127_130153.jpg
    140.8 KB · Views: 55
OP
T

tweidman

Well-known member
Joined
Dec 1, 2009
Messages
505
Location
Ackermanville, Pa.
I was able to get the walls stripped down to the studs. I removed the old insulation and BX wiring. Then I ran new wire and installed new Roxul R-15 insulation. After that I installed new 1/2" sheathing and got a few screws into the sheathing right around dinner time. So, I called it a day on Sunday. It would have been nice to get a few cabinets hung, but that will have to wait a few days.
I can tell those walls are warmer already. :beer:
Now my kitchen is officially torn out, no turning back now.
 

Attachments

  • 20180128_140404.jpg
    20180128_140404.jpg
    143.2 KB · Views: 59
  • 20180128_144643.jpg
    20180128_144643.jpg
    142 KB · Views: 64
  • 20180128_180601.jpg
    20180128_180601.jpg
    141.8 KB · Views: 64

RSr

Well-known member
Joined
Jul 20, 2010
Messages
155
Location
Pittsburgh, PA
I feel your pain. Everyone likes an old house that has "good bones" or where you say they don't make them like this anymore. That is until you want to update a room and they are serious mf'rs to take apart.

I demo'd a powder room in my first house (1930's stone tudor) that had tiled half walls that an 8lb sledge couldn't break apart. It probably took 20 hours for the walls and floor for a 15 square foot bathroom. I told the new owners this and they wisely decided to wainscot over the kitchen walls which had the same construction.

At my new house (1980's construction) I've never been so happy for a builders grade bathroom then when I demoed it. It took less than 20 minutes to get 80 square feet of floor tile removed. I guess the technique then was to staple down 1/4 ply to the subfloor and tile on top. I could pry whole sheets off with the tile still adhered.

Anyways, been following the thread for a long while so keep up the quality work and hopefully the end is in sight.
 
OP
T

tweidman

Well-known member
Joined
Dec 1, 2009
Messages
505
Location
Ackermanville, Pa.
I feel your pain. Everyone likes an old house that has "good bones" or where you say they don't make them like this anymore. That is until you want to update a room and they are serious mf'rs to take apart.

I demo'd a powder room in my first house (1930's stone tudor) that had tiled half walls that an 8lb sledge couldn't break apart. It probably took 20 hours for the walls and floor for a 15 square foot bathroom. I told the new owners this and they wisely decided to wainscot over the kitchen walls which had the same construction.

Anyways, been following the thread for a long while so keep up the quality work and hopefully the end is in sight.

Yeah,I have a bathroom like that. The wall are super thick and they are "wet set" tile from floor to ceiling. We are not touching that stuff.
 
OP
T

tweidman

Well-known member
Joined
Dec 1, 2009
Messages
505
Location
Ackermanville, Pa.
I took the day off yesterday to get a bit more done on the kitchen. I first had to run the new 40 amp line for the cook top. I also ran a new 20 amp for the microwave. There was already a separate circuit for the Microwave but it was down in the basement box. Since everything else for the kitchen is in the new garage panel box, I decided it would be best to keep all of the kitchen circuits together.

After that I was able to start hanging cabinets. The upper corner cabinet was a bit of a challenge, especially since I had to make a 1" spacer board for between the corner cabinet and the cabinet on the left. The plaster ceiling also made it challenging because of it's uneven nature. I will definitely need a small molding to cover the changing gap.
I was also able to bring up a few more of the base cabinets and set them in place to see how they will fit. I hope to get them all mounted on Saturday. :beer:
 

Attachments

  • 20180131_194207.jpg
    20180131_194207.jpg
    137.5 KB · Views: 68
Last edited:
To avoid these ads, REGISTER NOW!
Top Bottom