
You are using an out of date browser. It may not display this or other websites correctly.
You should upgrade or use an alternative browser.
You should upgrade or use an alternative browser.
Eastern PA shop addition
- Thread starter tweidman
- Start date
I bought them from a guy here on the garage journal named John. Here is the link to his website. I had them in 6 days. https://www.shopstoragecabinets.com/
Thanks, I looked at their web site and it looks like they want $400 more than Sears does for the same set. I wonder if they would price match because I would rather buy from a GJ member.

Do you remember John's user name or have his contact info?
dittle fart around
Well-known member
Thanks, I looked at their web site and it looks like they want $400 more than Sears does for the same set. I wonder if they would price match because I would rather buy from a GJ member.
Do you remember John's user name or have his contact info?
Hey, that's me.


GLTHFJ60
Well-known member
Looks awesome!!
Why didn't you put an entrance to the house from the shop on the adjoining wall?
Why didn't you put an entrance to the house from the shop on the adjoining wall?
Looks awesome!!
Why didn't you put an entrance to the house from the shop on the adjoining wall?
Thanks.
It's on the to do list and it has always been in the plans to put a door between the old garage and the new shop.
The door will go in the corner adjacent to the outside man door. That way you will be able to easily access either garage without opening a garage door and also get into the house.

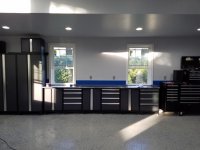
My cabinets arrived this past week. I found some shipping damage, but newage is sending me replacements.
I did a test fit once I had all the cabinets un-boxed. They look awesome and I should be able to start moving my stuff in soon.
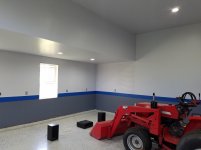
I also moved my tool box into the new space, you wouldn't think that moving my box such a short distance would be difficult, but it was....
I did a test fit once I had all the cabinets un-boxed. They look awesome and I should be able to start moving my stuff in soon.
I also moved my tool box into the new space, you wouldn't think that moving my box such a short distance would be difficult, but it was....
Attachments

Last edited:
Magneto
Well-known member
SWEET! Enjoyed watching this build.
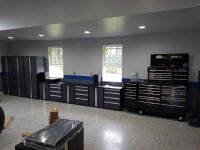
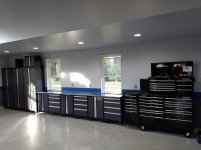
I was able to get all of the cabinets installed, except for the overhead wall cabinets. I'm still not sure what I want to do with those? I was going to put two or three wall cabinets between the windows, but now that I see the space, I'm not sure I want them there?
I was also able to get my stereo installed. I have a two large holes in the back of the two lockers on the left. These line up with the outlets, this allowed me to put my stereo on a shelf inside the locker so that it will stay clean and undamaged. The other outlet I am using to plug in my tool battery charger, which keeps it out of the way.
Yesterday I was able to actually start to unpack my shop supplies after being in my basement for over a year.
Attachments
Kevin54
MEMBER EMERITUS
Very nice space indeed. I don't know how I missed this thread for this long. I do have one question though.......the builders built your eave over your existing roof, and it looks like they did it directly over the existing shingles. Did they put step flashing up onto the fascia, or did they just bend up a piece of metal and cover the fascia board. if they did not put in step flashing, you may be in trouble with water eventually running down the sidewall of the house and garage. By all rights, they should have cut the shingles back and properly step flashed it.
Other than that question, the garage looks fantastic.

Other than that question, the garage looks fantastic.
Very nice space indeed. I don't know how I missed this thread for this long. I do have one question though.......the builders built your eave over your existing roof, and it looks like they did it directly over the existing shingles. Did they put step flashing up onto the fascia, or did they just bend up a piece of metal and cover the fascia board. if they did not put in step flashing, you may be in trouble with water eventually running down the sidewall of the house and garage. By all rights, they should have cut the shingles back and properly step flashed it.
Other than that question, the garage looks fantastic.
The framers cut the existing eave off completely. Later when they did the trusses, they cut the shingles and tar paper off the remaining end of the roof and put down a 2x12 and glued and nailed it down to the old roof boards. Then when the roofer came, they fully step flashed everything and then put the shingles down. The gutter guys later wrapped over the fascia board and covered the step flashing that stuck out with that little turn out at the bottom of the fascia wrap. I guess they thought that would look better than terminating it into the step flashing. The bend at the bottom also helped it hold it's shape.
We have had some really bad rain storms since this was done and I have seen no sign of water anywhere within the new addition or the old garage.
I kept a pretty close eye on the subs when they were working to make sure it was done right.
Last edited:
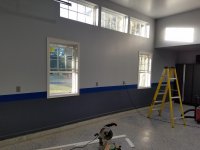
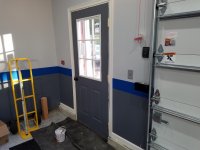
This weekend I was able to get most of the interior trim work done. The windows and door have casing and the base molding is installed. I was also able to caulk the saw cuts in the floor. I started painting the trim but I still have a few more hours left before that is done.
As soon as my siding comes in I will need to abandon the interior work and get the exterior finished before it gets cold out.
As soon as my siding comes in I will need to abandon the interior work and get the exterior finished before it gets cold out.
Attachments
Last edited:
1/2 Cup
Member Emeritus
That looks a treat tweidman, well done
Regards
Regards
Magneto
Well-known member
Hey Twied,
I'm really impressed. Great Job. What type of caulking did you use for the saw cuts? I never filled mine in.
Mag
I'm really impressed. Great Job. What type of caulking did you use for the saw cuts? I never filled mine in.
Mag
Thanks Mag.
I used painters caulk and painters putty on the trim before painting.
EDIT : When I first read this I thought you were referring to the trim.
You probably mean the floor saw cuts. I used silicone exterior window and door caulk in Gray to match the floor. I have noticed some shrinkage after it cured. But it is still better than the deep cuts that all your dirt and small parts fall into.
Sent from my SM-T320 using Tapatalk
Last edited:
Here are a couple of issues I was dealing with...
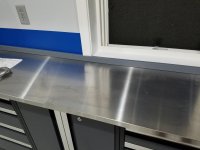
Here is a pic of how I dealt with having outlets that lined up with the locker cabinets. It was poor planning that created this problem, but as it turn out, I really like having power available inside the cabinet. I have used them to plug in my chargers and the other to power my stereo that is located inside the cabinet.
The workbench ended up just below the window not allowing enough room to case out the window. Also, the wall was not dead straight so there was a small gap between the wall and the bench top in a few spots. I made this piece of trim to cover the gap and it gave me something to terminate the casing into.
Attachments

Last edited:
1/2 Cup
Member Emeritus
tweidman, that was a great solution to your issue. Done well..
Regards
Regards
Magneto
Well-known member
Yes, I was referring to the floor cuts. All they do is collect debris. I'm going to do the same and fill them in.
Thanks Mag.
I used painters caulk and painters putty on the trim before painting.
EDIT : When I first read this I thought you were referring to the trim.
You probably mean the floor saw cuts. I used silicone exterior window and door caulk in Gray to match the floor. I have noticed some shrinkage after it cured. But it is still better than the deep cuts that all your dirt and small parts fall into.
Sent from my SM-T320 using Tapatalk
I decided to hang two of my wall cabinets this weekend. I wasn't really sure if I wanted these between the windows or not, but I decided to go ahead and put them up. They work well for keeping manuals and paperwork quickly accessible. I also finished painting all of my window trim on all four windows.
My siding was delivered on Friday, all 1200 lbs of it. I was able to get the fascia wrapped and two of the corners installed. I was also able to get my starter strip mounted and the first row of siding started. Now I need to drag my radial arm saw down from the wood shop so I can make the siding cuts.
My siding was delivered on Friday, all 1200 lbs of it. I was able to get the fascia wrapped and two of the corners installed. I was also able to get my starter strip mounted and the first row of siding started. Now I need to drag my radial arm saw down from the wood shop so I can make the siding cuts.
Attachments


Last edited:
I was able to get the front of the building sided this weekend. I still need to put up the 8" trim board that goes across the top against the soffit. I also need to install the window trim, but I really need that top trim board mounted first. Another trip to the lumber store.....
I had almost no waste and even the top row will not need to but trimmed. I am very happy about that.
I had almost no waste and even the top row will not need to but trimmed. I am very happy about that.
Attachments


Magneto
Well-known member
That is some nice looking siding.
That is some nice looking siding.
Thanks, my wife and I are really happy with the look too.
Our vision for the house is really starting to become a reality . I just wish I had more time to make some real progress.
After looking at the wrap I did on the soffit boxes (I think that is what you call them?), I am really not happy with my workmanship. I need to rip that stuff off and start over. I am just not sure how I am going to get a nice professional finish without a brake or something to fabricate those flashing pieces.

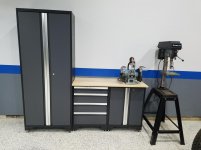
I started to set up my metal fab wall. I got the drill press and grinder cleaned up and moved down from the old wood shop. I had initially planned to put the drill press on the bench top, but after I got it moved I realized it was way too big for the bench, so I bought a stand for it. It will probably be more functional that way.
Next I need to find or build a welding table. I plan on mounting my vice on the welding table too. I also have to buy a new compressor, my old craftsman 60 gallon ended up staying at the old house, the house buyer made me an offer and it just meant one less thing to move.
Next I need to find or build a welding table. I plan on mounting my vice on the welding table too. I also have to buy a new compressor, my old craftsman 60 gallon ended up staying at the old house, the house buyer made me an offer and it just meant one less thing to move.
Attachments
1/2 Cup
Member Emeritus
tweidman absolutely fantastic work.
dittle fart around
Well-known member
Ya know lots of people follow, like me. When it comes to making a comment other that "hey nice job" or "I wish I'd thought of that" there's not a lot to say.

I envy those who have the time and money to build out what they what.
I envy those who have the time and money to build out what they what.
1/2 Cup
Member Emeritus
tweidman, IMHO, there are lots that follow your build.
With so much going on in the GJ space it is difficult at best to keep. I don't always post for that very reason but when I do it is usually a few words of encouragement and or kudos for a job well done.
Keep up the great work..
With so much going on in the GJ space it is difficult at best to keep. I don't always post for that very reason but when I do it is usually a few words of encouragement and or kudos for a job well done.
Keep up the great work..
BMiller270
Well-known member
Thanks 1/2cup
I lurk on your thread a lot.
Love it man!
I just built a welding table for my shop.
Keep up the good work.
Sent from my iPhone using Tapatalk
I lurk on your thread a lot.
Love it man!
I just built a welding table for my shop.
Keep up the good work.
Sent from my iPhone using Tapatalk
Thanks for the kind words everyone. It's good to know that people are looking at the thread.
BMiller, That is a really nice welding table. Do you mind telling me what the materials cost?
Last edited:
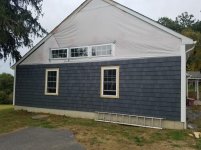
This Saturday I got back on the siding. I mentioned earlier that I was not happy with the poor job I did on the soffit box and lower fascia. So I ripped that stuff off and started over. I found some better sheers up in my g-dads old shop, which helped. So now the soffit box is wrapped (again) and the fascia started, but I ran out of material, so I couldn't finish the top two pieces.
Most of the house is low to the ground and doesn't require a ladder, but this gable end , not so much. Climbing ladders was starting to get old fast with no scaffolding.
With the high winds we had here Sunday, I decided not spend all day up on the extension ladder in order to finish it.
I also found a cool way to attach my white vinyl window moldings. The product is call a Cortex fastener. If you are installing vinyl trim, I think it is definitely worth some research into it. Once I install the trim I will let you guys and gals know what I think of it.
Attachments
Last edited:
BMiller270
Well-known member
Thanks for the kind words everyone. It's good to know that people are looking at the thread.
BMiller, That is a really nice welding table. Do you mind telling me what the materials cost?
Thank you!
It was around $480 for the materials including casters. I used 2" square tubing with a 3/8" thick top 3'x6'.
The top was what killed the price! Lol.
Sent from my iPhone using Tapatalk
1/2 Cup
Member Emeritus
tweidman, it look pretty good without the trim IMHO
Regards
Regards
Magneto
Well-known member

I was working on my wifes car in the new shop tonight. First repair with most of my stuff set up. So nice...[emoji1]
Hey Tweid,
Don't you just love dedicated space to work on your own vehicles. I've literally saved thousands repairing my own 4 vehicles after I finished my shop build in 2013.Eventually my savings will cover the cost of the shop.
Mag

1/2 Cup
Member Emeritus
tweidman it certainly would be a great feeling and with lots of satisfaction to get to this point..
Regards
Regards