To avoid these ads, REGISTER NOW!

Edlund Drill Press

bigcreek

Well-known member
Joined
May 11, 2013
Messages
387
Location
Idaho
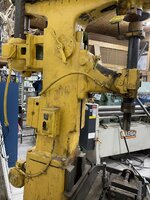
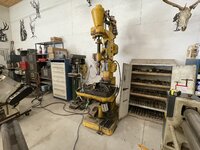
I had another thread going that talked briefly about this drill press I bought along with a lathe. That thread basically went toward the lathe so I wanted to start a separate thread for this press. I bought a lathe and this drill press from a forest service shop. I was after the lathe and I didnt know anything about morse taper bits at the time. I saw that cabinet full of bits and thought they were outdated or something by the looks of them because I had only messed with round straight shank bits all my life. Anyway I dumped it off at another auction along with all the bits. Well Id been wanting a bigger drill press for a long time and considered this one but again I thought the taper was outdated and not used anymore and that I wouldnt be able to use my present bits in this press. Well I was completely wrong about that and was schooled by some fine folks on this forum as to the drill bits and the Edlund brand. Upon closer inspection it comes with some chucks that fit in the taper part of the press and the chucks accept round bits so I can use either morse taper bits or my regular round shank bits in this thing. win win. Also it came with those 3 clamps on the drill presses table so that was cool.

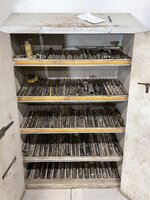
I went back to the auction and picked it back up. The auctioneer will get a little fee for the hastle. Here is a picture of it on my trailer upon arrival at my shop. Then there is a picture of the drill bit cabinet and the bits that came with it. I didnt count them but I wrote on a piece of paper which you can see in the picture of some of the sizes I looked at in that cabinet and there is some pretty odd ones. Also I wrote down the different drill bit makers I saw stamped on the bits just for fun. I didnt even bother looking yet at the scores of smaller drill bits to see what sizes they are, just the bigger ones.

So I am now trying to decide which one of my smaller drill presses to get rid of. I cant quite make up my mind on this. The JET Is 1.5 HP 18amp and made in Taiwan. The porter cable doesnt even say what HP it is but it does say 8amp and is made in China so much, much wimpier. Even though that porter cable is a chinese product it is a pretty tight little machine which drill nicely, almost tighter it seems like than the Jet. The Jets table is twice the size of the porter cable but with the big Edlund I could use that if I wanted a big table. I am leaning toward keeping the Porter Cable and dumping the Jet. But I am curious as to which one you guys would get rid of? I still need to wire up a vfd to the press before I can run it so Ill post that up when I get that part done.
 

Attachments

  • drill press 002.JPG
    drill press 002.JPG
    379.9 KB · Views: 191
  • drill press 021.JPG
    drill press 021.JPG
    340 KB · Views: 179
  • drill press 020.JPG
    drill press 020.JPG
    395.3 KB · Views: 160
  • drill press 016.JPG
    drill press 016.JPG
    423.8 KB · Views: 167
  • drill press 025.JPG
    drill press 025.JPG
    404.4 KB · Views: 161
  • drill press 022.JPG
    drill press 022.JPG
    392.5 KB · Views: 160
To avoid these ads, REGISTER NOW!
OP
B

bigcreek

Well-known member
Joined
May 11, 2013
Messages
387
Location
Idaho
I will now be hooking it up to the phase converter because when I pulled the vfd out of the box it is a 3 to 3 phase instead of the needed 1 to 3 phase. It had been sitting on the shelf for half a year and that detail somehow got by me. That is ok though I have a phase converter about 10 feet away so all good. Now there is a motor on the back of this drill press towards the bottom that I cant figure out what it is for. There is nothing connected to the shaft and I dont see anything anywhere on the press that looks like it would attach to that motor shaft. Anyone have any clue what that back motor is for? It is a 1/4hp motor. There are 2 on off switches on this. One at the very front and one on the side. Not sure what the two are for. Perhaps one to power up the machine and the one on the front to just start / stop. Someone mentioned wiring a foot switch up to it which is a great idea but that will have to be down the road.
 

Attachments

  • drill press back motor 007.JPG
    drill press back motor 007.JPG
    430.9 KB · Views: 162
  • drill press back motor 002.JPG
    drill press back motor 002.JPG
    385.4 KB · Views: 139
  • drill press back motor 001.JPG
    drill press back motor 001.JPG
    338.5 KB · Views: 162

larry_g

Well-known member
Joined
Apr 28, 2007
Messages
16,877
Location
oregon
Well call me envious, that is one heck of a buy and the bits are probably more valuable than the machine. As for the small motor it vary well could have been for driving a coolant pump. I don't remember what you said you had for a phase converter but if it is a rotary then you can drive the VFD with it. As for which small DP to get rid of wait a year and sell off the one with the thickest dust covering. Another thing to consider is which DP has the highest speed. With the big DP you have the big low speed bits covered but for small precision work you want high speed. One thing to pay attention to on the drill bits you got, pay attention to if they are marked HS or HSS for highspeed steel. If not assume carbon bits and adjust your speed and feeds accordingly. I learned that the hard way after burning up a couple of carbon steel ones.

If you want to be shocked a bit look up the price of some of those bits from the major suppliers. https://www.mscdirect.com/browse/tn...er-Shank-Drill-Bits?mscNew=true&navid=2106189

lg
 

tool_scrounge

Well-known member
Joined
Jul 20, 2010
Messages
4,180
Location
Southern California
MSC is really expensive. If you have an account and so,Ed volume I hear they have discounts.

Unless you are running production, buy used drills as they sell for pretty cheap. For example, a couple of years back I paid $10 each for some MT4 drills in the 1.5 to 2.31” diameter range. Nice quality too.
 

larry_g

Well-known member
Joined
Apr 28, 2007
Messages
16,877
Location
oregon
Holy **** a 2" bit on that site was $418. What the?? That is crazy
Yes it is crazy but like Tool_s said they can be found used for cheaper. I buy all that I can if found used for under $25. They are easy to sharpen and will last you a lifetime. I lucked into a set of tapershanks that went from 1/6" to 3/4" for $17 at the swapmeet once. I had a list that I carried of the ones I was missing and used it when I found a bunch used for sale.

lg
no neat sig line
 

RoninB4

Well-known member
Joined
Jul 22, 2020
Messages
3,518
Location
Under My House
A good choice to keep that drill press, for larger work and holes you'll need the low speeds and torque. For the other two drills why not keep both? Often holes require more than one operation (C'sink & Tap start) and it's time consuming to change tools. With 2 small drill presses you can set up rapidly work through cover plate/housing/bracket that require +25 holes. For C'boring you'd have to drill and then set the tools each time, PITA getting something set to stop at the right depth for all of them. If something isn't worth a lot of money the trade value can be worth more than the cash exchanged. You could swap one drill press for a nice bench grinder (you'll need one) rather than sell one machine to hunt for another. Just a suggestion.

OBTW- If the foot switch isn't going to happen soon you better figure out how to lock AND clamp the workpiece to the table. Rotation and/or lifting off the table when the large drill "grabs" happens fast and it will happen sooner or later. The higher the torque or speed the greater the danger. Be safe.
 
OP
B

bigcreek

Well-known member
Joined
May 11, 2013
Messages
387
Location
Idaho
Ya if I had more room that would be a fine idea but I can only keep two drill presses with the room I have. I have decided to keep the smaller Porter Cable and of course the big Edlund. I do have a 3/4hp Dayton bench grinder but honestly I dont use it a ton. Next to it I have a couple sanders, one is a Wilton/Olympic 72" x 2" with a finer grit and the other is a Wilton with 6" wide belt with a larger grit. These two sanders by far see more of the work than my bench grinder gets.
 

RoninB4

Well-known member
Joined
Jul 22, 2020
Messages
3,518
Location
Under My House
I do have a 3/4hp Dayton bench grinder but honestly I dont use it a ton. Next to it I have a couple
-You will if/when the drills are used more, have to learn to sharpen them for decent results. Understood why something has to go, we all eventually run out of available real estate and priorities come a calling. You'll make the right choice whatever it is.
 

brownbagg

Well-known member
Joined
Mar 20, 2006
Messages
5,208
my buddy has one like that big yellow thing, it will go through two inch plate like butter. that a shipyard drill
 
OP
B

bigcreek

Well-known member
Joined
May 11, 2013
Messages
387
Location
Idaho
Ive been away for awhile. Hunting and lots of work and got sick for a week. Ill give an update on the drill. So the guy in the forest service shop told me the on/off switch had stopped working and so they got an electrician in to fix it but when he saw it was a mercury switch he wouldnt touch it so the forest service was going to scrap it but put it up for auction instead. I thought a switch wouldnt be a problem. Turns out its not the switch but is the motor. The darn motor went out but thats ok. Its not like there is anything on these machines that is super technical. Well I got the motor off which was a real bear. Even with gravity assisting me that thing was tougher than nails to get off since there was some very slight rust on the shaft. My friend hooked me up with a 3 hp single phase WEG motor which I will have to raise it up an inch and change the base plate to make the holes work but I can do that. The old motor was a 1.5 hp 3 phase motor. Now at least I dont have to do any phase converting. So once I get some time I will put that new motor on there and get it wired up. Now a question for you guys. I am going to replace the belt as it is a leather belt and seems to be stretched out. It is 88" long x 2" x 3/16" thick currently. Where is the best place to get flat belts of that size?
Thank you!
 

AllenP

New member
Joined
Jun 10, 2019
Messages
3
Location
Oregon
So I am now trying to decide which one of my smaller drill presses to get rid of.
I love using my Edlund and I also bought it with a lathe!
What taper is the arbor on yours? MT 1 on mine and its motor and 4 pulley pairs are set up for smaller drills: my slowest speed is about right for 1/2”.
If yours is similar, I’d suggest you keep a second drill press that offers speeds the Edlund does not.
 
OP
B

bigcreek

Well-known member
Joined
May 11, 2013
Messages
387
Location
Idaho
I love using my Edlund and I also bought it with a lathe!
What taper is the arbor on yours? MT 1 on mine and its motor and 4 pulley pairs are set up for smaller drills: my slowest speed is about right for 1/2”.
If yours is similar, I’d suggest you keep a second drill press that offers speeds the Edlund does not.
Hey AllenP was yours ex government like mine is? Mine has Navy tags on them but then the Forest Service got them before me. My drill arbor is a MT3 on my Edlund. The bits in that cabinet run from MT1 to MT5 and I only have the adapters from 1 through 4 so I need to pick up one up to MT5.
 
To avoid these ads, REGISTER NOW!
OP
B

bigcreek

Well-known member
Joined
May 11, 2013
Messages
387
Location
Idaho
I acquired this drill press probably around 6 months ago now but with everything else going on I just got it going yesterday. So it turned out the motor on this drill press was burned up. The forest service shop foreman told me it was the start switch, guess he was wrong. I had it rewound and put it back on and wow what a machine. The first hole I drilled with it was a 1 1/8" hole through 3/4" thick steel and punched right through it so then I drilled a 1" hole through 2" thick metal and man it just goes through it like butter. So freakin nice! So in the picture you can see it next to my Porter Cable and the size difference is fairly noticeable. I have a book on this Edlund 4B drill press and it says this one weighs 2000# so it is a stout little dude. Also a picture of the 1" hole through 2" thick metal. I do have a question which hopefully you guys can enlighten me on. The book says this drill press has a 1 1/4" capacity as can be seen in the pictures I attached. However that cabinet is full of bits way over that and well over 2" in size. Is 1 1/4" actually what the manufacturer recommends as the largest hole that should be drilled with this machine? Because it can easily make bigger so not sure what that is about.
 

Attachments

  • edlund drill press and saw 086.JPG
    edlund drill press and saw 086.JPG
    864.4 KB · Views: 65
  • edlund drill press and saw 041.JPG
    edlund drill press and saw 041.JPG
    942.5 KB · Views: 62
  • edlund drill press and saw 040.JPG
    edlund drill press and saw 040.JPG
    823.8 KB · Views: 55
  • edlund drill press and saw 050.JPG
    edlund drill press and saw 050.JPG
    1.2 MB · Views: 75

dutchgray

Well-known member
Joined
Sep 28, 2014
Messages
6,465
Location
Dorset. England.
The manufacturers rated capacity is intended to be largest hole the machine should drill, usually rated in steel without a pilot,
You can get away with bigger holes occasionally especially if you step up in sizes or use hole saws or annular cutters which work at much lower torque loads.
The manufacturer had to set a capacity that the machine could survive drilling at in industry, all day long for years at a time.

Your cabinet of drills may not have been for use just on that machine.
 

RoninB4

Well-known member
Joined
Jul 22, 2020
Messages
3,518
Location
Under My House
-Good reply above from dutchgray. Drills in cabinet may also have been for materials that require less cutting force than steel, aluminum is just one commonly encountered material. Step drilling and/or a different machine are also solid possibilities and the drills just followed the Edlund with each sale in the long history it had. Nice DP, hope it serves you well.
 
OP
B

bigcreek

Well-known member
Joined
May 11, 2013
Messages
387
Location
Idaho
The manufacturers rated capacity is intended to be largest hole the machine should drill, usually rated in steel without a pilot,
You can get away with bigger holes occasionally especially if you step up in sizes or use hole saws or annular cutters which work at much lower torque loads.
The manufacturer had to set a capacity that the machine could survive drilling at in industry, all day long for years at a time.

Your cabinet of drills may not have been for use just on that machine.
Ok thank you. I did not drill that hole in the picture with a pilot hole just to see how it did. Im glad you mentioned that because I was wondering if I should or not. When using drill bits over an inch in size is it necessary to use a center punch? I do it but do I need to do it on big bits, what are your guys thoughts? There are several adapters in there so with what adapters are included I think I can use every size of bit that is in the cabinet, but yes who knows what all machines the bits were originally for.
 
OP
B

bigcreek

Well-known member
Joined
May 11, 2013
Messages
387
Location
Idaho
-Good reply above from dutchgray. Drills in cabinet may also have been for materials that require less cutting force than steel, aluminum is just one commonly encountered material. Step drilling and/or a different machine are also solid possibilities and the drills just followed the Edlund with each sale in the long history it had. Nice DP, hope it serves you well.
Yes I would be curious to see where all its been in its long life. Started out as Navy since the tag is still on it, but then I bought it from the Forest Service shop so who knows what department(s) owned it between those two.
 

larry_g

Well-known member
Joined
Apr 28, 2007
Messages
16,877
Location
oregon
A couple of other things to consider when getting into big cutting tools is what horsepower you have. Horsepower determines how many cubic inches of material you can remove in a given time, if the machine is ridged enough to handle it. You also have the capability of the flat belts to transmit that power. What is the minimum feed and speed of the machine? That also plays into largest cutter size. It is also probably also rated for carbon steel bits, not high speed steel or carbide.

All these things and more come into play when rating the capacity of the machine. You can also still keep me in the jealous column.

lg
no neat sig line
 

PoorUB

Well-known member
Joined
Mar 29, 2021
Messages
11,627
Location
Fargo, ND
I agree with the other comments. The manufacturer has to draw the line somewhere for safety and machine life.

I have a Powermatic 1200 and the largest recommended hole in steel in 3/4", I have drilled 1" holes without a problem.

I don't know if your machine will drill 2" holes, it might run too fast and not have the power to do it. If the RPM will go low enough and drilling a larger, maybe 1" pilot hole will help power wise.

I had a 3/4HP Tiawan built drill press before I got the PM1200. It is crazy the difference! Funny thing is the PM 1200 is only 1 HP. I knew better too when I bought the import years ago. I had worked at a machine shop and we had a 1-1/2 HP gear head drill press that you couldn't stall. It was a monster to run, you had to me careful. I had seen guys jam up a 3/4" drill bit and snap the bit right off and the motor barely hesitated. You had to respect it and make sure you clampped you work down well because it didn't care whether it was tearing up steel of flesh!
 

dutchgray

Well-known member
Joined
Sep 28, 2014
Messages
6,465
Location
Dorset. England.
Being that it uses flat belts you would most likely not damage the machine by occasionally overloading it, the belts would just slip, geared head machines like the one I just bought can be ruined if you manage to stall or severely shock them as if a gear breaks you are in big trouble (mine does have a broken gear and it has been modified to stop that gear set being used, it has cut it down to 6 speeds from the 9 it was built with.)

Drills do not need a pilot, sometimes it is desirable to use one, I would almost always centre punch and use a spotting dril to start the hole.
You can drill over the machines rated capacity to a point by stepping up in bit size, provided you can keep the rpm low enough for that diameter drill in your chosen material. Its not kind on drill bits however.
I bet that machine could drill 2" in steel with care and a couple of steps over the rated size.
The MT3 spindle will limit how much torque you can transmit, but so will the flat belts.
 

RoninB4

Well-known member
Joined
Jul 22, 2020
Messages
3,518
Location
Under My House
I was wondering if I should or not. When using drill bits over an inch in size is it necessary to use a center punch? I do it but do I need to do it on big bits, what are your guys thoughts?
-I ran a large radial drill press a few decades ago, it was my everyday job. A center punch is helpful when you need location, all twist drills have a "chisel point" that starts the drilling, looks closely at any twist drill unless it has center relief. This chisel edge doesn't cut material nearly as well as the sharper edge geometry past the chisel portion. That chisel edge sorta "wipes" the metal out of the way, in the process of doing this the twist drill can often wander off location because it's trying to find a place to "bite" into the material. The harder the material the more it has a tendency to wander. If the center punch mark is smaller than the chisel point it may/may not start on location.

A pilot hole slightly larger than the chisel edge width is the most common method of beginning a large hole. Center punch, small pilot hole, larger drill is the process. As others have pointed out, step drilling is a common method of reducing the HP needed to drill large holes the drill press motor may not be able to handle, this is common. What is less obvious is that the larger the final drill size the greater a tendency for the large drill to "grab" if there's not enough material in the hole to offer resistance. Drilling 1/64 under final hole size, then running final size drill through (for more accurate hole size) is commonly done with drill up to 1/2" with no trouble. As drill size goes up over 1/2" there's a greater chance of grabbing as the size increases. Going from 1-15/16" to a 2" drill is asking for trouble unless certain precautions are taken.

Large hole drilling without a center punch or pilot hole can be done but location and hole diameter may not be what you want it to be due to wander, drill condition, and how accurately the drill was sharpened. The material being drilled also makes a difference. Brass is notorious for grabbing a drill as you break through the other side. You'll be drilling with no problem and all of a sudden the drill will grab and either spin the workpiece, shatter the drill, or yank the drill down in a somewhat violent manner. The drill can even get stuck in the material having bitten off more than it can chew. Softer material like brass, some bronzes, aluminum, and plastics have this tendency to grab. The drill cutting edges are customarily stoned (90°) just enough to break the sharp edge for brass, other materials just need either a quill stop set, quill drag, or a good grip on the quill feed handle and the material secured in a clamped or back-stopped vise. Drill feed pressure via the quill handle needs a light, careful hand, particularly when the drill is about to break through the other side.

Like all machining methods, drilling has rules to follow and things that look simple are not always as simple as they appear to be. RPM per the material is critical or you'll burn up the drill, look up a chart for this and attach it to the drill press for quick reference. Simple rule of thumb for steel is to produce silver colored chips. If the chips are turning yellow or blue the RPM is too fast and the drill will burn, perhaps rendering it useless for sharpening if the radial "land" is wiped off. This is getting a bit long and/or boring (machining pun....) so I'll step down off the podium now. Read, ask questions, be safe.
 
Last edited:
OP
B

bigcreek

Well-known member
Joined
May 11, 2013
Messages
387
Location
Idaho
-I ran a large radial drill press a few decades ago, it was my everyday job. A center punch is helpful when you need location, all twist drills have a "chisel point" that starts the drilling, looks closely at any twist drill unless it has center relief. This chisel edge doesn't cut material nearly as well as the sharper edge geometry past the chisel portion. That chisel edge sorta "wipes" the metal out of the way, in the process of doing this the twist drill can often wander off location because it's trying to find a place to "bite" into the material. The harder the material the more it has a tendency to wander. If the center punch mark is smaller than the chisel point it may/may not start on location.

A pilot hole slightly larger than the chisel edge width is the most common method of beginning a large hole. Center punch, small pilot hole, larger drill is the process. As others have pointed out, step drilling is a common method of reducing the HP needed to drill large holes the drill press motor may not be able to handle, this is common. What is less obvious is that the larger the final drill size the greater a tendency for the large drill to "grab" if there's not enough material in the hole to offer resistance. Drilling 1/64 under final hole size, then running final size drill through (for more accurate hole size) is commonly done with drill up to 1/2" with no trouble. As drill size goes up over 1/2" there's a greater chance of grabbing as the size increases. Going from 1-15/16" to a 2" drill is asking for trouble unless certain precautions are taken.

Large hole drilling without a center punch or pilot hole can be done but location and hole diameter may not be what you want it to be due to wander, drill condition, and how accurately the drill was sharpened. The material being drilled also makes a difference. Brass is notorious for grabbing a drill as you break through the other side. You'll be drilling with no problem and all of a sudden the drill will grab and either spin the workpiece, shatter the drill, or yank the drill down in a somewhat violent manner. The drill can even get stuck in the material having bitten off more than it can chew. Softer material like brass, some bronzes, aluminum, and plastics have this tendency to grab. The drill cutting edges are customarily stoned (90°) just enough to break the sharp edge for brass, other materials just need either a quill stop set, quill drag, or a good grip on the quill feed handle and the material secured in a clamped or back-stopped vise. Drill feed pressure via the quill handle needs a light, careful hand, particularly when the drill is about to break through the other side.

Like all machining methods, drilling has rules to follow and things that look simple are not always as simple as they appear to be. RPM per the material is critical or you'll burn up the drill, look up a chart for this and attach it to the drill press for quick reference. Simple rule of thumb for steel is to produce silver colored chips. If the chips are turning yellow or blue the RPM is too fast and the drill will burn, perhaps rendering it useless for sharpening if the radial "land" is wiped off. This is getting a bit long and/or boring (machining pun....) so I'll step down off the podium now. Read, ask questions, be safe.
Great information here thank you.
 

banditbigdog

Well-known member
Joined
Jan 3, 2009
Messages
271
Location
Southeast
Posted before but an Edlund drill press circa 1957 a friend gave to me.
3 phase, installed a phase converter.
Very rigid, use it often.
E94B7933-6EFD-433F-B016-A29D45C12362.jpeg
 
OP
B

bigcreek

Well-known member
Joined
May 11, 2013
Messages
387
Location
Idaho
-I ran a large radial drill press a few decades ago, it was my everyday job. A center punch is helpful when you need location, all twist drills have a "chisel point" that starts the drilling, looks closely at any twist drill unless it has center relief. This chisel edge doesn't cut material nearly as well as the sharper edge geometry past the chisel portion. That chisel edge sorta "wipes" the metal out of the way, in the process of doing this the twist drill can often wander off location because it's trying to find a place to "bite" into the material. The harder the material the more it has a tendency to wander. If the center punch mark is smaller than the chisel point it may/may not start on location.

A pilot hole slightly larger than the chisel edge width is the most common method of beginning a large hole. Center punch, small pilot hole, larger drill is the process. As others have pointed out, step drilling is a common method of reducing the HP needed to drill large holes the drill press motor may not be able to handle, this is common. What is less obvious is that the larger the final drill size the greater a tendency for the large drill to "grab" if there's not enough material in the hole to offer resistance. Drilling 1/64 under final hole size, then running final size drill through (for more accurate hole size) is commonly done with drill up to 1/2" with no trouble. As drill size goes up over 1/2" there's a greater chance of grabbing as the size increases. Going from 1-15/16" to a 2" drill is asking for trouble unless certain precautions are taken.

Large hole drilling without a center punch or pilot hole can be done but location and hole diameter may not be what you want it to be due to wander, drill condition, and how accurately the drill was sharpened. The material being drilled also makes a difference. Brass is notorious for grabbing a drill as you break through the other side. You'll be drilling with no problem and all of a sudden the drill will grab and either spin the workpiece, shatter the drill, or yank the drill down in a somewhat violent manner. The drill can even get stuck in the material having bitten off more than it can chew. Softer material like brass, some bronzes, aluminum, and plastics have this tendency to grab. The drill cutting edges are customarily stoned (90°) just enough to break the sharp edge for brass, other materials just need either a quill stop set, quill drag, or a good grip on the quill feed handle and the material secured in a clamped or back-stopped vise. Drill feed pressure via the quill handle needs a light, careful hand, particularly when the drill is about to break through the other side.

Like all machining methods, drilling has rules to follow and things that look simple are not always as simple as they appear to be. RPM per the material is critical or you'll burn up the drill, look up a chart for this and attach it to the drill press for quick reference. Simple rule of thumb for steel is to produce silver colored chips. If the chips are turning yellow or blue the RPM is too fast and the drill will burn, perhaps rendering it useless for sharpening if the radial "land" is wiped off. This is getting a bit long and/or boring (machining pun....) so I'll step down off the podium now. Read, ask questions, be safe.
Going off this.. If I am going to drill say a 1" drill hole and I drill a pilot hole, is it necessary to drill the pilot hole all the way through the material, or just say half an inch deep or so if drilling through thicker metals?
 

PoorUB

Well-known member
Joined
Mar 29, 2021
Messages
11,627
Location
Fargo, ND
Going off this.. If I am going to drill say a 1" drill hole and I drill a pilot hole, is it necessary to drill the pilot hole all the way through the material, or just say half an inch deep or so if drilling through thicker metals?


With that drill press you do not need to drill a pilot hole at all! If you want to drill a pilot hole, look at the web thickness of the drill you intend to finish with and drill the pilot hole approximately that size. Yes, drill it all the way though.

With my Powermatic 1200 I have drilled 1" holes with no pilot hole.
 

RoninB4

Well-known member
Joined
Jul 22, 2020
Messages
3,518
Location
Under My House
Going off this.. If I am going to drill say a 1" drill hole and I drill a pilot hole, is it necessary to drill the pilot hole all the way through the material, or just say half an inch deep or so if drilling through thicker metals?
-I've done both, sorta depends upon how rigid my set up is clamped down, drill condition, and whether location AND hole diameter are important. A drill will have a tendency, generally speaking, to follow an existing pilot hole. That affects location accuracy. A drill that's been sharpened off center or has one dull edge, even a smaller drill, will usually drill a hole larger than the it's own given diameter in most materials and "walk" off location as it makes it's way through the material due to only one cutting edge working. Yes some materials tend to "shrink" a hole (copper, plastic, wood, etc.) but that's a topic for another discussion.

A pilot drilled hole only part way through the material will be easier to drill up until the pilot hole stops, easy to see why. Sometimes, particularly with larger drills, they will chatter until they are fully engaged/contained. The chips won't come out curled, they'll be thin and show the chatter marks as the twist drill "stutters" into the material. The noise will also announce loudly that something isn't working well. This even happens sometimes on multi-flute c'sinks. A pilot hole will allow the twist drill to enter the material deeper in less time and (hopefully) have the beginning side wall of the hole to help stabilize the twist drill. I usually drill a pilot hole through because I'm there and that material has to come out anyway. The size of the pilot hole does commit you to the hope that you'll have no further problems. If the pilot hole is too large the twist drill will want to bite/grab. A smaller pilot drill is now out of the question. There's likely a formula to calculate the best size pilot hole per the larger drill but I've always used my personal experience and the conditions at hand to decide.

I'm not trying to be vague here, every aspect of machining is conditional. The cutting tool, the material, the spindle speed, and the feed rate all affect what's happening. Most times things proceed with minimal fuss but when they don't it's really important to know why before going further. Failure to correct something can result in ruined tooling, work hardened material (SS is a known offender), and/or poor results. Drill a hole, simple yeah? Not so, the problems of less than ideal parameters are magnified as any of the above mentioned variables increase. Surface finish is another subject with even more variables. For most machining tasks I decide beforehand the expectations I need to have. These expectations decide which machine to use, which tooling, how fast, how long, and how many stages I need to work in. Not trying to make things overly complex but all machining is about the numbers and calculations for conditions.

I'm running long on my reply for a reason but I'll end it by addressing your question. For a 1" clearance hole without any need for accuracy in size or location I'd center punch the approximate location, lock/clamp down the material and likely spot drill the location to ensure the twist drill doesn't wander and/or begin drilling off angle. Off angle can be seen when you pick the drill up off the material. If the twist drill moves back, even a little, it's not aligned with the spindle axis. Binding and/or breakage may occur when drill "flex" is excessive. Reposition the material so the beginning hole is exactly under the spindle axis. This is important in drilling, reaming, or tapping.

If location and hole size are somewhat important then I'll pilot hole through and step drill to final size.

If hole size and/or location is critical then drill well under-size and single point boring are required. Nothing else works as well for a truly round hole on location, not even most CNC milling machines.

Apologies if I've put most of the audience asleep. Hope this helped someone.
 

tool_scrounge

Well-known member
Joined
Jul 20, 2010
Messages
4,180
Location
Southern California
If I am trying to get accurate hole locations of bigger holes, I 120deg spot drill on a vertical mill. Then drill a pilot hole. I then finish drilling the hole with big drills on a drill press.
 
OP
B

bigcreek

Well-known member
Joined
May 11, 2013
Messages
387
Location
Idaho
-I've done both, sorta depends upon how rigid my set up is clamped down, drill condition, and whether location AND hole diameter are important. A drill will have a tendency, generally speaking, to follow an existing pilot hole. That affects location accuracy. A drill that's been sharpened off center or has one dull edge, even a smaller drill, will usually drill a hole larger than the it's own given diameter in most materials and "walk" off location as it makes it's way through the material due to only one cutting edge working. Yes some materials tend to "shrink" a hole (copper, plastic, wood, etc.) but that's a topic for another discussion.

A pilot drilled hole only part way through the material will be easier to drill up until the pilot hole stops, easy to see why. Sometimes, particularly with larger drills, they will chatter until they are fully engaged/contained. The chips won't come out curled, they'll be thin and show the chatter marks as the twist drill "stutters" into the material. The noise will also announce loudly that something isn't working well. This even happens sometimes on multi-flute c'sinks. A pilot hole will allow the twist drill to enter the material deeper in less time and (hopefully) have the beginning side wall of the hole to help stabilize the twist drill. I usually drill a pilot hole through because I'm there and that material has to come out anyway. The size of the pilot hole does commit you to the hope that you'll have no further problems. If the pilot hole is too large the twist drill will want to bite/grab. A smaller pilot drill is now out of the question. There's likely a formula to calculate the best size pilot hole per the larger drill but I've always used my personal experience and the conditions at hand to decide.

I'm not trying to be vague here, every aspect of machining is conditional. The cutting tool, the material, the spindle speed, and the feed rate all affect what's happening. Most times things proceed with minimal fuss but when they don't it's really important to know why before going further. Failure to correct something can result in ruined tooling, work hardened material (SS is a known offender), and/or poor results. Drill a hole, simple yeah? Not so, the problems of less than ideal parameters are magnified as any of the above mentioned variables increase. Surface finish is another subject with even more variables. For most machining tasks I decide beforehand the expectations I need to have. These expectations decide which machine to use, which tooling, how fast, how long, and how many stages I need to work in. Not trying to make things overly complex but all machining is about the numbers and calculations for conditions.

I'm running long on my reply for a reason but I'll end it by addressing your question. For a 1" clearance hole without any need for accuracy in size or location I'd center punch the approximate location, lock/clamp down the material and likely spot drill the location to ensure the twist drill doesn't wander and/or begin drilling off angle. Off angle can be seen when you pick the drill up off the material. If the twist drill moves back, even a little, it's not aligned with the spindle axis. Binding and/or breakage may occur when drill "flex" is excessive. Reposition the material so the beginning hole is exactly under the spindle axis. This is important in drilling, reaming, or tapping.

If location and hole size are somewhat important then I'll pilot hole through and step drill to final size.

If hole size and/or location is critical then drill well under-size and single point boring are required. Nothing else works as well for a truly round hole on location, not even most CNC milling machines.

Apologies if I've put most of the audience asleep. Hope this helped someone.
Great info. Thank you.
 
To avoid these ads, REGISTER NOW!
Top Bottom